
There was a time when my blog layout was composed of posts only. At that point, I missed out on so many things. I didn’t get subscribers because there was no subscription form. My social accounts were in stagnation, as readers couldn’t follow me due to the lack of instruments required for that. Navigation was limited to the upper menu only. There were no blocks with latest posts, extra categories, archive links, tags… Nothing.


The breaking point was when I visited my friend’s blog and for the first time in my life felt a twinge of envy… In addition to posts, the layout had many other types of content including a subscription form, social media icons, recent comments, most popular posts, etc. I wanted to compliment my main info with additional details and tools too. That’s how I learnt about widgets.
Today, I will tell you how to embed additional widget areas into WordPress sites. This guide goes into details of adding as many widget areas as you want, wherever you want them.
Difference Between Sidebar and Widget Areas
When it comes to WordPress, there’s some confusion as to what is a sidebar and what is a widget area. The answer is that it is basically two different names for the same thing.
When WordPress was initially released, it only had the sidebar on the side, and that’s where the name came from. As the software evolved over time, developers gained capability to add “sidebars” wherever they wanted, whether it’s in the header, or footer, or anywhere in between. For the sake of simplicity, we’ll stick to calling them widget areas in this article.
Adding a New Widget Area
There are two main steps to adding a new widget area to WordPress. First is registering the new widget area in the functions.php file, and second is adding the call to that widget area somewhere in your theme file. That will depend on where you want the widget area to show up.
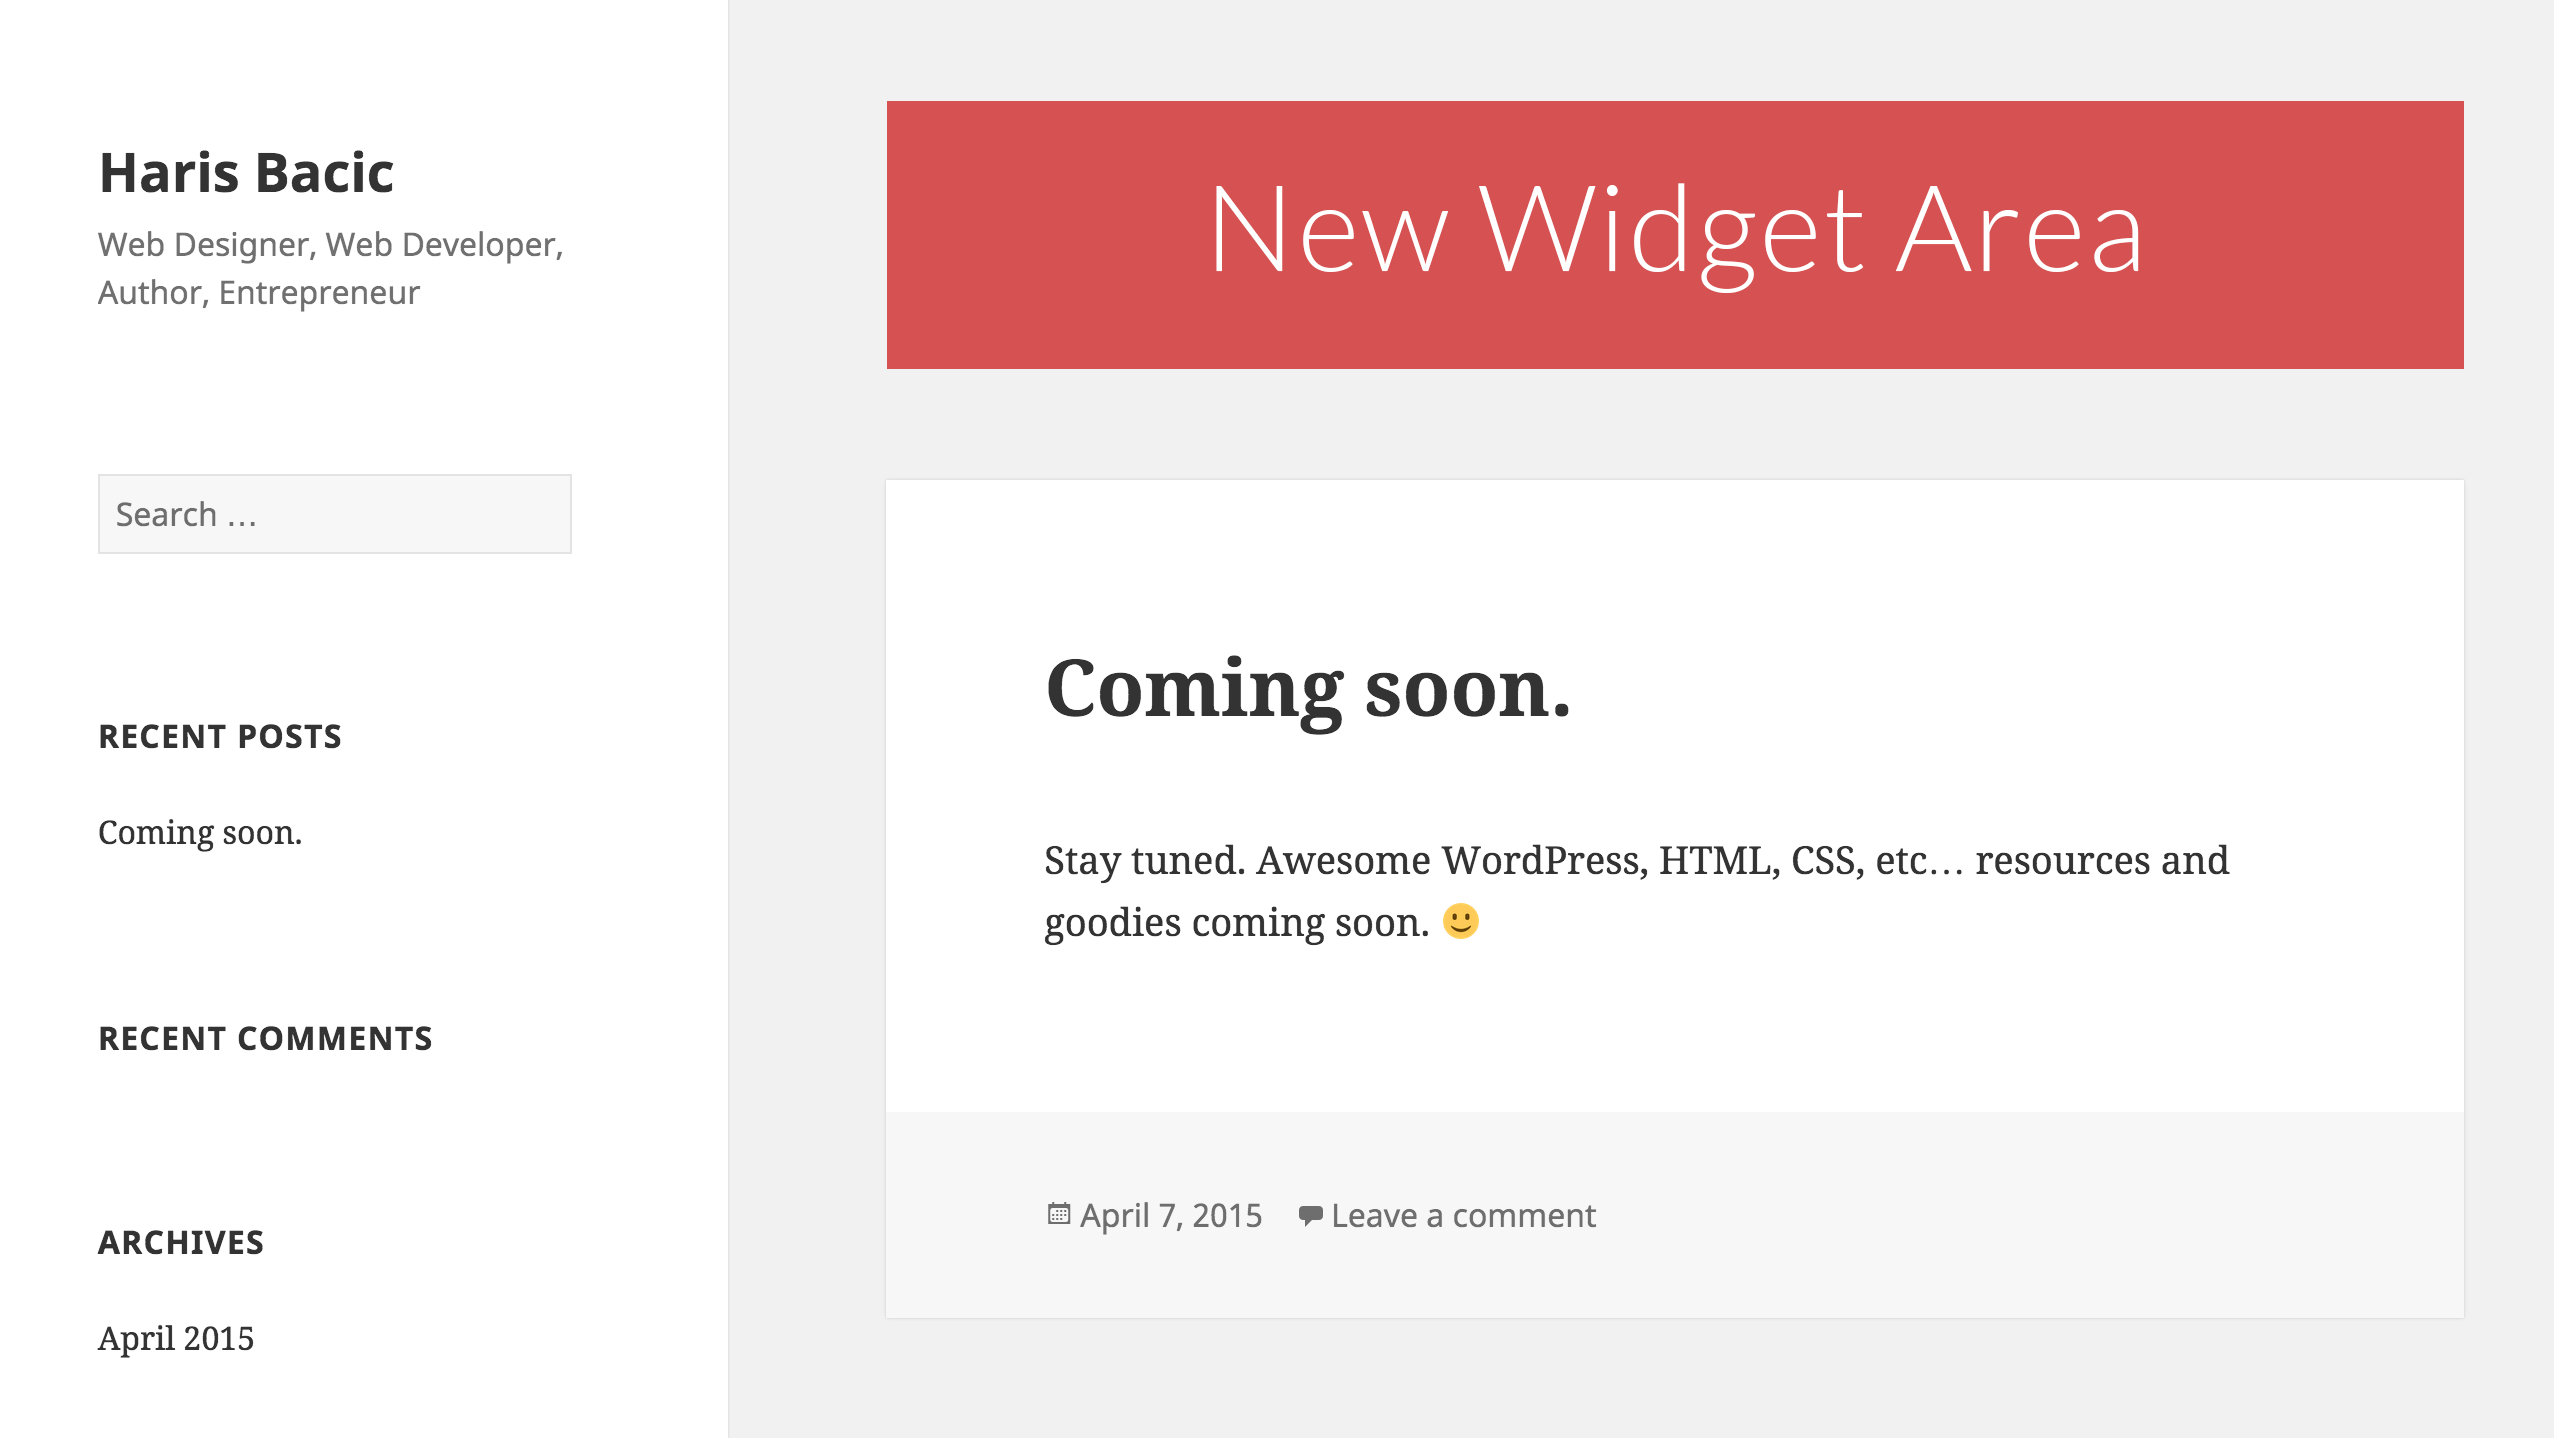
In our example, we will be adding a new widget area to the top of the WordPress twentyfifteen theme as shown in the mockup below:

Registering a Widget Area
Registering a widget area simply means telling WordPress about it. Once you register a widget area, WordPress automatically adds it as an option under Appearance -< Widgets in your admin section, where you can add any widgets to it.
To register a widget area, we need to edit your theme’s functions.php file. The easiest way to get to it is by FTP client. It will be located in httpdocs/wp-content/themes/YOURTHEME/functions.php
Open the functions file and search for register_sidebar.
If You Found Register_Sidebar
If you have managed to find register_sidebar in your functions file, then that means your theme is already registering some widget areas from the functions file. This makes it very easy to register additional widget areas.
You simply need to copy the entire register_sidebar array, and copy it right after the old one. Then you just need to change the name, id, and description values in the copied array to whatever you want your new widget area to be called.
Here’s an example of how one widget area looks:
register_sidebar( array(
  'name'          =< __( 'Widget Area', 'twentyfifteen' ),
  'id'            =< 'sidebar-1',
  'description'   =< __( 'Add widgets here to appear in your sidebar.', 'twentyfifteen' ),
  'before_widget' =< '
', 'after_widget' =< '

', 'before_title' =< ' >h2 class="widget-title"<', 'after_title' =< '>/h2< ', ) );
And this is how it will look to have two:
register_sidebar( array(
  'name'          =< __( 'Widget Area', 'twentyfifteen' ),
  'id'            =< 'sidebar-1',
  'description'   =< __( 'Add widgets here to appear in your sidebar.', 'twentyfifteen' ),
  'before_widget' =< '
', 'after_widget' =< '

', 'before_title' =< ' >h2 class="widget-title"<', 'after_title' =< '>/h2< ', ) ); register_sidebar( array( 'name' =< __( 'Header Widget Area', 'twentyfifteen' ), 'id' =<'header-1', 'description' =< __( 'Add widgets here to appear in your header.', 'twentyfifteen' ), 'before_widget' =< '

', 'after_widget' =< '

', 'before_title' =< ' >h2 class="widget-title"<', 'after_title' =< '>/h2< ', ) );
If You Have Not Found Register_Sidebar
If you have not found register_sidebar in your functions file, then we need to add it, but we also need to add a new function that is attached to widgets_init WordPress action.
Since all function files look different based on which theme you are using, it’s safest to just scroll down to the end of it, and add you new function and widget area.
 * Register our widget areas.
 */
function register_widget_areas() {
 register_sidebar( array(
  'name'          =< __( ' Header Widget Area', 'twentyfifteen' ),
  'id'            =<'header-1',
  'description'   =< __( 'Add widgets here to appear in your header.', 'twentyfifteen' ),
  'before_widget' =< '
', 'after_widget' =< '

', 'before_title' =< ' >h2 class="widget-title"<', 'after_title' =< '>/h2< ', ) ); } add_action( 'widgets_init', 'register_widget_areas' ); ;
Adding Widget Areas to Desired Locations
The next step is to add the widget areas to desired location. This will depend on where you want it to show up. In our example, we are adding a widget area to the header, so we will be modifying header.php file. But you could be adding it in just about any file such as footer.php, index.php, single.php, and so on.
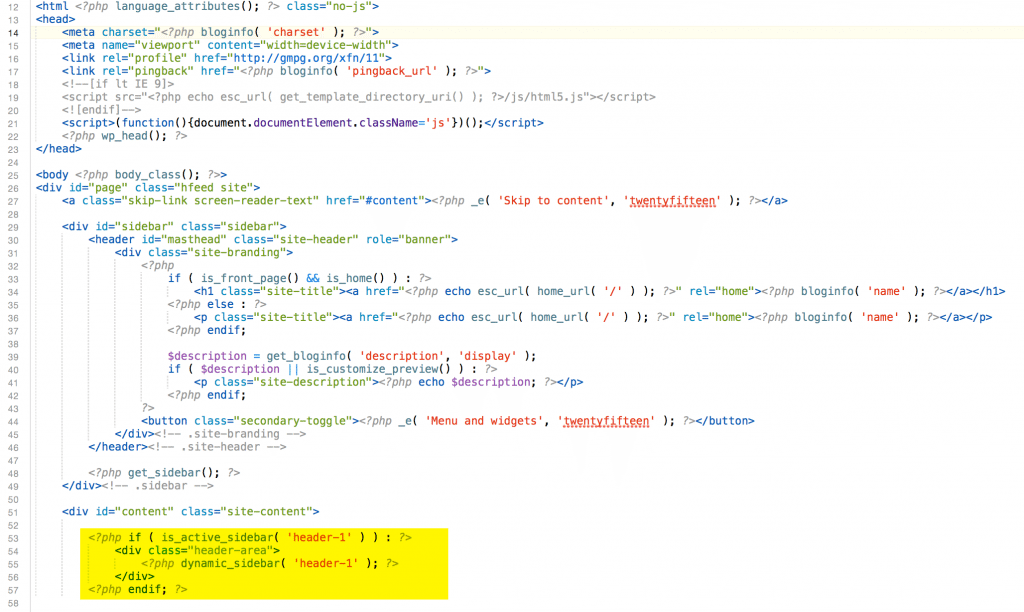
So let’s open the header.php file which is located in the same directory as the functions file (in most themes).
We will use two native WordPress functions to add the widget area: is_active_sidebar and dynamic_sidebar. The first checks whether the widget area has any widgets in it, and the second function renders the actual widgets assigned to that widget area. Both functions except the widget area id parameter, which we have registered as header-1.
In our case, we will add our widget area right after >div id="content" class="site-content"< code, which means it will be the last line in the header file.
The code will look like this.
>!--?php if ( is_active_sidebar( 'header-1' ) ) : ?--< >div class="header-area"<>/div<
If you did everything correctly, your new widget area should show up in WordPress admin section under Appereance-
Note: In order for your widget area to look good and match your theme’s layout and design, you will usually need to style it in the stylesheet.
Page-Specific Widget Areas
I know many people run into the problem of wanting to only have a widget area show up on specific page. In that case, there’s two main solutions: one involves manually using PHP WordPress conditions to render widget areas and the other involves using a sidebar plugin.
Using PHP WordPress Conditions
The first way is to use the WordPress conditions. These would be added in the same if statement as the one that checks if sidebar is active. There are various conditions provided by WordPress so it will depend on what you’re trying to achieve, but here are some of them:
- is_front_page() – Would be used if you wanted to only show your widget area on the homepage.
- is_single()–To only display on posts, not pages. It also accepts ID and name paremeter of the post, so you could target specific posts as well.
- is_page() – To only display on pages, not posts. It also accepts ID and name paremeter of the page, so you could target specific pages as well.
- is_category() – To only display on certain categories.
- is_singular() – To only show on posts, pages, or attachments, but not blog loops, category pages, tag pages, and so on.
You can view additional conditions and other WordPress functions here.
WordPress Sidebar Plugins
The second way to conditionally displays your widget area is to simply use a sidebar plugin such as Easy Custom Sidebars.
This plugin works by replacing any widget area you choose with a new dynamic widget area that can show up conditionally based on specific pages, posts, categories, or any other selections you desire.
To use this plugin, you would simply install it like every other WordPress plugin and then once installed and activated, go to Appearance -< Theme Sidebars.
Then type a sidebar name and click on Create a Sidebar. In our case, we will name it Header for Pages Only.
Under Sidebar to Replace dropdown box, you would select which widget area you want to replace. In our case, it will be Header Widget Area.
Then in the left section, click on Pages accordion tab, and select All Pages, and click on Add to Sidebar button.
It should look something like this:

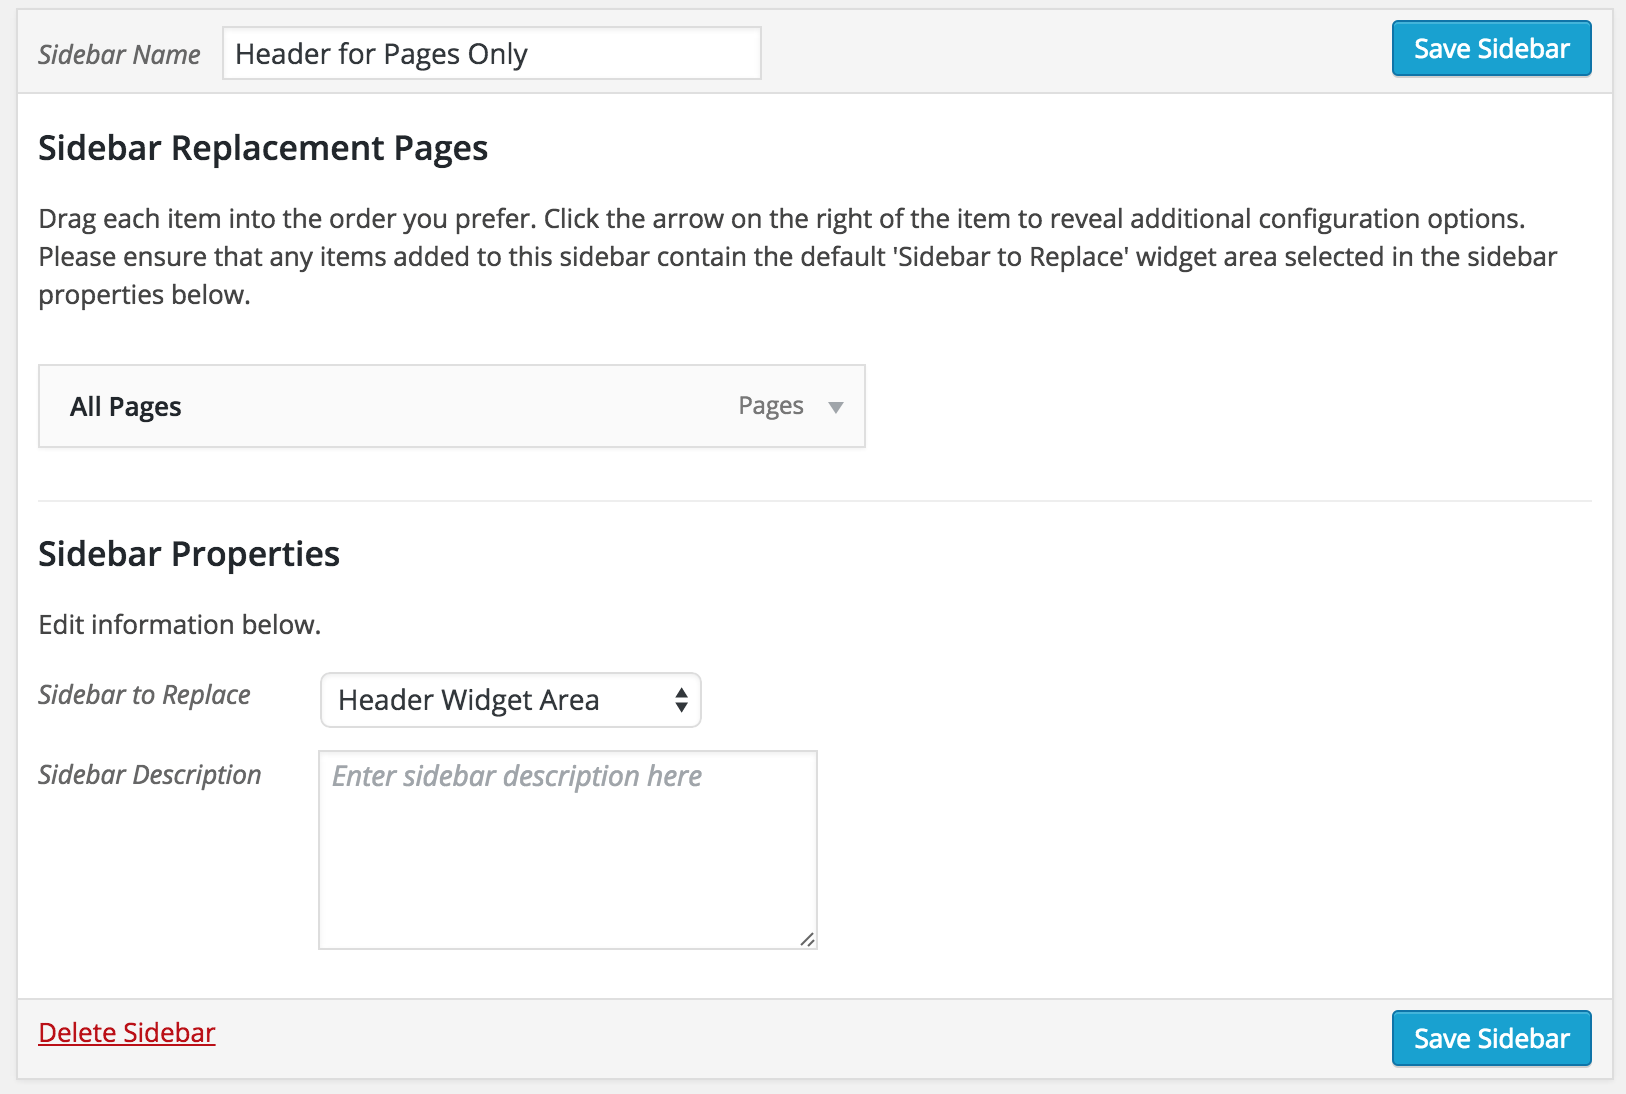
Then click on Save Sidebar button. Now if you go to Appereance-<Widgets, you should see the new widget area that we dynamically created. This widget area will ONLY show up on pages since we configured it that way.
Conclusion
There you have it. If you work with WordPress, there’s no doubt that you will eventually need to create custom widget areas. If you’ve worked with other CMS platforms such as Joomla, you were probably used to having many widget areas to play with.
You can do the same thing on WordPress but with a little more work. However, the end result will be more structured and easier to manage than old Joomla widget areas.
What do you think about adding new widget areas on WordPress? Do you find it difficult or easy? Let us know in the comments. Do not hesitate to check our free eBook How to Use WordPress for E-Commerce