After Effects Tutorial: 8 Ways to Speed Up After Effects Render
Speed up After Effects render. For those of you guys who have purchased one of our After Effects Video products or have just had a chance to work with Adobe After Effects software it won’t be a big secret that the render speed influences the entire process of creating video effects.
Table of contents:
1. Improve Performance before Starting After Effects
2. Improve Performance By Simplifying Your Project
3. Improve Performance When Using Effects
4. Memory & Multiprocessing Preferences
5. How To Make After Effects Use More Than 2 GB RAM
6. After Effects Output Module Settings
7. Increase After Effects Productivity
Rendering is an essential operation that you have to perform to finalize your work in Adobe After Effects. So, we’ve decided to share the experience gathered by TemplateMonster video professionals and support team and provide you with some useful tips that will help you increase the rendering speed (based on the official help info from Adobe). These suggestions will save your time, money (because a) time is money and b) you won’t need powerful hardware) and improve your general After Effects skills as well. So, let’s start.
1. Improve Performance Before Starting After Effects
- Make sure that you’ve installed the current version of After Effects, including any available updates. To check for and install updates, choose Help > Updates from the top menu in After Effects.
- Make sure that you’ve installed the latest versions of drivers and plug-ins, especially video card drivers. To download updates for drivers and plug-ins, go to the provider’s website.
- Quit applications that are not necessary for your work. This may include some applications that start automatically when the operating system starts.
- Make sure that your system includes a display card that supports OpenGL 2.0 or later. Though After Effects can function without it, OpenGL accelerates various types of rendering, including rendering to the screen for previews
- Adjust the size of the virtual memory paging file (Windows only). Virtual memory enables the system to use hard disk space to store information normally stored in RAM. Windows manages virtual memory using a paging file. To improve performance in After Effects, adjust the size of the paging file to a maximum of twice the amount of installed RAM—the default in Windows XP.
- Defragment all hard disks regularly. See the documentation for your operating system for details.
- Make sure that your system has enough RAM. Optimum performance is achieved with computer systems with at least 2 GB of installed RAM per processor core. See the documentation for your operating system and computer for details on how to check the amount of installed RAM and how to install RAM.
- Stop or pause resource-intensive operations in other applications, such as video previews in Adobe Bridge.
- When possible, keep the source footage files for your project on a fast local disk drive. If your source footage files are on a slow disk drive (or across a slow network connection), then performance will be poor. Ideally, use three fast local disk drives: one for source footage files, one from which the application runs, and one for rendered output.
2. Improve Performance By Simplifying Your Project
By simplifying and dividing your project, you can prevent After Effects from using memory and other resources to process elements that you are not currently working with. Also, by controlling when After Effects performs certain processing, you can greatly improve overall performance. For example, you can avoid repeating an action that needs to happen only once, or you can postpone an action until it is more convenient for you.
- Delete unused elements from your project.
- Divide complex projects into simpler projects, and then recombine them before you render the finished movie. To recombine projects, import all of the projects into a single project by choosing File > Import > File.
- Before rendering, put all of your source footage files on a local disk—not the one that the application runs from. A good way to do this is with the Collect Files command.
- Pre-render nested compositions. Render a completed composition as a movie so that After Effects doesn’t rerender the composition every time it is displayed.
- Restrict the influence of layer switches by choosing Edit > Preferences > General (Windows) or After Effects > Preferences > General (Mac OS), and deselecting Switches Affect Nested Comps. (Remember to select this option again before you render the composition for final output.)
- Collapse transformations for nested compositions.
- Substitute a low-resolution or still-image proxy for a source item when not working directly with that item.
- Lower the resolution for the composition. You can lower the resolution from the Render Queue Render Settings window.
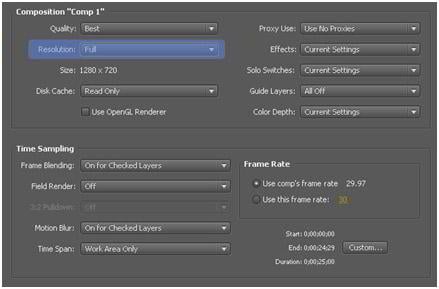
Full - Renders each pixel in a composition. This setting gives the best image quality, but takes the longest to render.
Half - Renders one-quarter of the pixels contained in the full-resolution image—half the columns and half the rows.
Third - Renders one-ninth of the pixels contained in the full-resolution image.
Quarter - Renders one-sixteenth of the pixels contained in the full-resolution image.
Custom - Renders the image at the horizontal and vertical resolutions that you specify.
Note: To increase the rendering speed of RAM previews, set the resolution of the Composition panel to match the magnification. For example, if the magnification is 50%, choose Half from the Resolution menu.
- Isolate the layer you’re working on by using the Solo switch. (To solo one or more layers, select the layers in the Timeline panel, and click the Solo icon to the left of the layer names.)
3. Improve Performance When Using Effects
Some effects, such as blurs and distortions, require large amounts of memory and processor resources. By being selective about when and how you apply these effects, you can greatly improve overall performance.
- Apply memory-intensive and processor-intensive effects later. Animate your layers and do other work that requires real-time previews before you apply memory-intensive or processor-intensive effects (such as glows and blurs), which may make previews slower than real time.
- Temporarily turn off effects to increase the speed of previews.
- Limit the number of particles generated by particle effects.
- Rather than apply the same effect with the same settings to multiple layers, apply the effect to an adjustment layer. When an effect is applied to an adjustment layer, it is processed once, on the composite of all of the layers beneath it.
4. Memory & Multiprocessing Preferences
The Multiprocessing preferences allow you to essentially increase the After Effects render speed. The Multiprocessing preferences window could be accessed using the Edit > Preferences > Memory & Multiprocessing (Windows) or After Effects > Preferences > Memory & Multiprocessing (Mac OS) menus.
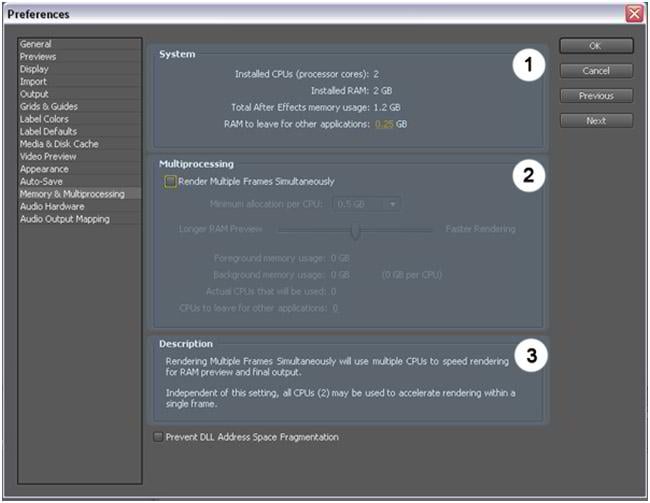
- System block - displays your system preferences
- Multiprocessing block – contains the After Effects Multiprocessing settings
- Description block – contains the dynamically changed notes that will help you configure the Multiprocessing correctly.
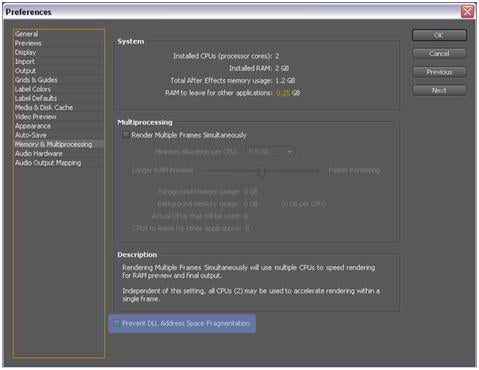
Prevent DLL Address Space Fragmentation - (Windows only) Select this option to give After Effects access to more contiguous memory on a computer with a large amount of RAM. This option may be incompatible with some display card (OpenGL) drivers, which can cause a crash when the application starts. If such a crash occurs, the option becomes unchecked automatically to prevent further crashes when you start After Effects.
Checking the Render Multiple Frames Simultaneously box you will enable the Render Multiple Frame feature.
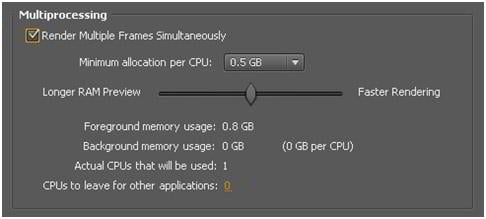
The Render Multiple Frames Simultaneously multiprocessing feature works best at improving performance when the resource that is most exercised by the composition is CPU processing power, such as when applying a processor-intensive effect like a glow or blur.
Minimum Allocation Per CPU
Specifies the minimum amount of RAM that will be allocated to each background process, each of which runs on its own CPU (processor core).
Note: The optimum amount of RAM varies according to project settings (color bit depth), composition settings (composition frame pixel dimensions), and what effects are applied.
At least 1 GB per background process is recommended for 8-bpc project and at least 2 GB for a 32-bpc project.
Longer RAM Preview / Faster Rendering
Drag the slider to adjust the memory allocation to a balance that suits your work and computer system.
The length of a RAM preview is determined by the number of frames that can be stored in the RAM cache. This allocation of memory to the foreground process can cause fewer background processes to be used to render multiple frames simultaneously, so there is a tradeoff between faster rendering and longer RAM previews.
Possible issues
After Effects temporarily disables multiprocessing with Render Multiple Frames Simultaneously
If After Effects can’t use background processes to render multiple frames simultaneously, a message appears in the Info panel and After Effects uses only the main foreground process to render all frames. These messages include the following:
- “Incompatible composition. Multiprocessing is off.”
- “Incompatible effect. Multiprocessing is off.”
- “Incompatible preview mode. Multiprocessing is off.”
The reasons could be the following:
- The rendering of a single frame requires more RAM than is available to the individual background processes.
- The project uses OpenGL for rendering of previews or final output.
- The composition uses an effect that relies on GPU processing. These effects are generally effects implemented with Pixel Bender.
- The composition contains a live Photoshop 3D layer.
- The composition uses an effect with a temporal component that renders much more quickly when the rendering process has access to a cache of previous frames. These effects include some effects with the Temporal Smoothing option.
- The composition uses an effect with a temporal component that requires frames to be rendered in a strictly sequential order.
If a composition uses any of the following effects, the composition will not be rendered with the Render Multiple Frames Simultaneously multiprocessing feature:
- Auto Color
- Auto Contrast
- Auto Levels
- Cartoon
- Lens Blur
- Particle Playground
- Shadow/Highlight
Note: Some third-party effects—such as CC Time Blend and RE:Vision Effects Video Gogh—are also incompatible with the Render Multiple Frames Simultaneously multiprocessing feature.
5. How To Make After Effects Use More Than 2 GB RAM
By default After Effects software can see only 2 GB RAM installed and it won’t use more. However performing some alterations you can make it use more than 2GB RAM and increase the render speed.
Let’s see what could be done.
- Click Run from your Windows Start menu
- Type C:\boot.ini (the root could be different depending on your system disk name) and click OK

- The boot.ini file will open in your default text editor.

At the end of the line with your operation system type /3GB and Save the changes.
- Reboot your computer.
- Open After Effects and go to Edit>Preferences>Memory & Multiprocessing.
- There enable the Prevent DLL Address Space Fragmentation checkbox to make After Effects handle the large amount of RAM.
- Restart After Effects
After these alterations your After Effects will use the specified amount of RAM for render.
6. After Effects Output Module Settings
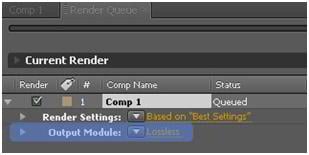
The important role in render speed belongs to the After Effects output module settings. The output module settings could be accessed from the Render Queue window.
After you add your composition to the Render Queue you can see the render options.

Click the Output Modules > Lossless. The Output Module Setting window will open.
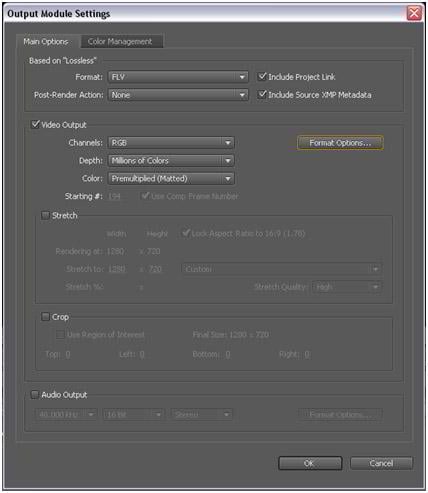
Configure the settings as shown on the image above.
1. Format – Adobe Flash Video (FLV)
2. Channels - RGB+Alpha (if you need transparent background) else RGB
3. Color – Straight (Unmatted) (if you need transparent background) else Premultiplied (Matted)
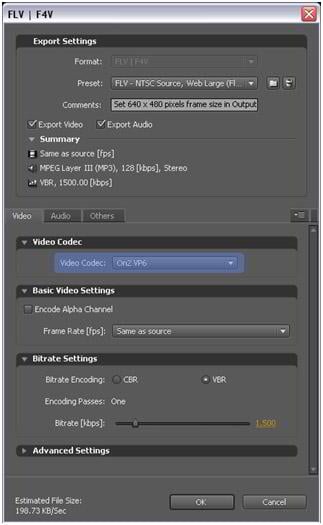
When you are done click the Format Options button. In the appeared window set the Video Codec to On2VP6.
The Output Module settings window also contains the useful Crop feature.

It allows you to render not the full scene but only the area you are interested in. It is useful at the testing stage when saving time is vitally important.
7. Increase After Effects Productivity
1. Memory and cache settings.
Start out by making sure you have set After Effects to use the optimal settings. Open After Effects and go to Edit>Preferences>Media & Disk Cache
The Disk Cache is where After Effects can off-load already rendered images/frames/layers/comps onto your hard drive instead of throwing them away when you are running short on RAM. Note that After Effects will only use the Disk Cache if it is faster to read a frame from the Disk Cache than it is to re-render it.
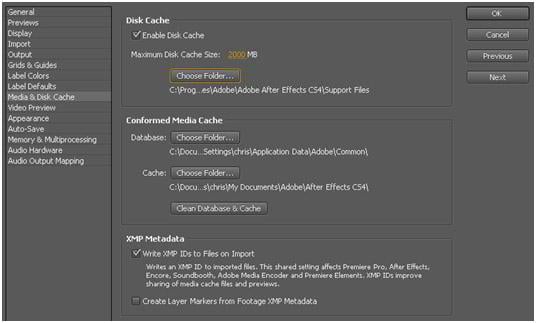
Enable the Desk Cache, set the amount of maximum disk cache and select the folder that will contain the cache files. If possible, put the Disk Cache on a fast hard drive, preferably not the same as your operating system or your source material (the above screen shot was taken on my laptop, where you seldom have the luxury of three drives.)
2. Lower the Number of Undos
Every operation that After Effects has to be able to Undo takes up valuable memory space. Try to Purge Undos from the Edit menu:
Open Edit>Purge>Undos
Or go into the Edit>Preferences>General and decrease the amount of Undos to just a few, or even just one step.
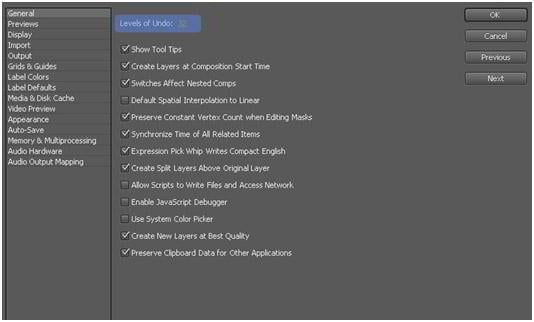
(Remember to set it back to somewhere between 20 and 32 when you've gotten the renders done.)
8. Encoding and Compression
Using the Render Queue panel, you can render the same composition to different formats or with different settings:
- You can output to a sequence of still images, such as a Cineon sequence, which you can then transfer to film for cinema projection.
- You can output using lossless compression (or no compression) to a QuickTime container for transfer to a non-linear editing (NLE) system for video editing.
- You can output to H.264 or another highly compressed format for playback on mobile devices such as mobile phones or the Apple iPod.
- You can output to MPEG-2 for playback from DVD.
After Effects uses an embedded version of the Adobe Media Encoder to encode most movie formats through the Render Queue panel. When you manage render and export operations with the Render Queue panel, the embedded version of the Adobe Media Encoder is called automatically. The Adobe Media Encoder appears only in the form of the export settings dialog boxes with which you specify some encoding and output settings.
Compression is essential for reducing the size of movies so that they can be stored, transmitted, and played back effectively.
For most output formats, you can specify format-specific encoding and compression options. In many cases, a dialog box opens and presents these options when you choose a format to export to or click the Format Options button in the Output Module settings dialog box.
Output Module settings dialog box could be opened from the Render Queue window:
You can select the format of the output video and compression using the Format Options button:
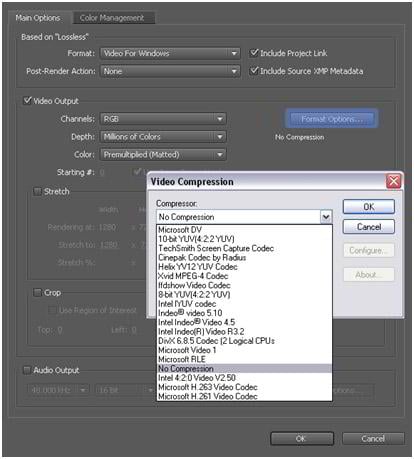
Output module settings
Format - Specifies the format for the output file or sequence of files.
Include Project Link - Specifies whether to include information in the output file that links to the source After Effects project.
Include Source XMP Metadata - Specifies whether to include XMP metadata in the output file from the files used as sources for the rendered composition. XMP metadata can travel all the way through After Effects from source files, to footage items, to compositions, to rendered and exported files.
Post-Render Action - Specifies an action for After Effects to perform after the composition is rendered. Format Options - Opens a dialog box in which you specify format-specific options.
Channels - The output channels contained in the output movie. After Effects creates a movie with an alpha channel if you choose RGB+Alpha, implying a depth of Millions of Colors+. Not all codecs support alpha channels.
Note: All files created with a color depth of Millions of Colors+, Trillions of Colors+, or Floating Point + have labeled alpha channels; information describing the alpha channel is stored in the file. Therefore, you do not have to specify an alpha interpretation each time you import an item created in After Effects.
Depth - Specifies the color depth of the output movie. Certain formats may limit depth and color settings.
Color - Specifies how colors are created with the alpha channel. Choose from either Premultiplied (Matted) or Straight (Unmatted)
Starting # - Specifies the number for the starting frame of a sequence.
Resize - Specifies the size of your output movie. Select Lock Aspect Ratio To if you want to retain the existing frame aspect ratio when resizing the frame. Select Low Resize Quality when rendering tests, and select High Resize Quality when creating a final movie.
Crop - Used to subtract or add rows or columns of pixels to the edges of the output movie. You can specify the number of rows or columns of pixels to be added or subtracted from the top, left, bottom, and right sides of the movie. Use positive values to crop, and use negative values to add rows or columns of pixels.
Audio Output - Specifies the sample rate, sample depth (8 Bits or 16 Bits), and playback format (Mono or Stereo). Choose a sample rate that corresponds to the capability of the output format. Choose an 8-bit sample depth for playback on the computer, and a 16-bit sample depth for CD and digital audio playback or for hardware that supports 16-bit playback.
Note: The specifications for some formats impose limits on audio parameters. In such cases, audio options may be unavailable for modification in the Output Module Settings dialog box. Also, audio options for some formats are set in the export settings dialog box for that format. For example, to set audio output options for Windows Media, click Format Options in the Output Module Settings dialog box.
Read also:
Consult – Business Consulting Adobe CC 2018 Muse Template
Top 10 Adobe Muse Templates to Build Sites Code-Free
Vector Graphics Alternatives To Adobe Illustrator CC
TOP 10 After Effects Intros 2020 on TemplateMonster Marketplace
Speed up After Effects render FAQ
After Effects is software from the famous Adobe company for editing videos, creating motion graphics, animations, and various special effects. AE is part of the Adobe ecosystem, which simplifies the export and import of materials from other programs of this corporation.
After Effects is widely used in the television and film industry, as well as while the creation of three-dimensional typography and graphic design.
- edit video sequence;
- develop complex graphic compositions;
- create animations and special effects;
- engage in color grading and post-production;
- create static three-dimensional images (logos, typography, and scenes).
Don’t miss out these all-time favourites
- The best hosting for a WordPress website. Tap our link to get the best price on the market with 82% off. If HostPapa didn’t impress you check out other alternatives.
- Monthly SEO service and On-Page SEO - to increase your website organic traffic.
- Website Installation service - to get your template up and running within just 6 hours without hassle. No minute is wasted and the work is going.
- ONE Membership - to download unlimited number of WordPress themes, plugins, ppt and other products within one license. Since bigger is always better.
Get more to your email
Subscribe to our newsletter and access exclusive content and offers available only to MonsterPost subscribers.

Leave a Reply
You must be logged in to post a comment.