


Hey there! So, you want to build a website but have no idea where to start from?
Cheer up! Today I’ll tell you how to create a website with minimum financial investments, and without the necessity to pay for the services of professional web developers. Follow this simple step-by-step guideline and you’ll end up having a high-quality and functional website for either your business or personal use ready for attracting and converting traffic.
But before moving on to my tutorial, let’s clarify some facts. At the moment, there exist 3 major ways how to create a website on your own:
- By using online website builders;
- By using CMS (content management systems);
- By writing the website code from scratch.
Not that you most likely have never written a single line of code, but we’ll skip on the last one and talk more about the first two options.
A website builder is a specialized online service that includes plenty of ready-made graphic design options, as well as a convenient and intuitive user interface. The most popular site-building platforms are Wix, UKit, Weebly, and more.
Although this is a super convenient drag-and-drop web solution for beginners, I would still not recommend using one for serious business projects. Despite the fact that most such builders are free, there are a bunch of hidden fees you may not be very excited about. And if you don’t pay, all you can count on is a third-level domain name and a huge website-building company logo placed at the corner of your website pages.
Now, let me introduce you to the CMS, which stands for Content Management System. It’s a platform for creating and managing site content with the help of a simple and intuitive interface.
If you wonder what the best part of using CMS is, I’ll say that most of those systems are completely free (and also free of any hidden charges).

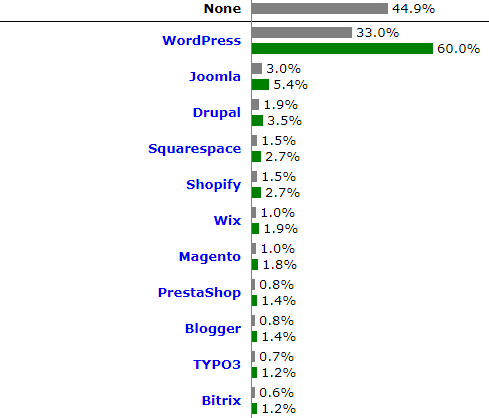
Have you ever heard of WordPress? This is by far the most popular content management system (CMS) in the world. According to last quarter's stats provided by Web Technology Surveys, almost 60% of all existing websites are built with WordPress, which is more than 11 times greater than Joomla, which is second-best.
Why Should I Use WordPress?
- It’s free! - WordPress is distributed under an open license agreement, so you can legally use this product for any purpose, including commercial.
- Unlimited possibilities - allows you to create websites of ANY complexity and purpose.
- Flexible customization and high functionality with a help of paid and free templates, plugins, and widgets.
- Easy administration - it’s all intuitive and requires no need for special coding or web development skills.
- Ability to build a website and publish your first post within 5 minutes - from the technical point of view, it’s indeed possible.
From the statements above, I have no doubts that WordPress is the best modern platform for building your first personal or business website.
I hope that I sound convincing enough to make you think the same way because from now on, my step-by-step guide will be dedicated to WordPress only.
Let’s start!
Step # 1: Finding Web Hosting
By purchasing hosting, I mean purchasing the server space where they’ll place your website. The market offers plenty of web hosting companies, so it’s important to pick up the right one for you. When choosing a particular hosting service, focus on such aspects as:
- The price of the hosting;
- Available additional options;
- Quality of tech support;
- The amount of provided file space.
The most popular hosting companies are Bluehost, InMotion, SiteGround, HostGator, etc.
Step # 2: Choosing a Domain Name
When choosing the right domain name for your website, it’s important that one is going to reflect the thematic focus of your business. These are some tips to help you choose a good domain name:
- In the best possible scenario, a domain name completely reflects the name of your website or business. If not completely, then at least partially.
- Use the shortest domain name possible. People are just too lazy to type in a long address in the browser line. So if you do have a long company name, make it shorter - as much as you can.
- The chosen website address should make sense and be easily remembered.
Domain Zones
The choice of a domain zone does not affect the technical characteristics of the resource but it MIGHT affect your SEO results. Not to say a website with a bizarre ending like yourwebsite.wordpress.com it will have the least trustworthiness.
For commercial projects, try to choose the top-level domains, for example, .com, .info, .org, .net, or any of your local domain zones. Finally, be careful with the recently emerged customized domain zones like .club, .guru, .ninja, .expert, and others - I personally feel like this is too much.
Step # 3: Website Installation and Preliminary Settings
After purchasing the domain name and a hosting plan, it’s time for a WordPress installation.

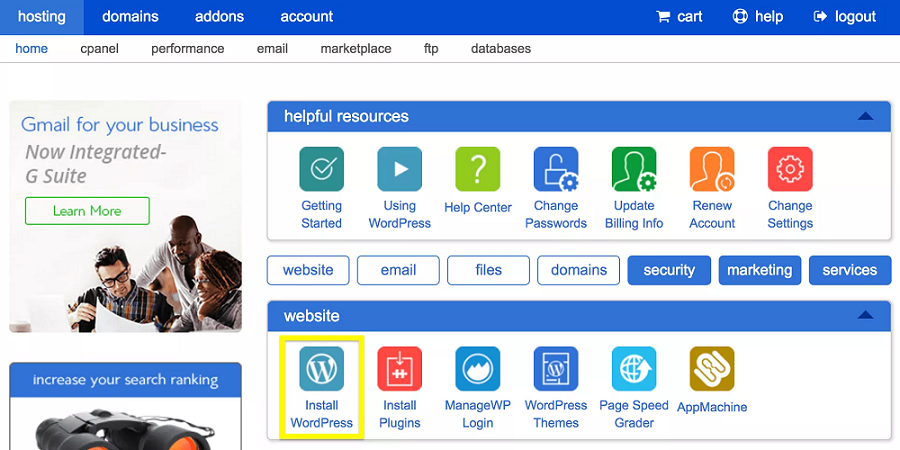
Please note that some hosting providers offer a one-click installation of such CMS as WordPress, Joomla, and Drupal. If you have this feature in the control panel of your hosting account, move on to the next step of my guide.
Those who don’t, follow the instructions:
- Go to the WordPress site and download the latest WP version;
- Unzip the archive;
- By using FileZilla or another FTP client, upload WordPress files to the root folder or to a subdirectory. The root folder contains the index.html file. To create a subdirectory, you need to place the folder with the site files in the root directory.
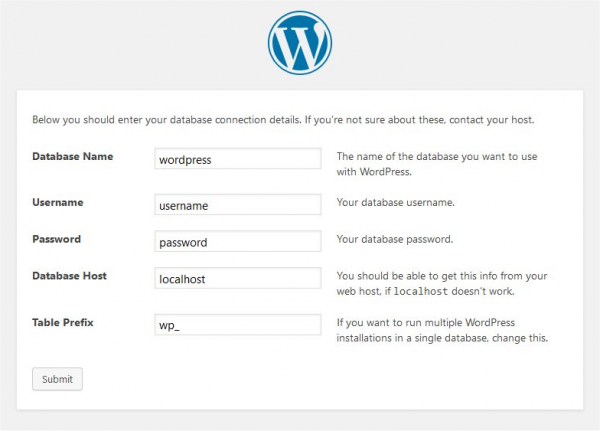
In the first case, your website address will look like that - www.yourdomain.com. In the second case, you will install WordPress on an existing site, so the link would be www.yourdomain.com/wordpress/. - Create the new database via the databases section of your Cpanel. Don't forget that you need to create in this database, the credentials you will need for the next step.
- Install WordPress. To do this, open the website link in the browser. Fill in the gaps with the credentials of your database.
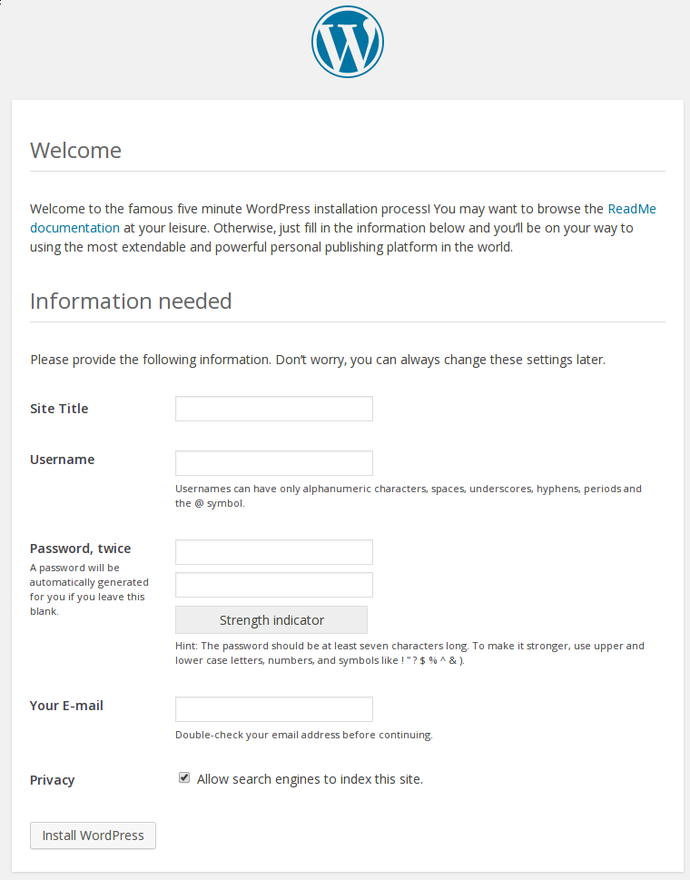
- Fill in the required information: enter the site name, username, password, and email. Specify whether search engines will be able to index your website.
- If everything is done correctly, you’ll see the following message:
Now you can enter the WP admin panel and start the configuration procedure!


Step # 4: Choosing the WordPress Theme
Finding a WordPress theme to your taste these days is super easy. Just have a look at these incredible WordPress themes available at TemplateMonster.
This marketplace offers a HUGE choice of ready-made web solutions for your website. Those of you looking for a highly-functional and modern-looking template should try Monstroid2 - a multipurpose modular Elementor WordPress theme that is just beyond any best WordPress built-in template.

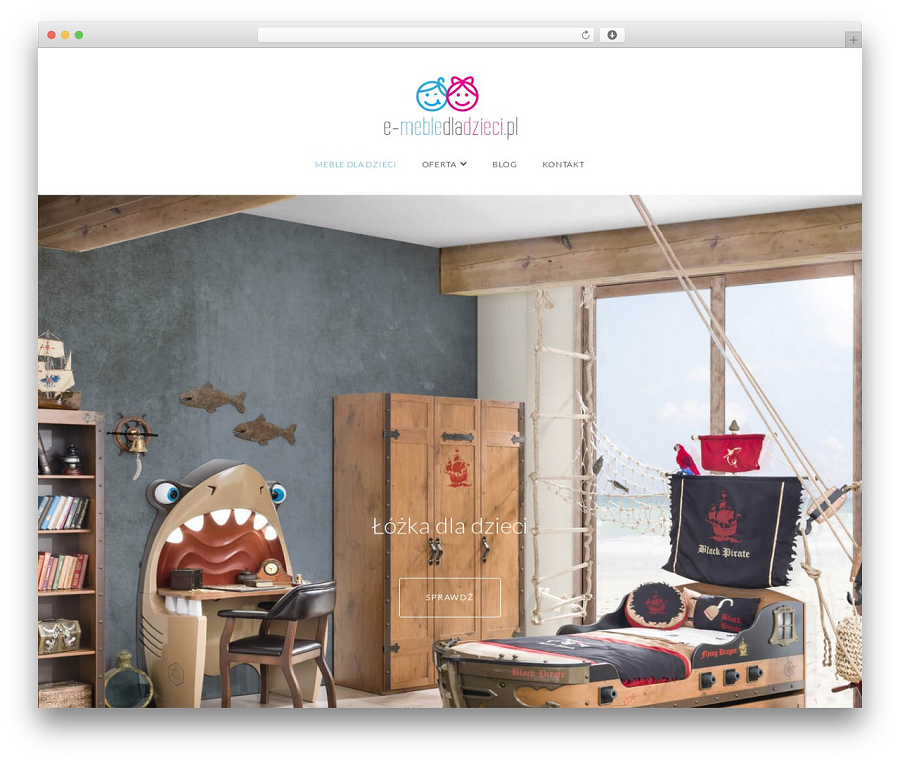
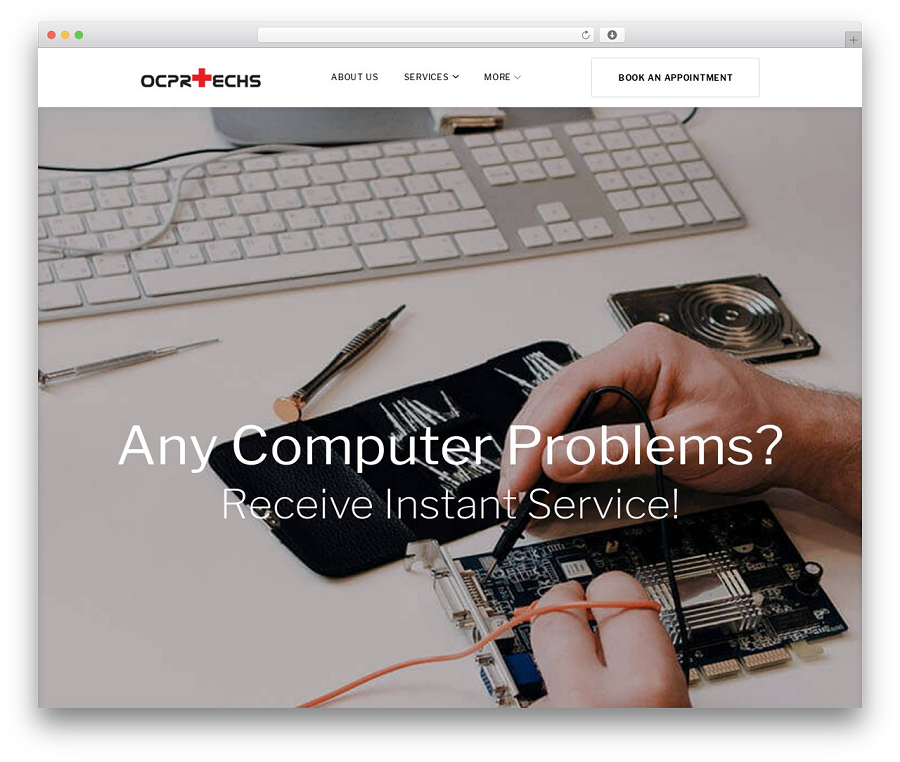
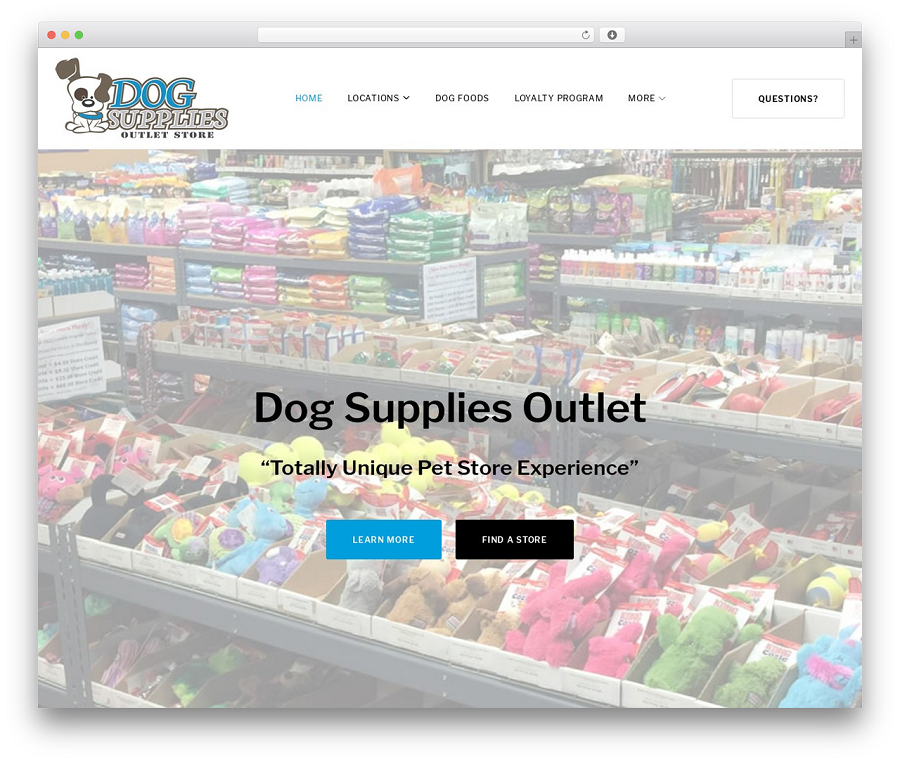
Below are several examples of real websites built with Monstroid2:
We've just released the new “Ready-to-use Website” offer for everyone who is too busy or lazy 😉 to go through all the steps of this tutorial.
What's this 'Ready-to-use Website' offer about?
So basically, they’ll take over the “dirtiest” job for you and will create the website from scratch without your actual involvement.


By purchasing the Ready-to-use Website offer for only $149 instead of $275, you get the following products and services:
In a few days, you will get a highly-functional and beautiful website, whether it's a blog or an eCommerce store, which has an easy-to-use drag-and-drop builder onboard.
How Does it Work?
- Buy a "Ready-to-Use website" offer.
- Our manager will call you within 3 hours after the purchase is completed. He will help you to choose a theme and will finalize all project details.
- Whereas time is money, with this offer you'll be able to save a lot of your precious business hours.
- After we receive all the required information we'll need 7 business days to build your website.
This offer is valid through February 8, 2019.
Step # 5: Content and Site Structure
Now that your website no longer looks like a blank sheet of paper, it’s time to produce some killer content! By content, I mean all kinds of information, such as articles, images, videos, charts, and much more. Luckily for you, adding content to a WordPress website built with Elementor builder won't require you to write a single line of code. Working in the WP admin panel is a piece of cake.
My advice, try it all! Do not be afraid of clicking anything and getting anywhere - all the same, you are not going to spoil or break the site!
Now, let me tell you about the correct structure of your site. Typically, it includes the following elements:
- pages and posts;
- categories;
- widgets.
Pages are what we can call static elements of the website's general structure. Those include:
- the homepage;
- About us/me;
- Contacts.
Please note that “About us/me” and "Contacts" are your must-have pages. The information about you or your company, as well as your physical address or phone, increases trustworthiness.
Homepage
In case you will run a blog, its homepage will be dynamic, which means it will change each time a new article is published.
On one hand, dynamic content has a positive SEO effect, but on the other, a lot of users want their homepages to look static all the time, you can make this happen by adding several widgets with a set of hand-picked articles.
Categories
A category is a specific subject that helps search engines know what your website topic is. Also, by dividing all articles into specific categories, you can simplify navigation around your blog/website.
Widgets
WordPress widgets are separate blocks placed in the right sidebar of your website that contain certain information. For example, different widgets can display the following:
- Weather forecast;
- Calendar;
- Recent posts;
- Authorization form, and many others.
Please note that some themes may not support all widgets. I do not recommend adding too many widgets, they can make your pages look bloated.
Step # 6: Choosing the Best WordPress Plugins
A plugin is a special script that is installed additionally on your website with the sole purpose to increase the website's functionalities. WordPress offers tons of plugins, but it doesn't mean that you need them all. In fact, too many installed plugins will slow down your site. Therefore, make wise choices and give preference to the most needed software out of all.
This is an approximate list of the must-have WordPress plugins I will personally recommend:
- Akismet
- Yoast WordPress SEO
- Sitemap Generator
- Google XML Sitemaps
- Disable WordPress Updates
- Hyper Cache
- WordPress Related Posts
- Video Embedder
But as I said, no extra plugins are needed!
And finally…


Get Started!
You've already created and set up a WordPress site, and learned how to publish content. Here comes the most difficult and responsible job! To run a successful website, you’ll need to develop a habit of creating high-quality and useful content.
Hopefully, WordPress can make things a lot easier. It’s a great fit for almost any project, from the news portal to an online store.
If you have questions, comments, or suggestions, feel free to write them in the comments. And remember to share this guideline with a friend =)
Read Also
Building a WordPress Website Brick by Brick
10+ Design Tips For The Success of WordPress Website
How to Create a WordPress Custom Page Template: Gaining Ultimate Control
Ultimate Guide on How to Transfer WordPress Site to a New Server