We are ready to present you a brand new guide on extending your WordPress-based website functionality. And today we will tell you about a tiny yet powerful plugin named T(-) Countdown.
T(-) Countdown is a highly customizable, HTML5 countdown timer that can be displayed as a sidebar widget or in a post or page using a shortcode.
You can add it to your WP dashboard in Plugins > Add new section after you download it from here.
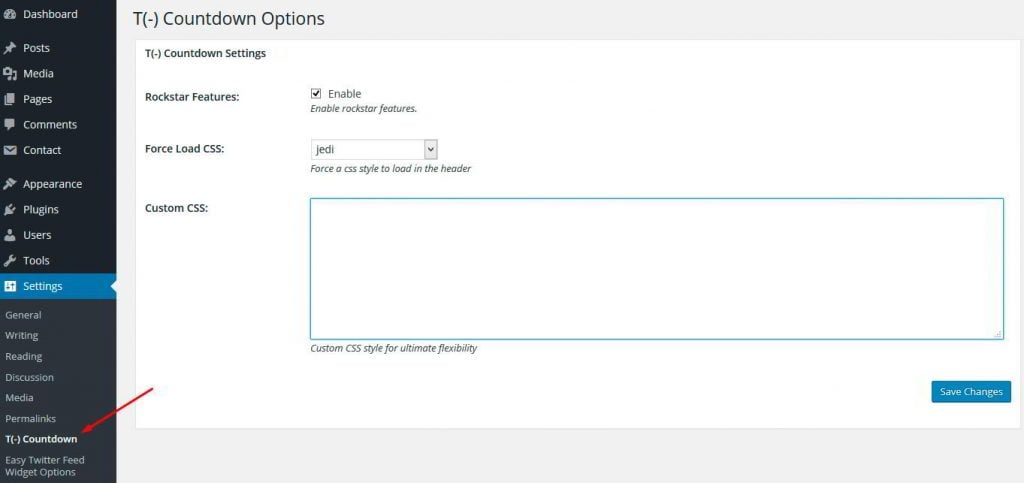
Now let's see how to work with it. After you activate the plugin, go to Settings tab in WP admin menu and pick the T(-) Countdown plugin from the list appeared.
[mfc_lightbox] [/mfc_lightbox]
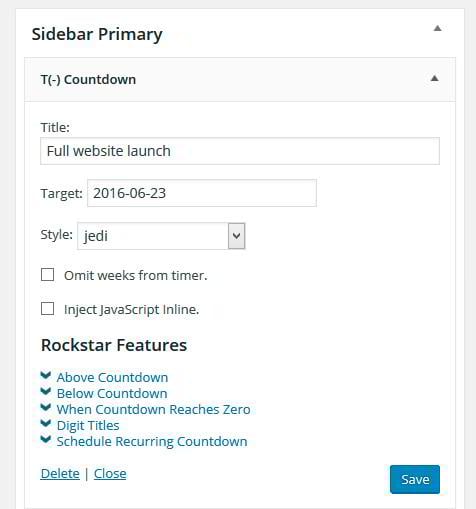
At first glance, it does not seem really customizable in this window. You can enable Rockstar features (extra plugin options) and adjust the CSS styles in the settings. However, the plugin does allow you to customize it to full extent in the Appearance > Widgets section. After we added the widget to one of the available Sidebars, let's take a look on its settings:
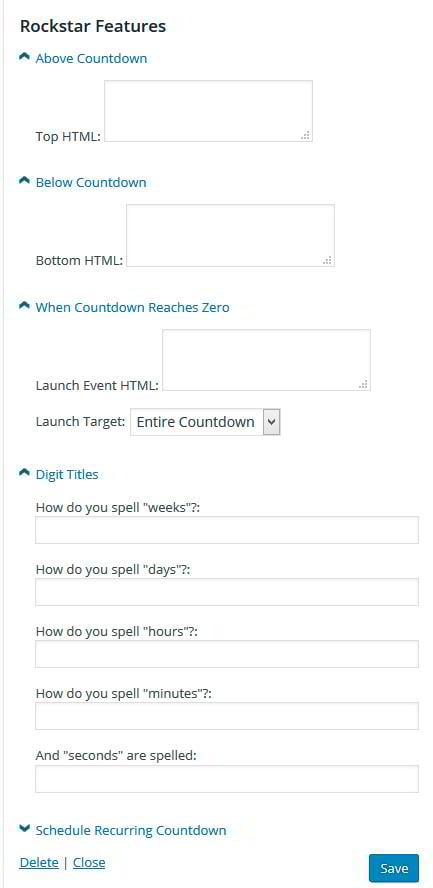
Here you can set the widget title, countdown timer date, and a few additional Rockstar features for more advanced configuration, including HTML settings and Countdown Zero Reaching events:
If we just set the title and the target date and save a widget in the sidebar, the countdown timer should be already displayed on the website:
[mfc_lightbox] [/mfc_lightbox]
Check out KingNews GPL WordPress Theme.
With no doubt you can bind the timer to any event you plan on your website just by changing the widget title. Also it should be mentioned that you can add the timer not only to a sidebar, but also to a post or a page using a special shortcode [tminus]. In it's simplest form the shortcode is: [tminus t="DD-MM-YYYY HH:MM:SS"/]. This shortcode also can have the following attributes:
ID Attribute [tminus t="31-12-2012 23:59:59" id="new-years-eve"/] A unique ID for the countdown element. If the id attribute is not defined, a unique, random number will be assigned.
Weeks Attribute [tminus t="01.01.2014" weeks="wochen"/] Replaces the default title for 'weeks'.
Days Attribute [tminus t="1/1/2014" days="tage"/] Replaces the default title for 'days'.
Hours Attribute [tminus t="next Thursday" hours="stunden"/] Replaces the default title for 'hours'.
Minutes Attribute [tminus t="20 December 2012" minutes="minuten"/] Replaces the default title for 'minutes'.
Seconds Attribute [tminus t="2012-12-31 23:59:59" seconds="sekunden"/] Replaces the default title for 'seconds'.
Omitweeks Attribute [tminus t="2012-12-20" omitweeks="true"/] Omit the weeks 'true' or show the weeks 'false'. Default is 'false'.
Style Attribute[tminus t="2011-12-20" style="carbonite"/] Defines the style to be used by the countdown. Available styles include:
- jedi (Default)
- darth
- carbonite
- carbonlite
- c-3po
- TIE-fighter
Jsplacement Attribute [tminus t="2012-12-20" jsplacement="inline"/] Where to inject the required javascript (footer or inline). The default setting 'footer' is recommended.
Before Attribute [tminus t="2012-12-20" before="May the force..."/] The HTML to be displayed above the countdown.
After Attribute [tminus t="2012-12-20" after="...be with you."/] The HTML to be displayed below the countdown.
Width Attribute [tminus t="2012-12-20" width="300"/] The pre-launch width in px of the countdown - default is 'auto'.
Height Attribute [tminus t="2012-12-20" height="200"/] The pre-launch height in px of the countdown - default is 'auto'.
Launchwidth Attribute [tminus t="2012-12-20" launchwidth="400"/] The post-launch width in px of the countdown - default is 'auto'.
Launchheight Attribute [tminus t="2012-12-20" launchheight="700"/] The post-launch height in px of the countdown - default is 'auto'.
Launchtarget Attribute [tminus t="2012-12-20" launchtarget="below"/] The area that the post-launch HTML is to be displayed in (above, below, countdown or countup - default is 'countdown')
So as you see from the list of the shortcode attributes, this smart plugin gives you a bunch of options to customize your countdown timer in the way you need it to be displayed. Feel free to conduct your own experiments with T Countdown.
Thank you for your attention and stay tuned for new tips on how to boost your WordPress-based website.
[mc4wp_form id="74928"]
Get more to your email
Subscribe to our newsletter and access exclusive content and offers available only to MonsterPost subscribers.


Leave a Reply
You must be logged in to post a comment.