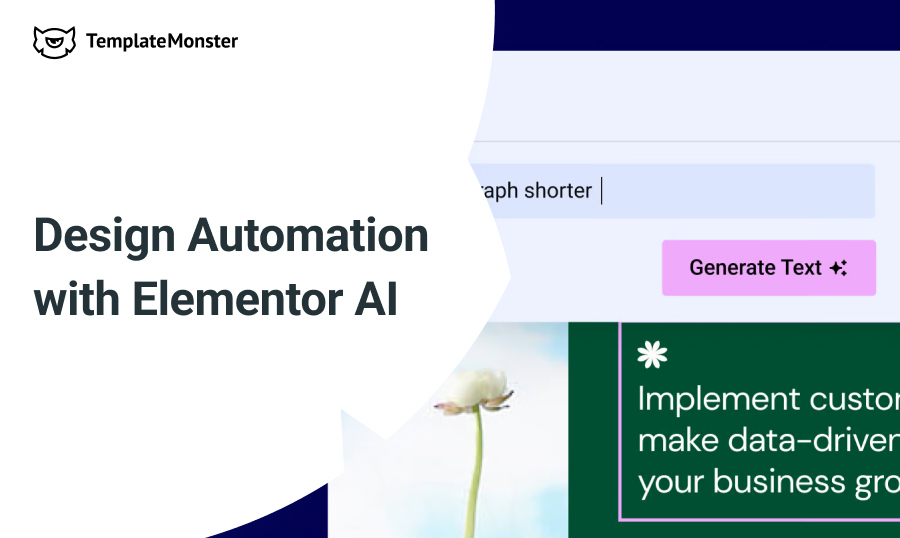
Power Up Design Automation: Introducing Elementor AI
Here it is, the long-awaited Elementor AI, the ultimate tool for website designers. This powerful artificial intelligence technology gives users a lot of freedom to create and customize professional-looking webpages in record time. With a single prompt, you can generate images with the text-to-image generator or write copy and code within the editor. Unlock creative options and change your workflow to build sites faster, all without leaving Elementor.
Elementor AI changes everything about designing and building websites, from the content to the layout. It changes how websites are made by helping with content creation, enhancing custom code, and improving design and workflow. Elementor AI has a new way of doing things that helps users who are just starting or professionals who want more creative control. This is indeed a revolutionary approach that helps users get the most out of their time and creates stunning results.
Not grasped it all yet? Let's break it down step by step.
So What Is It About?
AI technology has been added to Elementor 3.13 to make building websites easier with a variety of tools and use cases. You can try it out for free in the Editor. This includes an AI-based image solution and smart text and code generation.

Whether you are writing copy for your business or proposing a text solution for a client project, this user-friendly tool eliminates the guesswork and provides suggested requests based on the instructions provided. It has options for both short-form and long-form copies that are specific to the user's instructions. It also makes suggestions as creative prompts.
Here are some simple examples of the Heading and Text Editor widgets. The Heading widget can help you come up with catchy slogans, blog titles, or strong headers.
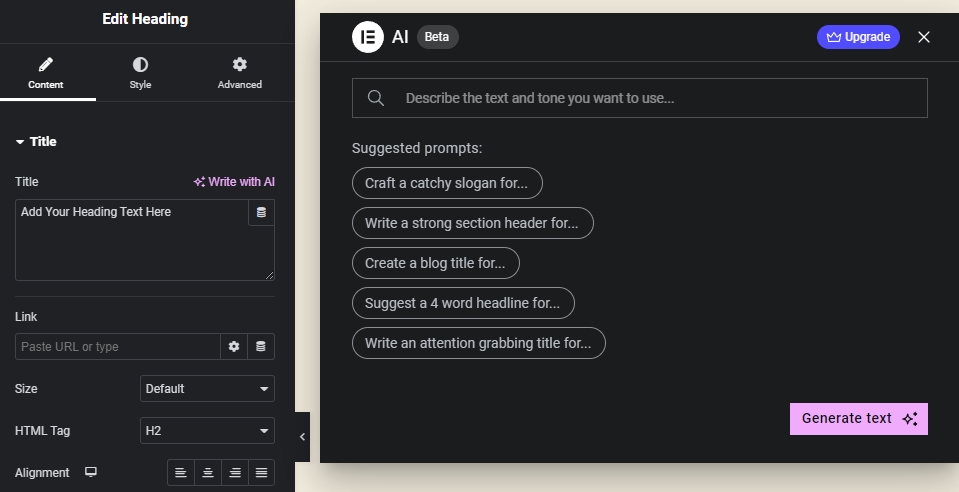
The Text Editor widget, on the other hand, tells you how to write longer pieces of content like product descriptions, blog posts, "about us" sections, and so on.
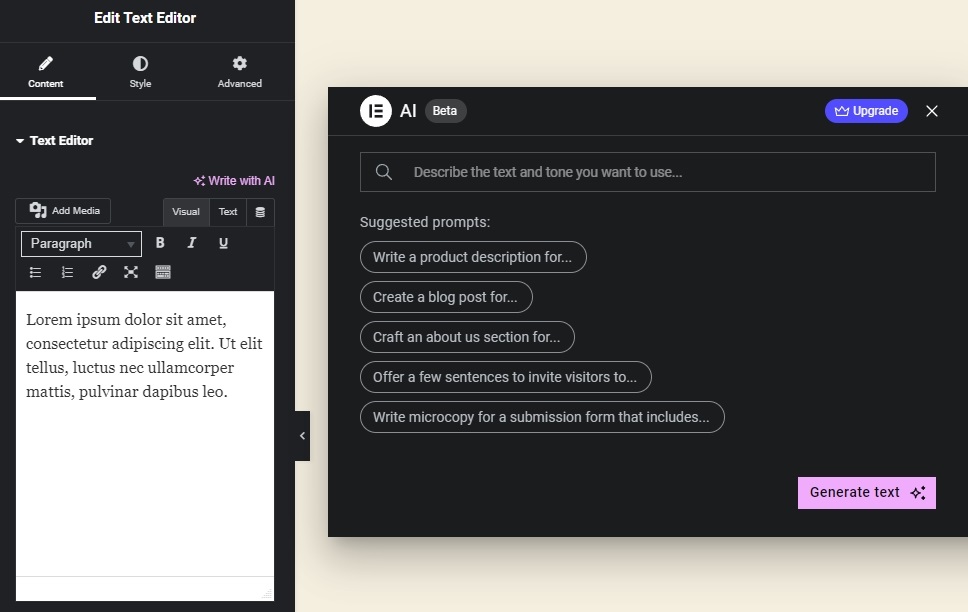
You can, however, use your own prompts. In any case, with these tools at your disposal, you can write a copy that stands out from the rest.
Improving Your Content
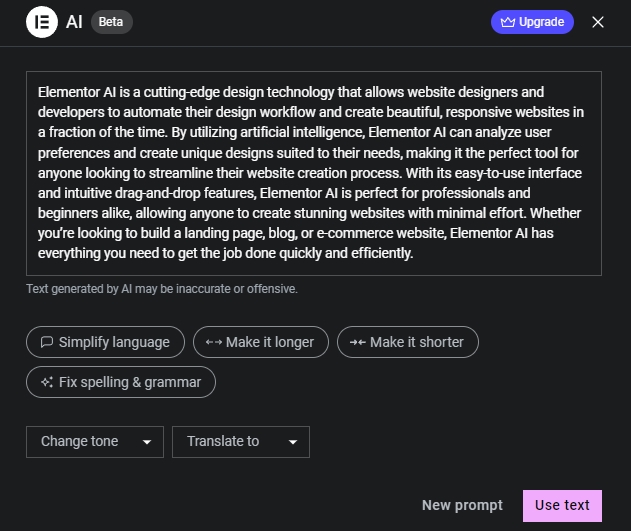
Elementor AI does more than just make content. It also has features to improve your content. It can be used to make the text easier to understand, change the length (make it shorter or longer), and fix spelling and grammar mistakes, all while delivering clear, high-quality messages. You may also request a rewording or translation.
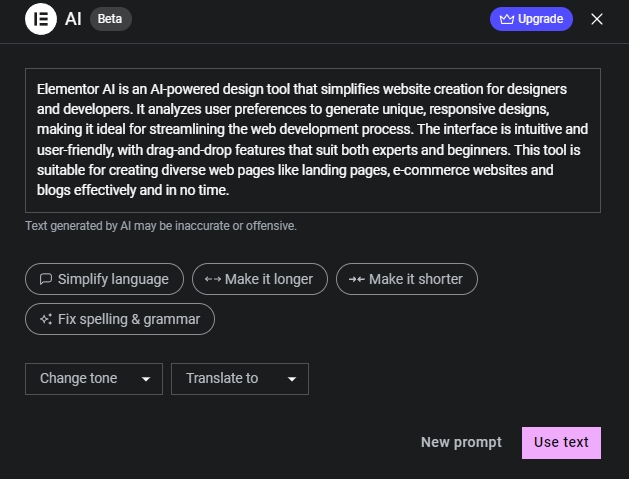
For instance, here is what was provided when we requested a few sentences about Elementor AI:
Then, we asked it to shorten the text it generated:
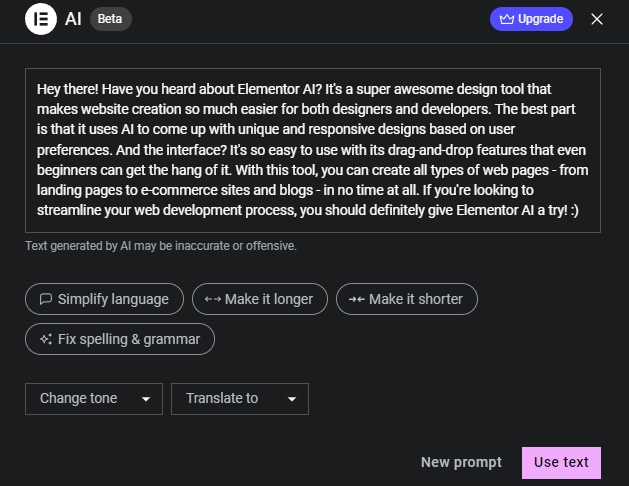
Here, we aimed for a more casual tone:
Crafting One-Of-A-Kind Web Pages
Elementor has a massive number of widgets that let you add almost any feature to your website. But when native elements do not meet all of a user's needs, the Code Assistant allows them to easily add custom features with HTML Snippets that blend in with their web design. With Code Assistant, it is easy to customize a site with sliders, Spotify playlists, and almost limitless other options.
With the Code Assistant, it is also easy to make Custom CSS rules. For instance, the Icon Box widget lets you make custom designs with no need for coding. It makes it easy to quickly change colors, add complex animations, and replace images by giving you simple controls and options.
Furthermore, the Custom Code feature lets you generate code for applications like Google Analytics tracking to monitor your site's performance and make adjustments. This tool also allows you to apply custom codes to your site's visual elements, such as changing icons based on different times in visitors' time zones.
But there is a catch: Code Assistant requires Elementor Pro.
How about Images?
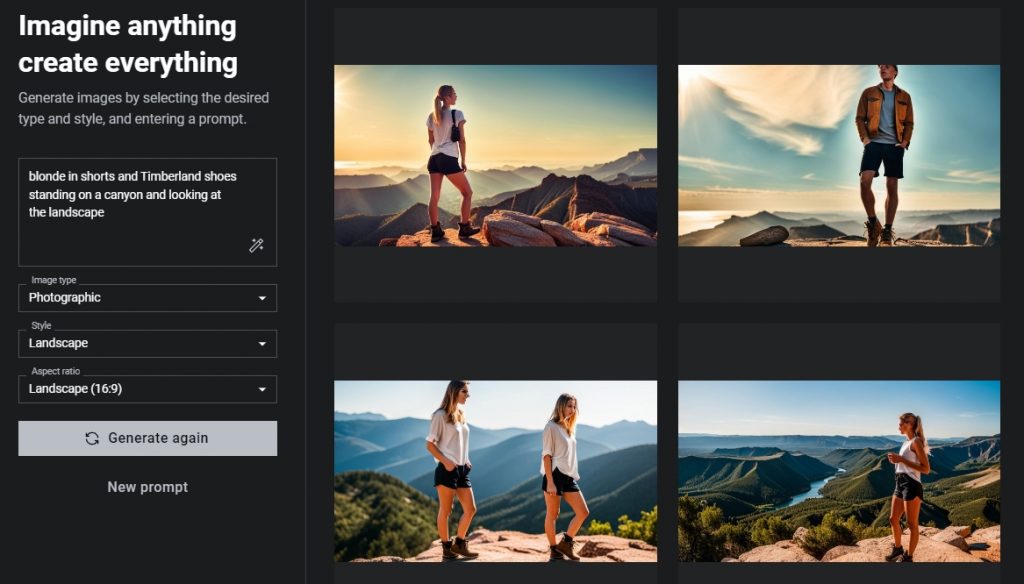
Elementor has a set of AI tools that can turn text into pictures. With twenty-nine preset styles, you can change the colors, add or remove elements, and make new or old photos look different.
This eliminates the need to browse through millions of stock photos, select the desired one, save it to your computer, and then upload it to your website. Indicate what kind of graphic you want; it will suggest some options, and you can use the selected one on your page.
You only need to do a few simple things:
- Describe the picture as much as you can.
- Pick the type (photographic, 3D, digital art, etc.).
- Choose a style, such as landscape, portrait, macro, etc.
- Select a ratio (3:2, 16:9, 1:1, and so on).
- Enjoy the outcome.
The Enhance prompt feature, found in the description field, helps you get even better outcomes from the AI image generator. The prompt enhancer will improve your prompt with minimal input from you by adding missing information and optimizing word choice.
Check it out:
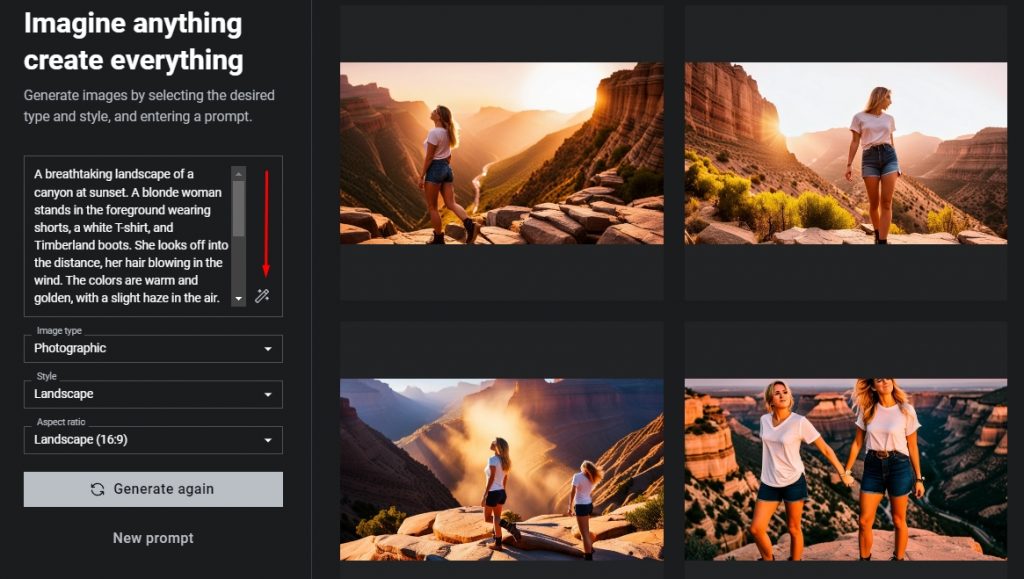
When you use Elementor AI to describe a picture, it will give you four options from which to choose.
After choosing an image for your website, you can adjust its dimensions and alignment to fit the space while maintaining quality. To make a graphic display horizontally or vertically on your site, you can adjust its aspect ratio.
Editing an Existing Image
If an image is almost perfect but still needs some work, there are several options available to you. Select the picture you want to modify, then click the pencil icon.
A screen with four editable options appears:
- Expand Image
- Generative Fill
- Resize
- Variations
Expand Image
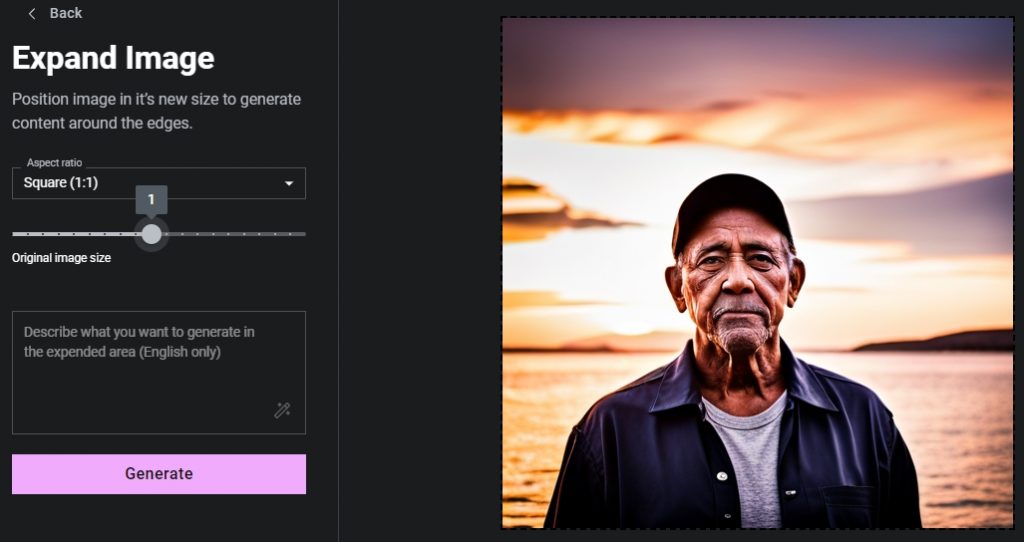
You can put your picture in a bigger frame when you use this feature. It offers you the following:
- Format the width and height to fit various aspect ratios. For this, head to the menu marked "Aspect Ratio" and choose the appropriate settings there.
- To increase the margins around the picture, shift the slider of the "Original image size" option to the left. The area around your photo will have new areas created by artificial intelligence.
- Click the "Generate" button. The system will generate four pictures that you can select.
Generative Fill

You can also change the appearance of the image by adjusting its components. When you select Generative Fill, you will have access to highly effective tools for generating individual elements.
Let us say your photo lacks some of the finer details you had in mind, or perhaps you have an existing photo that needs some tweaking or restoration. With Generative Fill, you can simply explain what you want to see in your picture, and it will generate it for you.
- Mark the area on your graphic where you want to insert the element with the brush.
- Explain its purpose in the description field.
- If necessary, enhance the prompt.
- Generate the picture.
With this degree of control, you can adjust the look of the visuals on your site to meet your specific requirements.
Resize
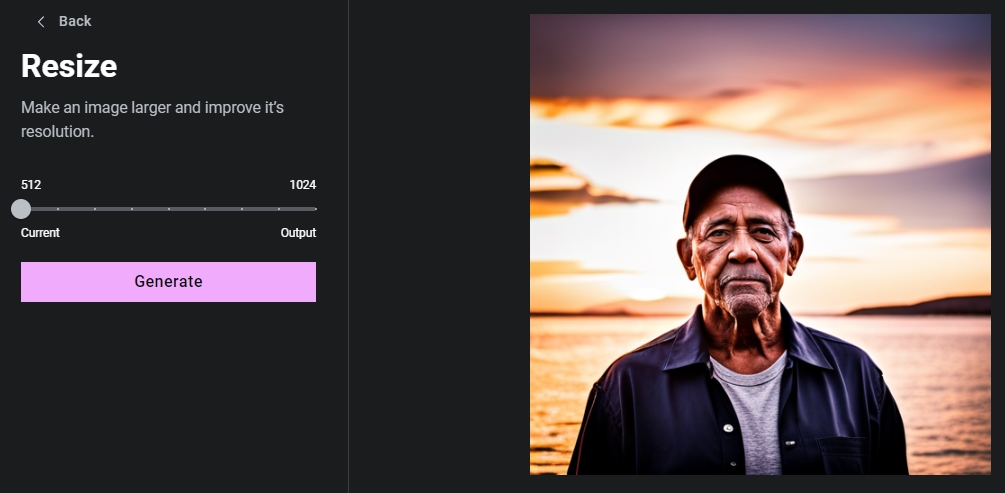
The Resize option allows you to enlarge an image. Just use the slider to select the size you want to increase without losing resolution. Either the width or the height will be changed first, and the other dimension will stay in proportion with it for a better result.
Variations
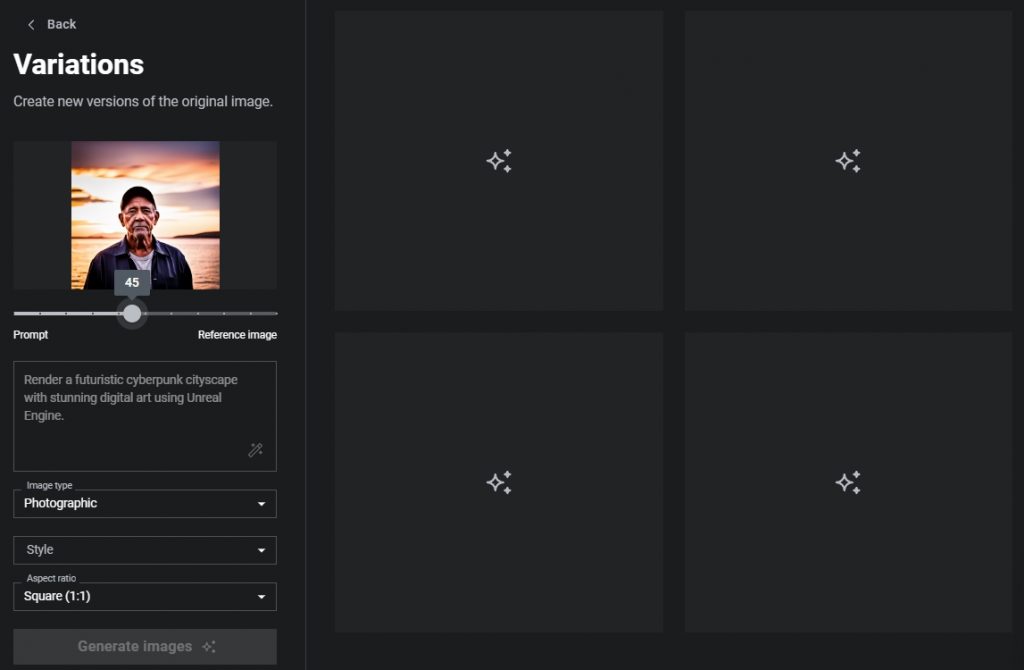
If your image is almost perfect but still missing that finishing touch, artificial intelligence can make that happen. To what extent the new picture is based on either your prompt or the existing photo is a choice you make when making these variations.
- Move the slider to make the edited version look more like the Prompt description or the Reference image, respectively.
- Change Type, Style, or/and Aspect Ratio.
- Bring the picture to life.
The Best Way to Communicate with Elementor AI

Here are some guidelines for writing more effective prompts.
Effective Prompts for Texts and Codes
- Provide as much detail as you can about the desired content. Incorrect: Write an intro for Elementor AI. Right: Write a short, inspiring introduction for Elementor AI that focuses on the latest updates, like a blogger.
- Avoid vague wording. Incorrect: A lengthy explanation of this product is unnecessary. Just a few sentences will do. Right: Write a 3–5-sentence paragraph about this product.
- Say what should be done instead of what should not be done. Incorrect: Create a dialogue between a customer service rep and a frustrated customer who just cannot get into their account. Do not require a login name/password. Right: Create a dialogue between a customer service rep and a customer. The agent will make an effort to diagnose the issue and offer recommendations without requesting any personal information. Instead of asking for personal information such as a username or password, direct the user to the FAQ article.
- To guide the algorithm toward a desired solution, use "leading words" when writing code. Incorrect: # Create a basic Python function. # 1. Ask me how many miles it is. # 2. It turns miles into kilometers. Right: # Create a basic Python function. # 1. Ask me how many miles it is. # 2. It turns miles into kilometers. Import. Keep in mind that the use of "import" suggests to machine learning that it should begin writing in Python. (Likewise, "Select" is often used as a clue at the beginning of a SQL statement.)
Effective Prompts for Images
- Describe your vision in detail. Remember that artificial intelligence was developed to faithfully carry out your commands, so be specific. For example, if you type in "pizza delivery," you will get pictures of a deliveryman or just a piece of pizza. On the other hand, the prompt "A futuristic photo of a delivery person handing a pizza to a man as he opens the door" will lead to more specific pictures. That is, the more information that is provided, the better the computer-generated result will be.
- Give examples. Mentioning the name of an artist or a style that is relevant to your content is a simple way to help the robot understand the aesthetic you desire. You can provide a clearer picture of what you want if you specify terms like "in the Baroque style" or "by Leonardo da Vinci."
- Be descriptive. Using a lot of adjectives is a great way to convey the feelings you want to evoke. Thus, you will give the artificial brain the technical details it needs to create a more accurate representation.
The Differences Between Free and PRO
| Free | Pro | |
| Generate Text | Yes | Yes |
| Generate Images | Yes | Yes |
| HTML Snippets | Yes | Yes |
| Custom Code | No | Yes |
| Custom CSS | No | Yes |
| Cost | Free Trial Credits are Limited | AI Starter: $2.99/mo or $35.88/yrAI Power: $8.25/mo or $99.00/yr |
AI-Related Plugins
Not only does Elementor perform miracles! There are already many other plugins that work well with AI. Today, AI-based add-ons can automate boring tasks and help businesses be more efficient while cutting costs. With advanced features like natural language processing and machine learning, AI plugins are now a must-have for any company that wants to stand out.
10Web AI Assistant
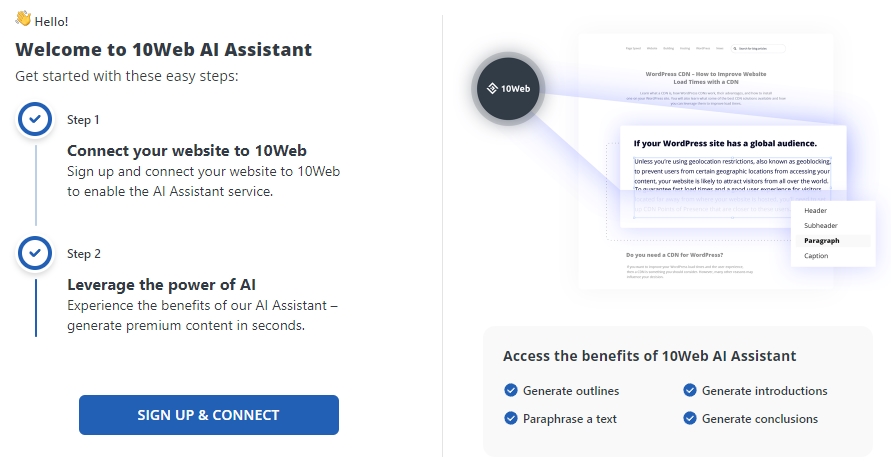
AI Assistant from 10Web is a one-stop solution for writing content that improves creativity, quality, readability, and SEO. With its easy-to-use dashboard and one-click setup, you can quickly create great product descriptions from either the Gutenberg Block editor or the Classic Editor. This is 10 times faster than doing it by hand.
Simply put, the add-on allows the user to make any changes they see fit to the content without effort.
AiBud WP
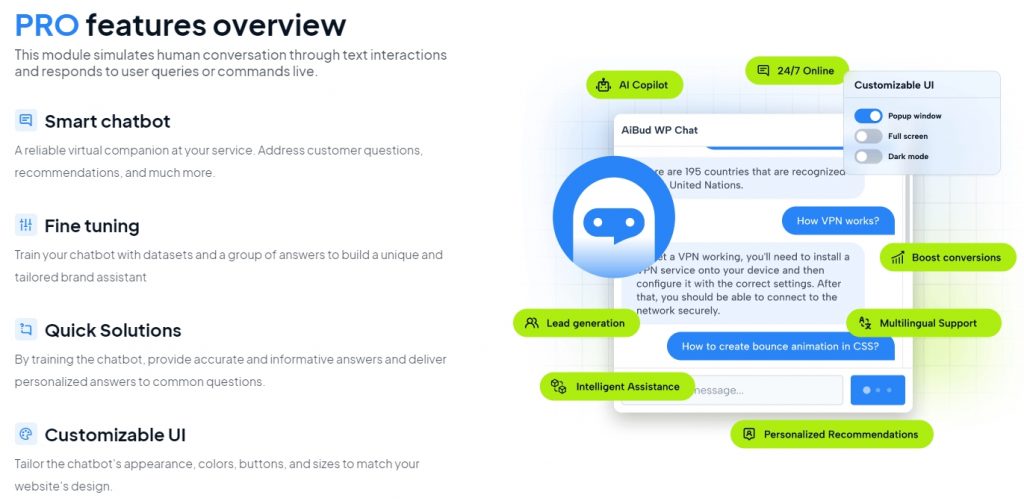
AiBud WP is an easy-to-use WordPress plugin that uses OpenAI technology to let you easily create unique and interesting text and images for your website. It makes it as easy as 1, 2, 3 to make good content automatically. Just give a prompt or topic in up to 40 languages, along with instructions about style, tone, and other parameters. Watch as AiBud uses its Content Builder module to make posts that make sense and its Image Generator tool to edit visuals. And if that was not enough, there is also Playground mode, which lets users tell the artificial intellect what to do on their sites!
All in all, the AiBuddy WP Plugin makes it easy to unlock your creativity with intelligent automation features at every turn.
Altis Accelerate
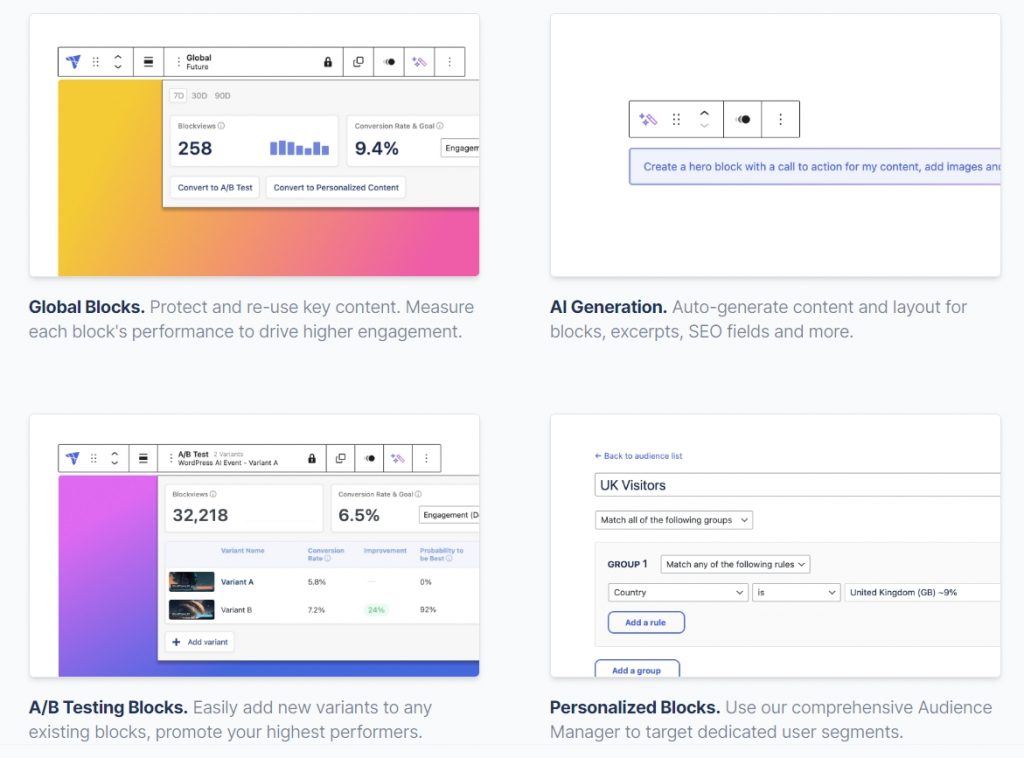
Altis Accelerate is a content creation tool that lets you use cutting-edge technology and get your audience more involved. The plugin fits in perfectly with the Block Editor. It has features like Global Blocks, AI-Powered Content, A/B Testing Blocks, and more. This gives users access to the tools they need to make amazing websites.
CopyCraft
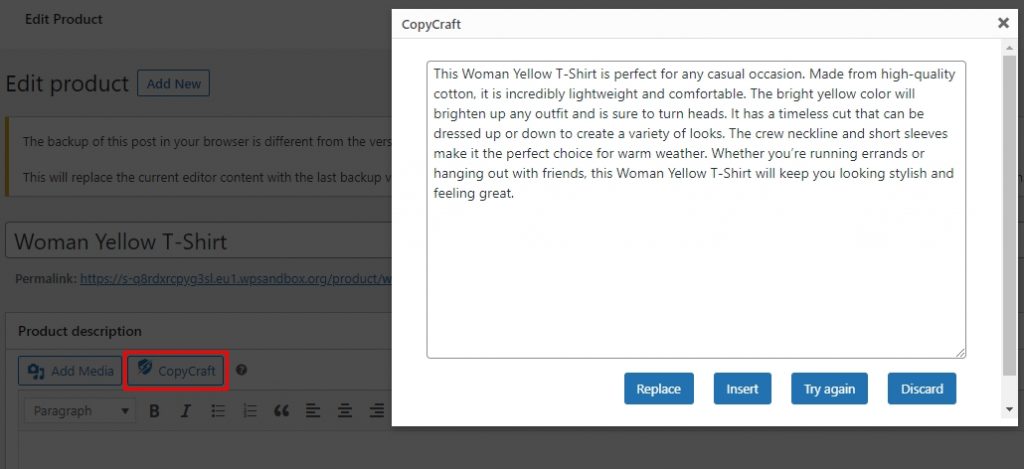
CopyCraft is an AI-powered tool that helps you save time when writing product descriptions for a WooCommerce store. The add-on looks at your collection and uses advanced algorithms to come up with meaningful and interesting content with little work from you. It is easy for anyone to get professional results thanks to its tight integration with WooCommerce's Add Product and Edit Product screens.
Just join OpenAI for free and take pleasure in writing professional-sounding product descriptions right away.
AI Power
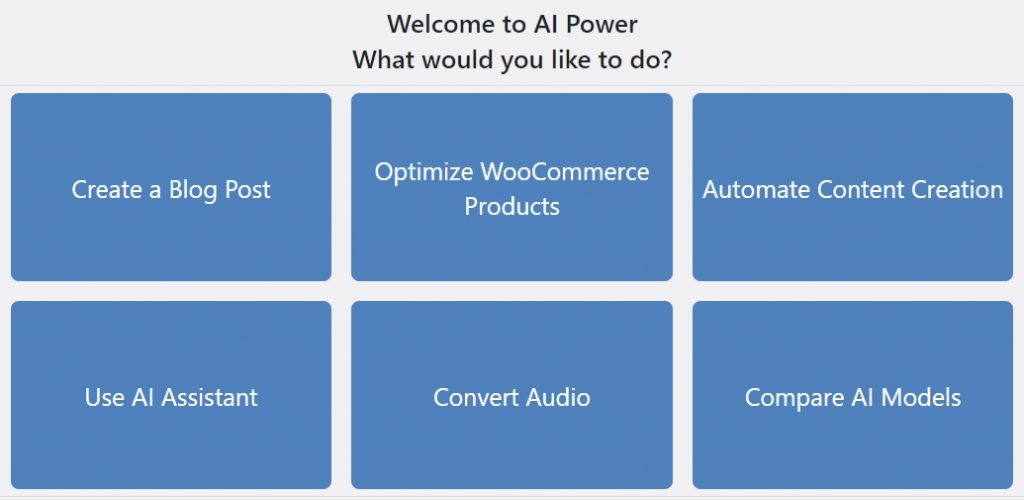
Create content, images, and chatbots with AI Power's adaptable widget and persistent memory. There are tools like the DALL-E image editor, PDF Chat, and the WooCommerce product builder. Built-in neural network training options like parameter tuning and dataset conversion are also available.
The index builder will change the context embedding formats for SEO after you add pages, posts, FAQs, and knowledge bases using the content builder module. Furthermore, the GPT3 plugin has access to media assets via the Pexels integration. This will allow you to schedule posts in advance. Perhaps everything you need to create interactive digital experiences is included in this all-inclusive package.
WordPress Theme Compatibility
Elementor AI plays nicely with WordPress themes. It is a breeze to make your new website's design match the look of your old one on this cutting-edge platform.
The compatibility it offers also makes it easy to incorporate third-party plugins without completely reworking the site's aesthetic. This ensures a consistent user experience, no matter the complexity or individuality of the project being worked on. Also, if you use any WordPress template, you can use your usual prompts (like ChatGPT) to add features that you used to have to pay for.
In sum, the combination of Elementor AI and web templates grants developers unprecedented leeway in creating polished websites. This gives them more time and resources to focus on other aspects of the development process.
Elementor AI FAQ
This is an innovative solution for webmasters. It uses advanced artificial intelligence algorithms to create stunning visuals for web pages and marketing materials without the need for manual design or coding. With its ability to produce high-quality content quickly and with little effort from the user, it saves time and gets great results. So, Elementor AI makes it possible to run effective campaigns that would be impossible with only traditional methods. This makes it an invaluable tool for any marketer. In fact, anyone can use this powerful innovation to improve their visitors' experiences.
For novice web designers and enterprise-level developers working on multiple sites, respectively, the service offers the Starter and Power plans. The first one provides you with 18,000 credits per year for just $2.99 per month (billed annually at $35.88). The second one gives you 50,000 credits a year for as little as $8.25 a month, which is $99 a year.
For most of the software's features, you do not need any special technical skills. Just put your preferences into easy-to-use wizards, and the software will generate optimized code in minutes.
The answer is yes; you can use Elementor AI with the free version. However, Elementor Pro indeed unlocks access to some of the plugin's more sophisticated artificial intelligence features and capabilities. Free trials are available to anyone using version 3.13 or later or on an Elementor-hosted website.
Don’t miss out these all-time favourites
- The best hosting for a WordPress website. Tap our link to get the best price on the market with 82% off. If HostPapa didn’t impress you check out other alternatives.
- Monthly SEO service and On-Page SEO - to increase your website organic traffic.
- Website Installation service - to get your template up and running within just 6 hours without hassle. No minute is wasted and the work is going.
- ONE Membership - to download unlimited number of WordPress themes, plugins, ppt and other products within one license. Since bigger is always better.

Posting contributed articles about the major web design highlights and novelties. Come across a handful of useful tutorials and guides shared by experts in the web design and online marketing fields.
Get more to your email
Subscribe to our newsletter and access exclusive content and offers available only to MonsterPost subscribers.
