Build Compelling Slides with MotoPress Slider
Adding sliders is one of the most effective ways of giving the WP powered site a more attractive look. But is creating a slider even possible for a regular user who doesn’t know a thing about coding? Well, thanks to a powerful MotoPress slider, building beautiful and compelling sliders becomes easier than ever. It offers a set of the necessary tools that will help you have the job done in several minutes.
So, let’s take a look at how to create a slider with MotoPress.
First of all, install the plugin to your CMS. After that, go to MotoPress Slider and press “Create New Slider”.
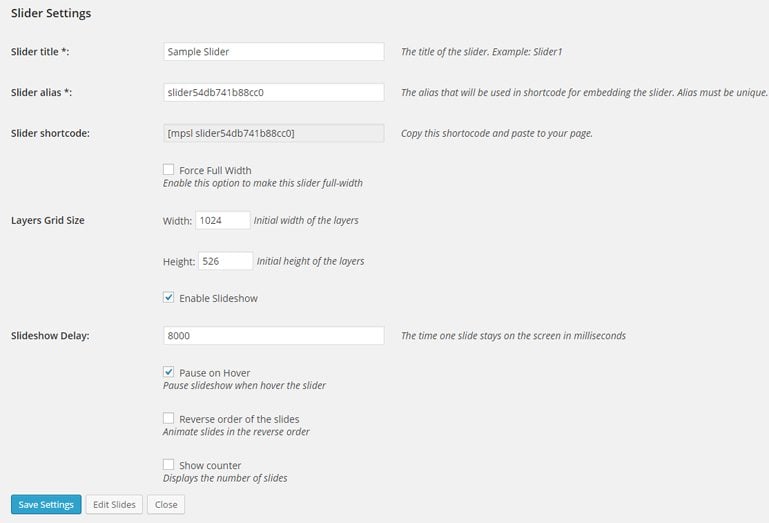
In the new window you will see a form that should be filled in. See the meaning of each field below.
Slider Title - type a name for each slider to distinguish it from the others you might create in the future.
Slider Alias - type a unique name to create a shortcode allocated to the slider.
Slider Shortcode - provides you with a ready-made shortcode that you can insert anywhere on your site.
Layers Grid Size - allows you to set width and height of the slider, as well as the layers grid size.
Slideshow Delay - control the timing of the slider and indicate how long each slide stays on the screen. In this section you can also play with the effects and options of the slider.
When you are done with this part, press “Save Settings”
Now it’s time to build sliders with MotoPress tutorial.
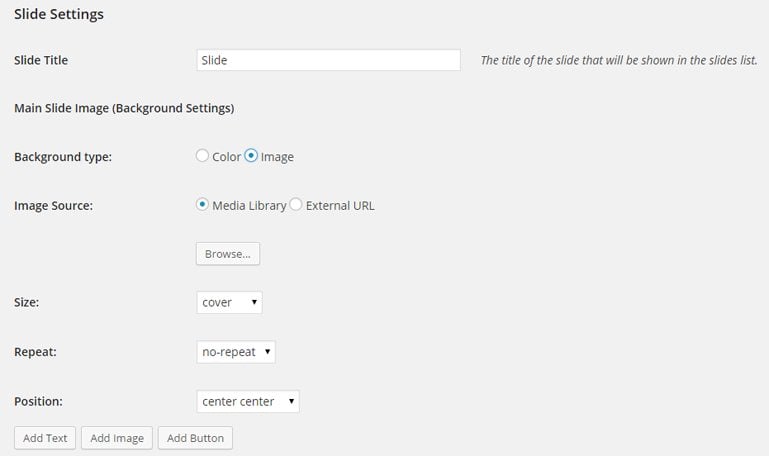
This procedure is pretty easy. Name the slider and choose the background type. You can also download the images from any source you like whether it is your computer or an online resource.
After that, choose a proper size, repeat and position of the slides. However, these fields are optional and you can leave them empty.
Once this step is complete, we move on to the Layer Settings.
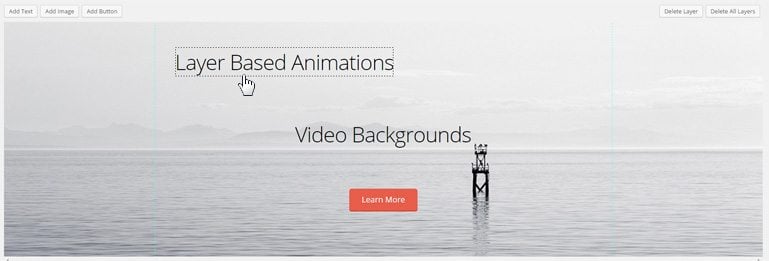
This feature allows you to create new layers like text, buttons, or images to make your slider more informative and attractive. For each single layer you can set some effects and options, including:
Start animation/End Animation - Choose the animation effect of the image when it appears and disappears from the slide.
Display at/hide at - the time it takes one layer to appear and disappear.
The drag and drop functionality allows you to rearrange the order of the layers the way you like.
Actually, the drag and drop feature is the core element of the MotoPress plugin, as it ensures splendid navigation and advanced usability. So even a beginner can deal with this procedure, even if he is creating a slider for the first time.
Well, eventually, you get something like this.
So now you know how to use MotoPress plugin to create sliders. Try it and you’ll see that this task is much easier than it seems. Give your site a fresh, new look with this great plugin.
Don’t miss out these all-time favourites
- The best hosting for a WordPress website. Tap our link to get the best price on the market with 82% off. If HostPapa didn’t impress you check out other alternatives.
- Monthly SEO service and On-Page SEO - to increase your website organic traffic.
- Website Installation service - to get your template up and running within just 6 hours without hassle. No minute is wasted and the work is going.
- ONE Membership - to download unlimited number of WordPress themes, plugins, ppt and other products within one license. Since bigger is always better.
Get more to your email
Subscribe to our newsletter and access exclusive content and offers available only to MonsterPost subscribers.


Leave a Reply
You must be logged in to post a comment.