In the first part, we talked out how certain WordPress sites structure can cause long page load times, and talked about how reducing the number of server requests, correcting their load order and optimizing images can speed up your WordPress site. In this part, we go into some more "hard-core" techniques of page speed increase.
The first thing we will mention is cache. Before I tell you how to implement it, let me tell you a little bit about the cache.


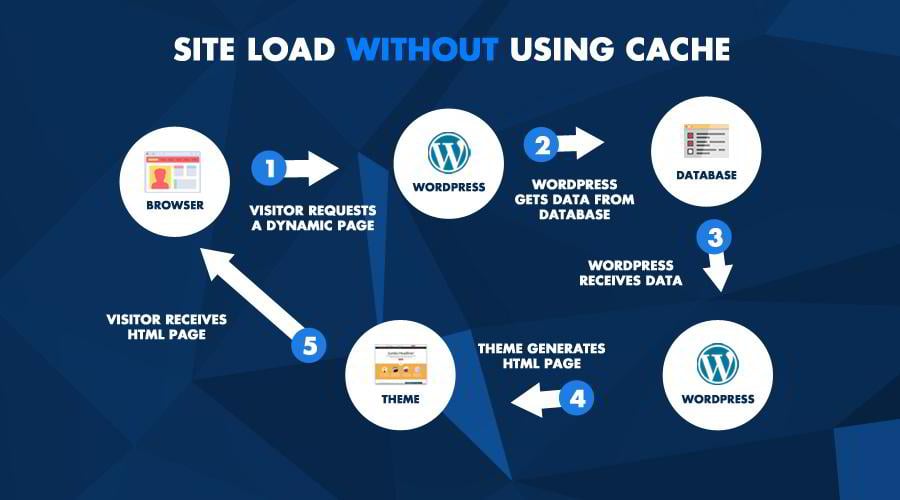
Here is a scenario: You have an "About Us" page on your company website. Let’s say you have 1000 visitors checking that page in a month. Every time someone opens that page, WordPress goes to the database, downloads your "About Us" content, generates an HTML page with your content, and sends it to the visitor’s browser. If you haven’t updated your "About Us" page in that month, WordPress loads the same exact content every single time. This is unnecessary.

Caching algorithms store a static HTML page of your "About Us" page, and when a visitor requests that page, it first checks whether the cache has an instance of that page and if it does have, sends it to the browser, without doing a database call. This saves a lot of time, because database access takes time, and after the engine gets the data, it also needs to generate a dynamic page. Compared to that, reaching out for a simple HTML file is a lot faster process (simply serving an HTML file is the quickest possible page load type anyway).

Of course, you can ask, what happens if you change the content. This is a common thing to solve in caching systems, and the most basic approach is to simply clear the cache every once in a while, or after you edit certain content.
For example, after you edit your "About Us" page, you can just purge cache, so the cached content will refresh.
So let’s see an image about how cache actually works.

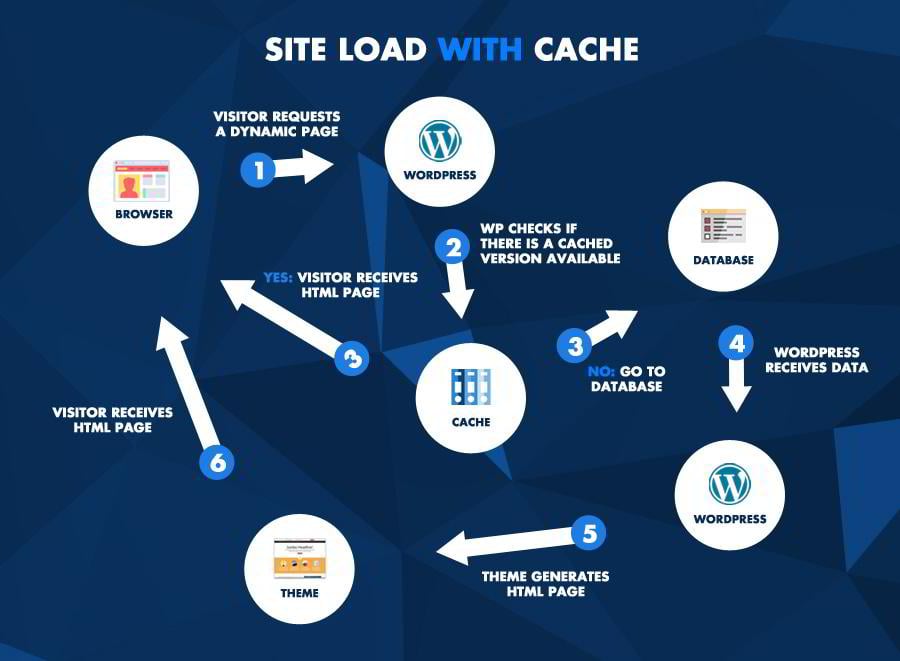
Get it? The whole idea about cache is to save time spent on database call. If a cached version is available, it won’t load content from the database, therefore speeding up page load.
To tell you one more thing, a caching system is especially useful when using a CMS like WordPress with a lot of plugins and a complex theme. Sometimes it can mean 10x (yes, ten times) speed.
There are also other advantages of cache besides faster page load. It also saves server resources (the more requests are solved through cache, the less CPU/memory you will use).
How To Use Caching in WordPress?
There are several cache plugins for WordPress, I will show you my favorite, the well known W3 Total Cache. Even though the cache is a pretty known and somewhat simple process, some plugins still do it better than others.
W3 Total Cache


W3 Total Cache is one of the most known solutions for WordPress caching. You can simply install it through WP Plugin Installer, or download it from the plugin repository and upload to your site. After it is done, it will add a new navigation item on your dashboard called Performance.
At the dashboard of W3 TC, you get an overall information about the plugin state and some information about the premium services. They include mobile and email support, plugin configuration, theme performance optimization, server optimization, and also something that is called CDN. We will talking about that later.
The actual magic happens when you navigate to Performance -> General Settings.This is where you can basically turn features on/off. To enable cache, simply turn on the checkbox besides, Page Cache. If you want to simply turn all features on or off, use the checkbox below General.

That’s it! This turned on page caching, and you can check results right away.
If you experience refreshing problems after editing your content, simply go to Performance -> Dashboard and click Empty All Caches button.
WP Super Cache

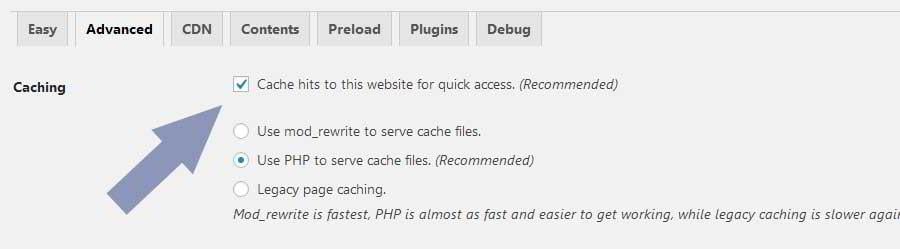
Another good solution for WP caching is WP Super Cache. It works similarly to the previous but gives you different ways of configuration. For example, WP Super Cache offers 3 types of serving cached pages: Mod_ReWrite, PHP and Legacy Page Caching. If you aren’t into technical details that much, I suggest keep it on the default PHP setting, or do some experiment and test your settings carefully.
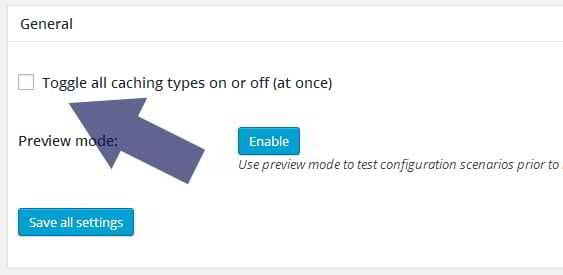
Simply enabling the plugin can be enough, you can do that by navigating to Settings -> WP Super Cache, and clicking on the first checkbox.

WP Super Cache also has a Preload mode, which means creating a cached version of all pages and blog posts. This makes your site real fast while forcing you to sacrifice a bigger amount of hosting space.
Like always, a little bit of trial and error is needed to find the settings that fit your site the best.
Tip: Measuring Page Construction Speed on Server
If you want to measure your progress as you are doing certain tasks to speed up page load time besides the tools I gave you in the first part of this post, you can simply check how fast your page is constructed on your server. Note, that page construction is only a part of your page total load time (page creation happens before your site gets downloaded to the browser).


I created a simple PHP script for you, which can give you some idea about how fast your page is created on your server. You simply need to edit your WordPress index.php the following way. You can do this with close to zero PHP skills, but for the worst case, it is better to create a backup of your index.php.
So, to do this, simply open your server with an FTP client like Total Commander, FileZilla, or the File Manager tool of your server administration tool, open index.php for edit, and add 3 lines.
This is how your WordPress index.php will look like:

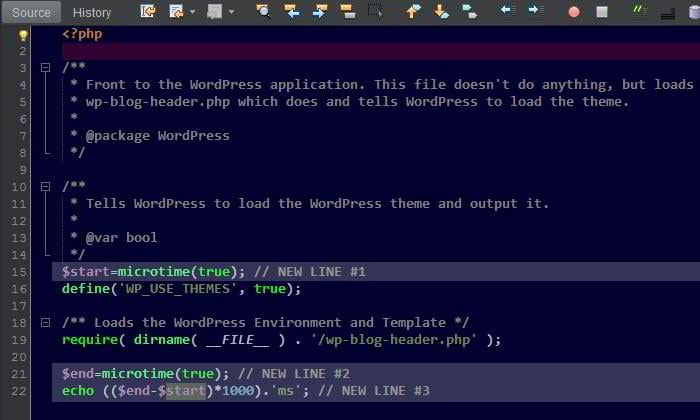
The lines you need to add are 15,21 and 22.
$start=microtime(true); // NEW LINE #1
$end=microtime(true); // NEW LINE #2
echo (($end-$start)*1000).'ms'; // NEW LINE #3
If you do this, you will have a one line information at the very bottom of every page. It tells you the page construction time in milliseconds. If you want to disable it, delete the 3 lines or simply comment out the last one with two slashes (//).
At first, it may sound crazy to deal with such small measures as a few ten or hundred milliseconds, but keep in mind that this means one-page load at a time for one visitor. If you reduce your page construction time from 500ms to 450ms, the main thing is not the 50ms, but the fact that if you have 100 requests at a time, you decreased each by 10%, which can cause a great effect in the end.
Using a CDN for Further Speed
Both of the mentioned plugins offer CDN settings for you. CDN stands for Content Delivery Network, and it is a technique created to support faster website loads. A CDN basically means you register your site with a CDN provider, which then hosts files of your site. The reason why a CDN can give you faster downloads is that all CDNs use several servers on different geographical locations, and when a visitor opens your site, the CDN chooses the closest server to the actual client and delivers your content from there.
Content Delivery Networks are usually used on high traffic sites that contain a lot of data.
For example, MaxCDN.Com offers you 3 plans: Entrepreneur, Professional, and Custom. They start as little as $9/month, and goes up to several hundreds or thousands, depending on the services you choose.
Summary
We went through a few ideas about making a WordPress site faster. While applying these tips, you always need to figure out where are the points in page load where your site suffers, or where you could get more speed. You can do this with the tools I gave you in part 1. After you see where your site spends too much time, you can start applying a solution targeting that part.
In order to succeed, it is better to understand which of the several processes are affected by your chosen trick. When you’re done, let us know about your success by posting a comment!
Good luck!