The Complete Guide To Creating A WordPress Multisite Installation
What is a Multisite for WordPress? As described by WordPress’ codex, a multisite is a feature of WordPress 3.0 and later versions that allows multiple virtual sites to share a single WordPress installation. When the multisite feature is activated, the original WordPress site can be converted to support a network of sites. It’s basically creating a network using one main site to manage all other sites and creating your smaller version of WordPress.com where you can create an additional website within your main website.
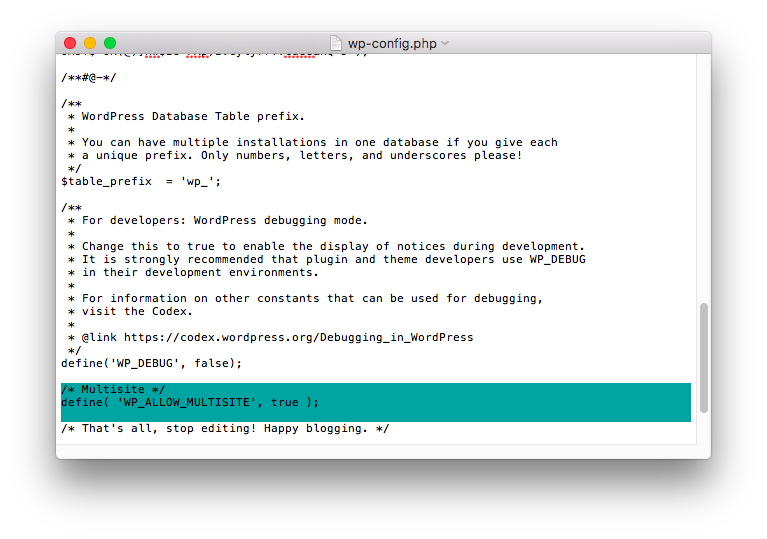
So, what do you need to do to enable multisite for your WordPress website? You just go to your wp-config.php file add this above the line saying /* That's all, stop editing! Happy blogging. */:
/* Multisite */ define( 'WP_ALLOW_MULTISITE', true ); |
It should look something like this:
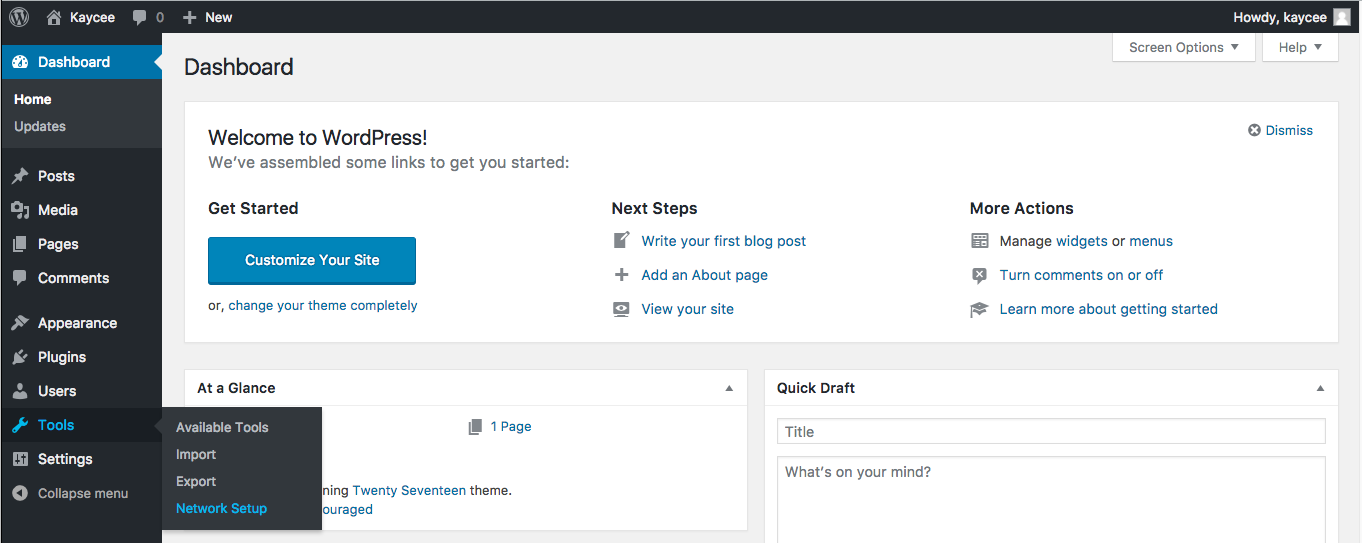
 Once the line above has been added, you’ll need to refresh your browser. You’ll then be able to see an additional option called Network Setup in your Tools menu.
 On the Network Setup screen, you’ll be able to add the addresses of websites in your network. WordPress will give you two options for creating the addresses to your site, namely subdomains and subdirectories. Subdomain is a domain-based network, which uses the format http://wpwebsite.mynetwork.com while subdirectory is a path based network, which uses the format http://mynetwork.com/wpwebsite. You can also modify the network details, which are the server address, network title, and admin e-mail address. These details are already filled in by default, but you can change it if you want to.
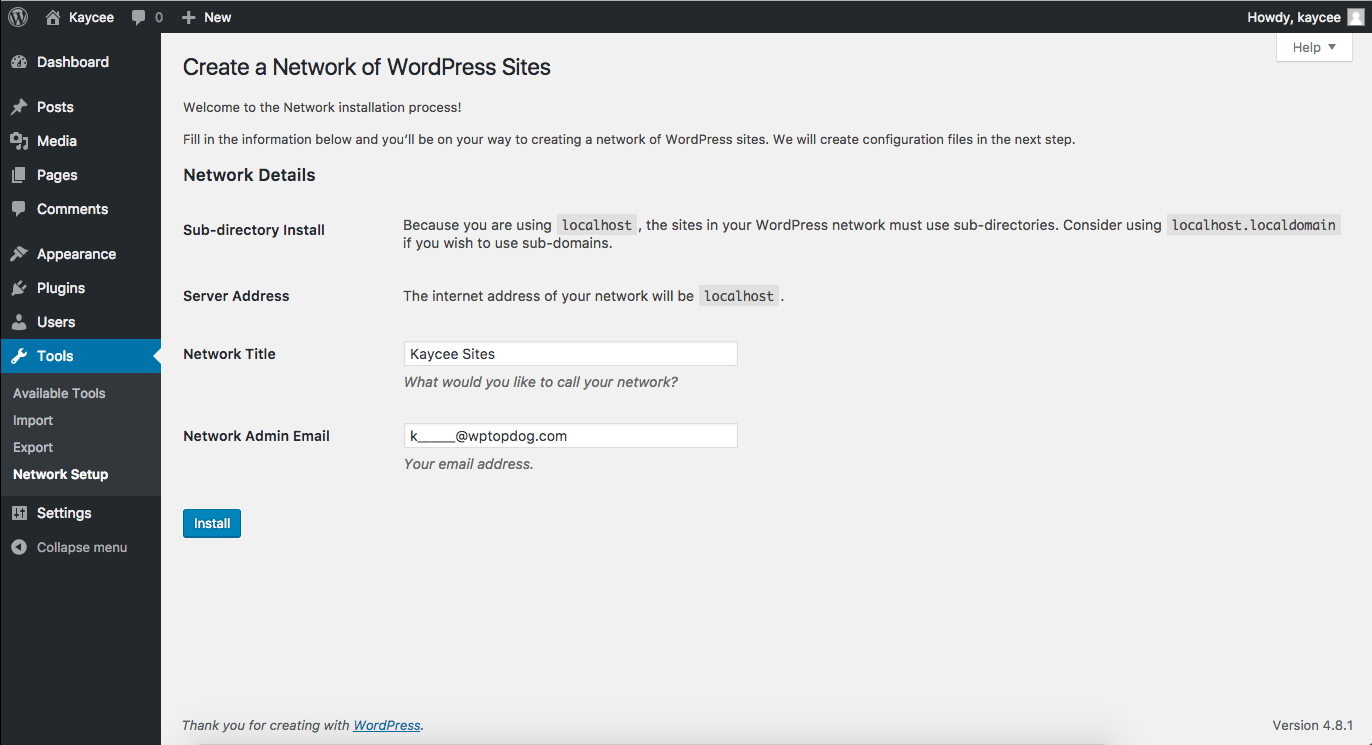 My Sub-directory install is different since I’ve only installed WordPress via localhost. As you can see on my screenshot, I can only use sub-directories when WordPress is on localhost. Once you’re satisfied with your Network Details, click install.
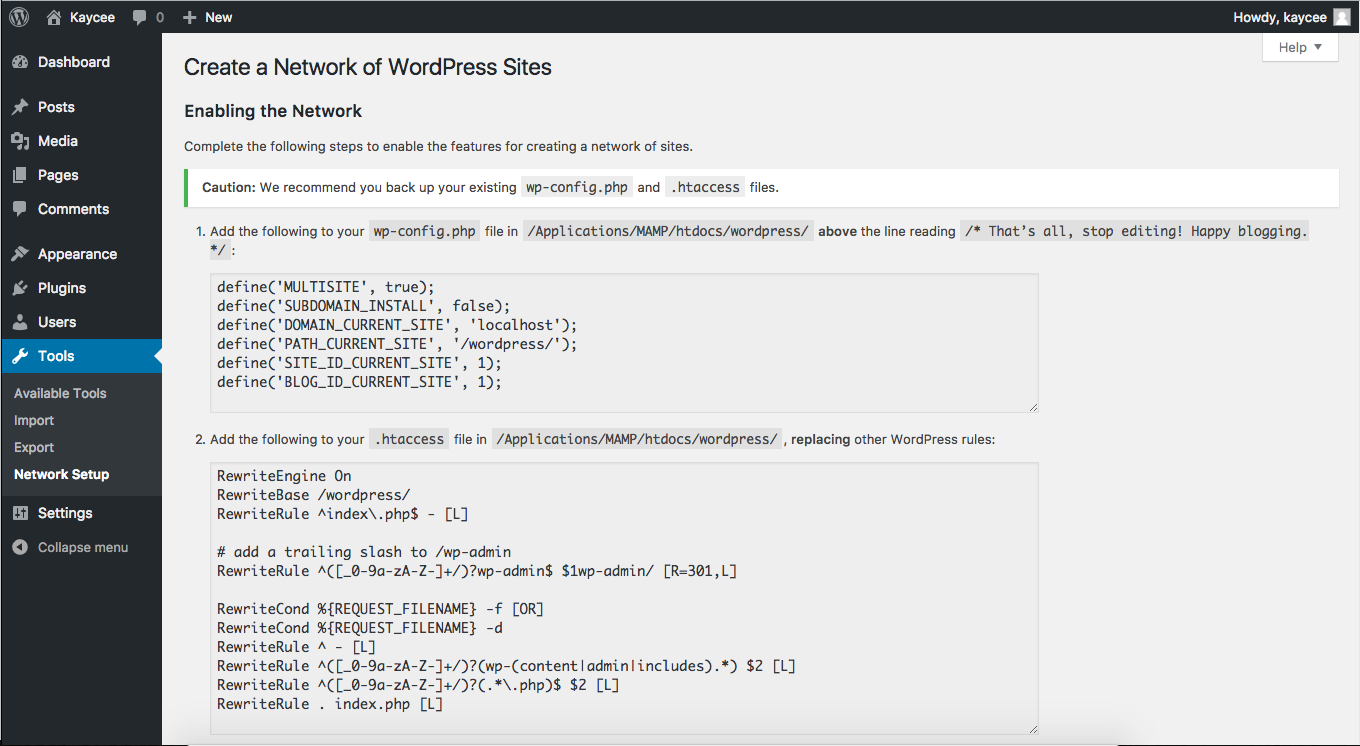
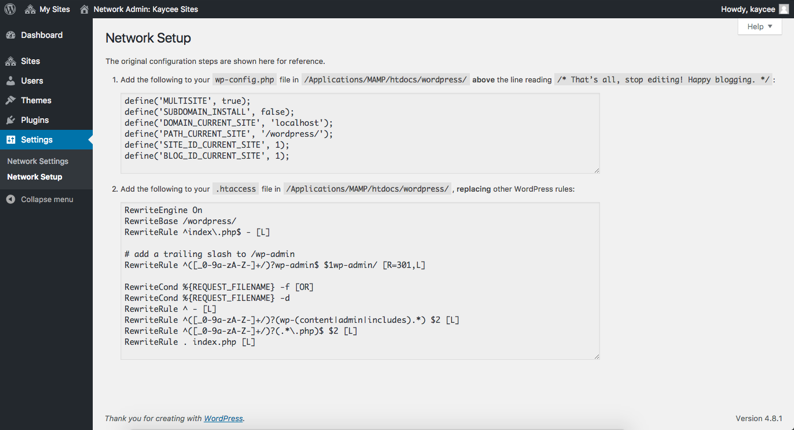
Next, you’ll need to enable the network we’ve just set-up. Just follow the instructions from the Create a Network of WordPress Sites screen which has been customized for your installation. Make sure that you create a backup of your wp-config.php and .htaccess files, as you’ll be updating these files to enable the network. If the .htaccess file does not exist, create the file in the same directory as where your wp-config.php is saved. You’ll need to add some extra lines on the wp-config.php file, and these lines need to be inserted after the step you did on allowing the multisite.
 After doing all the needed steps, open the link provided and log-in again.
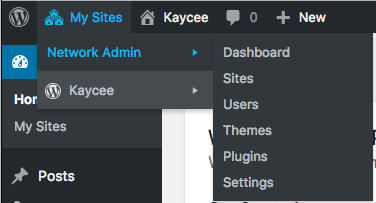
You’ll see that your WordPress toolbar has updated to reflect a dropdown called My Sites.
 Here, you’ll be able to see the Network Admin where you can see a Dashboard for the Network Dashboard screen. You’ll also see the option Sites where you can add, edit, and delete any of your sites. You can select Users to see who the admin and super admin is for each site you have. The Themes is where you can install the theme that can be used by all of your sites or install only for a specific site. Of course, there’s also the Plugins which works the same as the Themes. You can either install a plugin that can work only on a specific site, or on all your sites.
Sites
Sites are where you can see the list of all your sites that you’ve created since activating the multisite. Here, you can also edit and delete your sites.
 Adding more on your site is easy. Just click the Add New button and WordPress will only require this info:
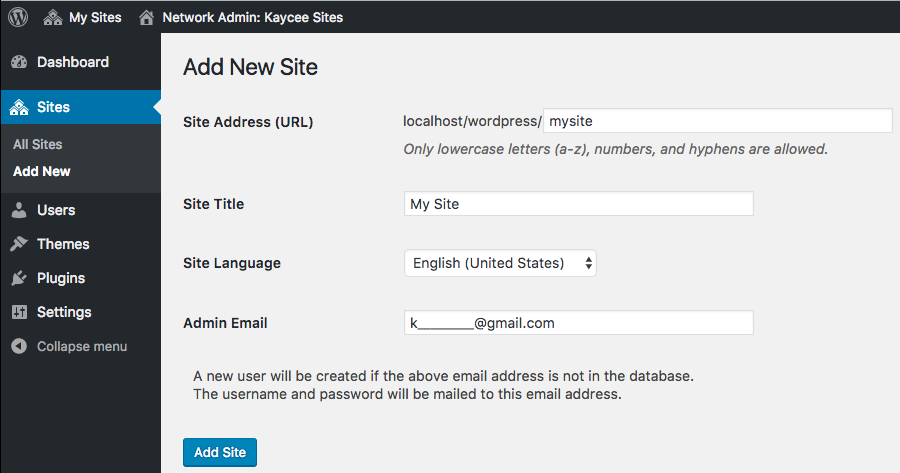 Enter the site address which will be the link to your main website. The site title is the title that will appear on this website. You may change the site language here as well, which you can maximize if you want to have separate links for different languages for your website. Last is the admin email, which you can assign another email address as an admin for this site that you’re creating. Click Add Site to save this new site.
Users
With Users, you can see all the username and email addresses that are associated with each site you’ve created. You’ll also see that the Super Admin is indicated on the username of the main user account.
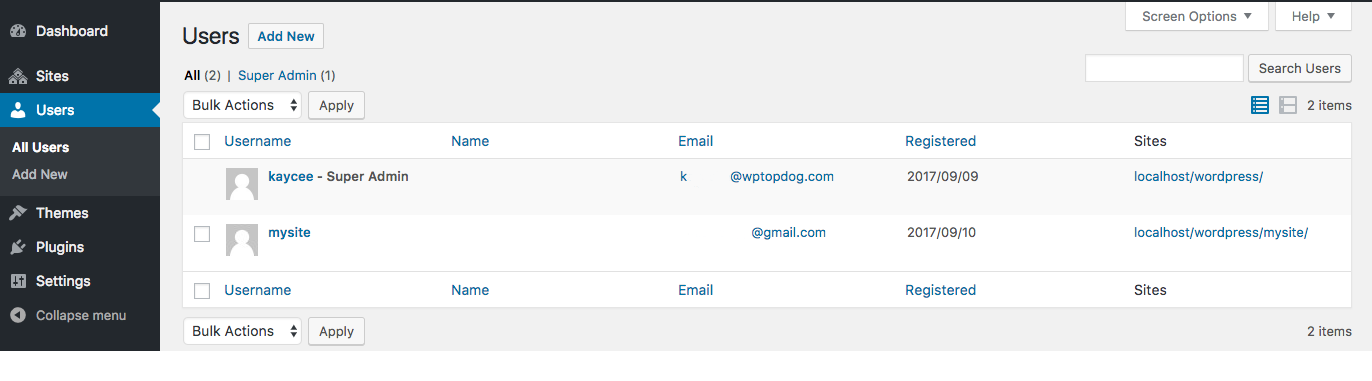 You can edit the profile of each username, and this includes adding the name and changing the email address associated for the user. Since we’ve created a site, the default username is the site address URL. But if you create a new user first, then create the site, the username that would be assigned to your site is what you’ve set when you create a new user.
Themes and Plugins
You can select and upload themes and plugins in the Network Admin area. This would allow Network Enable or Network Disable for all themes or plugins you install. It would mean that you are allowing a theme or plugin to be available on all sites, while you can also allow the admins of each of your site to install a different theme on their end.
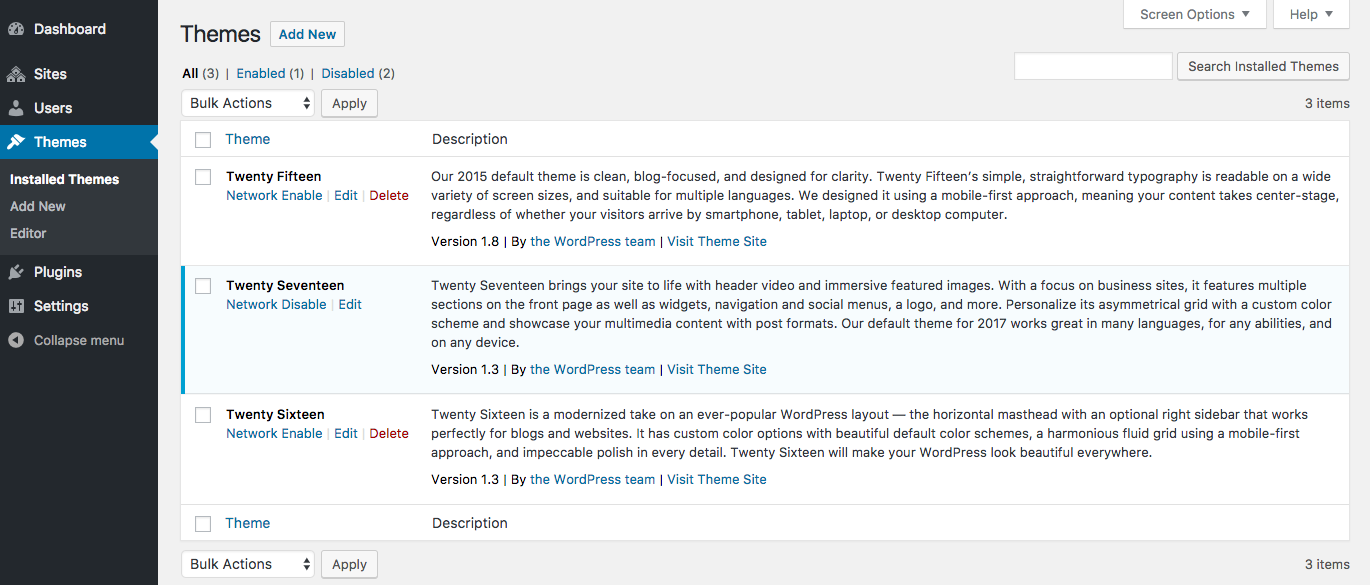 Do keep in mind that installing a theme or plugin from the admin of one of your site will not work the same, meaning the theme or plugin installed in one of the site created will not be available for all and each site will need to install the theme or plugin on their end.

Settings
There’s also a Settings option for the multisite, where you can find the Network Settings and Network Setup. You as a super admin can change these details, but by default, WordPress has set this up for you. The Network Settings allows you to edit the basics, like your network’s title, email, and modify your new site settings. The option to the site upload limit can also be changed on the Network Settings.
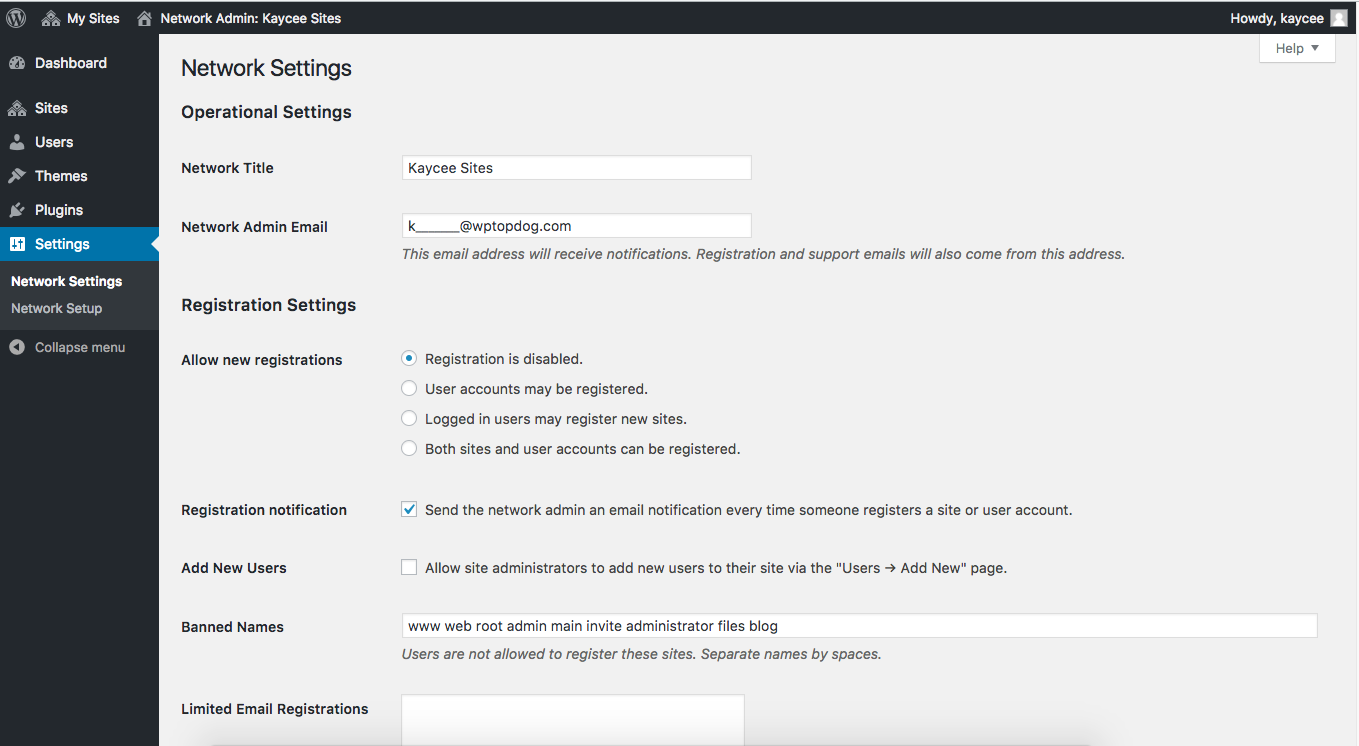 While the Network Setup shows the needed setup for enabling multisite, which you’ve also seen when we’ve first activated multisite.
Related Posts
Best Plugins to Backup WordPress Sites
8 Must-try WordPress Contest Plugins for Your Site
Six WordPress Plugins to Install on Every WordPress Site
P. S. Just to make sure you get WordPress Themes in right place.

Posting contributed articles about the major web design highlights and novelties. Come across a handful of useful tutorials and guides shared by experts in the web design and online marketing fields.
Get more to your email
Subscribe to our newsletter and access exclusive content and offers available only to MonsterPost subscribers.

Leave a Reply
You must be logged in to post a comment.