Ultimate Guide on How to Transfer WordPress Site to a New Server
- Migration vs transfer
- How to transfer WordPress site to a new domain?
- How to migrate a WordPress site?
- How to change the DNS?
- How to move WordPress site with the help of plugins?
- Best plugins for moving WordPress site
Have you ever moved from one house or flat to another? I think even those who didn’t face that local Armageddon can imagine it. All those boxes, packages and bags that you have to pack, move and then unwrap. You have to remember not only what and where did you put, but also the exact number of all that stuff (it’s very easy to forget about taking something essential in such a chaos). The same situation is with moving WordPress website to another server.
WordPress migration is not a very complicated task, especially if you managed to build a website on your own. It is slightly easier than moving to a new flat, but the cost of a mistake will be higher. If you will migrate WordPress site incorrectly you can lose all the data and break everything. However, keep calm and don’t panic, with a bit of accuracy and a good step-by-step instruction you will move WordPress theme without a single issue. I can’t influence your accuracy, but I definitely can give you a good guide, so let’s do it.
Migration vs Transfer
To start from the outset, let’s talk a little about the difference between “migrate WordPress site” and “transfer WordPress site”. Did you think those two are the same? Nope, they describe different processes. Those definitions are not official but everyone uses it, so you should know it to name the actions correctly.
When you change a domain (that also means you change a registrar), but leave the website on the same hosting – it is called Domain Transfer.
When you move WordPress site to new host, but stay with your old domain registrar – that is called Website Migration.
When you change both hosting and domain (that could be one service or two separate ones) – it is a Complete WordPress Migration.
Now, when you know what’s what it is time to look deeper at each of them.
How to transfer WordPress site to a new domain?
You have a nice domain name and users already know it. Why could you possibly want to change it? That’s very simple, sometimes domain change could boost your traffic and gain you lots of profit. Here are the main reasons for transferring your website to a new domain:
- .com domain became available. It could be a little funny for you, but the TLD (those few letters at the end of your URL, like .org or something) really means a lot. Domain names like .biz and .info are nice but not as authoritative as the .com. If you can have it, don’t ignore the chance to become more substantial in user’s eyes.
- Memorable URL. If you have a long (more than 25 characters) and complicated to spell website name – you definitely need to change it. Users won’t be able to return to your site if they don’t remember its name, so it is a great idea to make your URL short and memorable.
- More relevant name. If you sell jewelry and your website has a jewelry.com name it will be super easy for a customer to find you and the search results will be really amazing. Of course, all the most fitting names are already occupied, but you can find something close enough.
- Company name changes. That is the only situation when you not only can but must change your domain name. The wrong website name will confuse users and decrease your authority, so you can’t afford to leave the old name, believe me.
I bet something like “C’mon, what about my SEO rankings? I don’t want to lose them!”, already appears in your head. Don’t worry, if you’re accurate and follow the instructions, your search engine rate won’t be harmed. You will have to perform the next preparations:
- Audit the links. If your website isn’t newly created it has a bunch of inbound links. You will have to check if redirection works smoothly for that links, so you need a list. Use the Open Site Explorer tool to get a report about all the links coming to your website.
- Don’t forget about the redirect. All the inbound links have to be redirected to your new URL, so make sure it works correctly. You can find the detailed description of the 301 redirections settling in the “How to Use Redirect 301 Correctly on Various Server Platforms” article.
- Make Google know. There’s a special button for that in the Google Webmaster Tools panel. It will inform the moderators you’ve changed the URL and they will update the information. Here’s a detailed instruction on how to do that.
Now, when we went through the main preparations, it is finally time to transfer WordPress website to the new domain, so, ladies and gentleman, fasten your seatbelts, we’re going for a ride.
The first thing you have to do is back up. The possibility of a situation where you would be needing it while transferring the site is very small, but a backup is always a wise precaution. A regular backup is generally a good idea because something could break when you are the less ready for it (you can use a special plugin and set up a monthly auto-backup to preserve your website). There are lots of extensions that help doing a backup, so get yourself something like UpDraftPlus or Jetpack. WordPress Codex has a great detailed explanation of how to backup your website manually.
When all your data is safe, it’s time to get a new domain name. Buy it from a registrar or get a free one on one of the domain registration websites. If you have any problems with that – check out the “How to get a domain name?” article for detailed instructions.
Now open your hosting account control panel and find the Domain Manager section. Hit the “Domain transfer” button and order the domain change. The system will ask you to type the new domain name and choose the TLD. Press the “Continue” button, write down your Contact Details and that’s all. It will take from an hour to 10 days to transfer WordPress site to a new domain. Details of this step could differ a little at your hosting, so if you can’t understand where to find the “Domain transfer” button or need a hint on what to write into the Contact Details fields, don’t hesitate to ask some help from your hosting provider. When your website will successfully land on a new domain you get an e-mail.
How to migrate a WordPress site?
The answer to “Why people change a hosting?” is almost the same as for “Why people move to another flat?” – because of cost or service issues. The other hosting provider could offer more profitable or convenient conditions, or there may be some problem with the service on the current hosting. One way or another, you are moving WordPress site to new host without changing the domain.
First Step. Pack everything up
When moving to a new house you first pack all your stuff into boxes. When you migrate WordPress site to new host you pack all your data and download it to the computer. There will be two big “boxes” to save on PC: website files and database. Let’s start with the database. Open your hosting Control Panel and go to Databases > phpMyAdmin.
Hit the “Export” tab and choose the database you currently use for your website from the list to the left. There are two export methods and I recommend you to click on the “Quick” one. You won’t need all those customization details for migrating WordPress site. The data you export must be downloaded in SQL format, so don’t change that default setting and press “Go”.
While the database is loading, don’t waste time and open the FileZilla (or another FTP client you have). Connect to your hosting folder and simply copy all the files to your local computer. The only issue can appear with copying the .htaccess file because it is often set to be invisible. You just have to make your FTP client see the invisible files (check the settings, it is almost sure you’ll find the necessary option there). The more media files you added to your website, the more time it will take to download all the files to the computer, so be ready to wait.
Now all your stuff is packed, so it is time to prepare the new flat.
Second Step. Prepare the place
If you move to a new house, you’ll be needing a shelf to put those dozens of teacups there. When you migrate WordPress site to new host you will need a database to import your files. Go to the hosts cPanel and find Databases. You will need either the “phpMyAdmin Databases” or the “phpMyAdmin database Wizard” button.
Both will give you an option of database creation, where you’ll have to create a user, choose database name and type the password. All the steps are understandable, so it won’t be a problem to perform them. Write down the database name, user’s name and password, because you will need them to change the wp-config.
Now you have to prepare the files for moving them into that database. Open the folder where you downloaded all the website files to. In the "htdocs" folder find the wp-config.php file and open it with a simple notepad (a standard Windows one will be quite enough).
It will be a good idea to make a copy of wp-config.php and save it somewhere else on your computer. That file makes describes the connection between the WordPress and database, so if something goes wrong you will be able to restore it. Now, when you opened wp-config.php, look for the following line (you can use Ctrl+F to do it faster):
define('DB_NAME', 'db_name');
Change the `db_name` (the name of your previous database will be written there) to the name of the newly created database. After that seek for the
define('DB_USER', 'db_user');
Instead of `db_user` write the name of your new user. The last change is password. Find the
define('DB_PASSWORD', 'db_pass');
Write your new password instead of `db_pass`. Don’t forget to save the file.
Third Step. Put the stuff on the shelves
The boxes are ready, the place is prepared, so now everything you have to do is place your belongings on the shelves. All the files are waiting for you to put them to a new hosting. The database will be first to fill. Go to the Control Panel > phpMyAdmin and click on the “Import” tab. Hit the “Choose file” button and find your database .sql file on local computer. All the other customization options leave as they are (but make sure that the file format is SQL) and push the “Go” button.
The process of uploading the website files is the same as downloading them to the computer, only vice versa. Open the FileZilla, connect to the hosting and move all the files to the public_html folder. The process will take the amount of time equal to the amount it took to download it to the local computer.
Don’t get too comfortable, the WordPress migrations are not over yet. If, by now, you have some unresolved questions this guide hasn’t answered you (I sincerely hope you will find all the information here, but just in case), check out these 18 best migration tutorials. You will definitely find the missing data in one of that articles. If everything is clear to you – let’s go on to the final stage.
How to change the DNS?
After transferring the site you need to change the DNS to make it available on the new hosting. For that, you need to go to the site where you have registered the domain of the site (your domain registrar) that is being transferred and in the Name Servers settings type in the names of the current server.
Note, that the DNS will be updated within 24 hours. In case you need to check how the new site works right after migration, you should Overwrite the Host HTTP header (on your computer) to request a specific virtual host from a remote server.
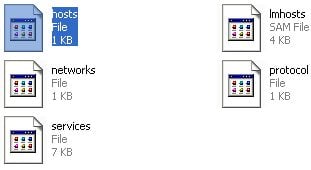
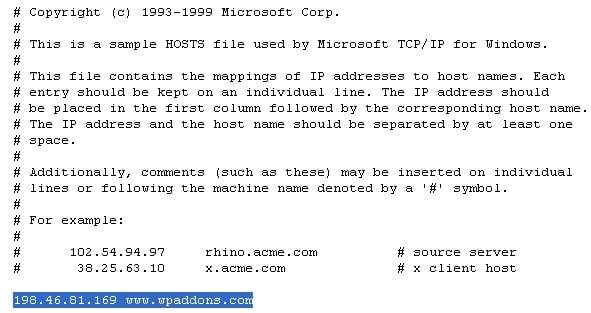
If you are a Windows OS user, go to C:\Windows\System32\Drivers\etc. Open the "host's" file in any text editor (Notepad is still enough for that).
Add the IP address and the domain name of your newly moved site, and save the document.
You will find your IP address in Settings Section of the hosting admin panel
Now, when somebody enters the domain name into the browser bar, the site will be displayed correctly.
How to move WordPress site with the help of plugins?
There's another way of moving the site that requires fewer efforts. If you are afraid to mess everything up or lose some content a plugin that will do the job automatically will save your day.
Let’s take a look at how the migration plugins work on the example of the All-in-One WP Migration.
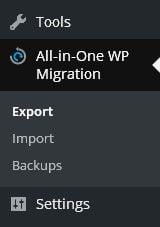
Step 1. That' pretty obvious, that you'll need to install the plugin to use it. To move a WordPress site you need to install it to both old and new hostings. Right after the installation, the link will appear in the left sidebar.
Step 2. Open the Export tab of the plugin (on those one installed on the old hosting), click “Export To” and select “File”.
You will see a notification window that indicates that the files are exported. Click “Download” and save the files on your hard drive.
At this point, we have created a backup file of the website. Now, let’s transfer it to a new hosting.
Step 3. Go to the File Manager and copy the saved file to public_html > wp-content > ai1wm-backups.
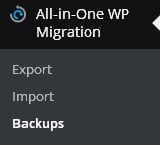
Step 4. Proceed to your WordPress account and open the “Backups” tab of the plugin.
In the new window, you will see the file you’ve copied to the directory.
Step 5. Press the “Restore” button and wait until the installation is complete. You will see a notification message once done.
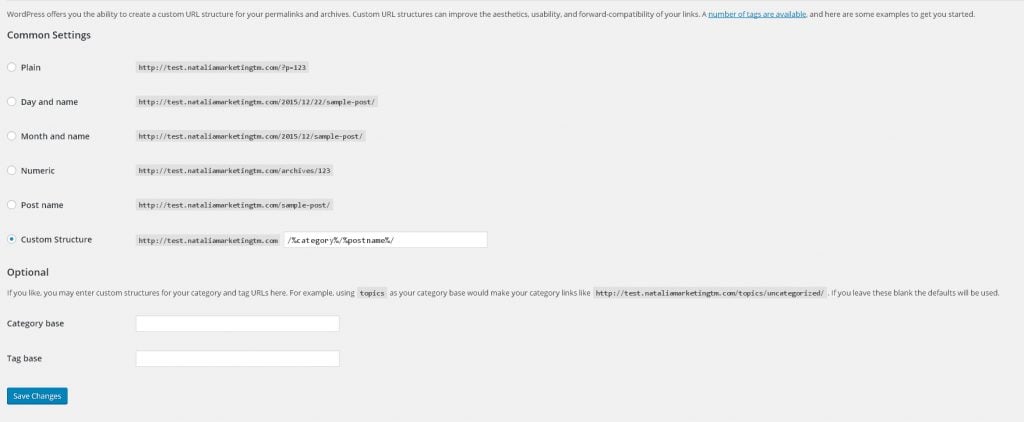
Follow the steps mentioned in the message above. Save the permalinks structure.
The All-in-One WP Migration plugin is available for free, although the free version allows you to import only files that are smaller than 512 MB. If you have a bigger amount of stuff on your website, you'll need to purchase a premium version.
IMPORTANT! If you have any other site installed on the same domain you better back up all the files as the new installation will overwrite the database.
That’s it, now you can check if the site is transferred to the new hosting.
Best plugins for moving WordPress site
Duplicator
WordPress Duplicator has all the features "All in one WP Migration" plugin have. It allows you to backup, transfer and restore the website in a couple of clicks. The free version of Duplicator is perfect for beginners. The developers and professional bloggers may use a premium version that offers a list of additional features, such as multisite backup, active customer support, more storage space, etc. And with our "How to Copy Your WordPress Website With Duplicator Plugin" guide you will migrate WordPress site to the new host in a blink of an eye.
On wordpress.org this plugin got 4.9 stars out of 5.
UpdraftPlus
Updraft is one of the most popular plugins on the Internet. Offers a long list of features that allow users to keep their website safe. The free version will let you backup and restore the site, and the content, although it will make no use for the developers. In this case, a premium version will become on hand as it offers a full range of features to migrate the website, schedule backups, additional storage space, etc. It is also rated pretty high - 4.9 stars.
WP Clone by WP Academy
The WP Clone tool offers a fast and effective way to backup the site and moves it to another server. The plugin is available for absolutely free of charge and will be a perfect fit for both beginners and developers. It also offers a pretty good support from the developers. The tool is ranked 4.1 stars.
WP Migrate DB
The plugin works pretty much the same with the phpMyAdmin tool that allows you to save the SQL files on your computer and move them to another hosting. The PRO version is specially designed for developers and professionals who know what they need from their sites. It comes in several packages that offer multiple installs, support etc.
That's it. Follow these simple steps and you will be able to move the site from one host to another. It won’t take you much time or effort to have the job done.
However, if you still have some doubts about doing that all by yourself and afraid of deleting the site from the hosting, leave this job to the professionals, contact the hosting support center and let the specialists do all the job for you.
Hope you enjoyed the guide and found it useful. If there is something I missed, please, feel free to leave a comment in the section below. Your feedback will help me to improve the article.
Don’t miss out these all-time favourites
- The best hosting for a WordPress website. Tap our link to get the best price on the market with 82% off. If HostPapa didn’t impress you check out other alternatives.
- Monthly SEO service and On-Page SEO - to increase your website organic traffic.
- Website Installation service - to get your template up and running within just 6 hours without hassle. No minute is wasted and the work is going.
- ONE Membership - to download unlimited number of WordPress themes, plugins, ppt and other products within one license. Since bigger is always better.
Get more to your email
Subscribe to our newsletter and access exclusive content and offers available only to MonsterPost subscribers.










Leave a Reply
You must be logged in to post a comment.