Build a User Color Picker with jQuery and Bootstrap
Anyone who is familiar with graphics design software should understand the purpose of a color picker. Some are designed in the form of a wheel, others focus on UI sliders or other features. It basically allows the user to fish through a sea of colors and pick out the specific hexadecimal code they need.
Many online web applications also include this color picker in web forms. Google AdSense allows you to choose colors for your text & links for ad displays. These color pickers are not required on all websites - but when you need one it's smart to use a trustworthy solution. This tutorial is focused on MiniColors, a jQuery plugin for handling user color selections.
Live Demo - Download Source Code
Getting Started
First you'll want to head over to MiniColors on Github and download the zip package. Inside we need to copy some files over into a new working directory for this tutorial. Create a folder named /css/ and copy over jquery.minicolors.css along with jquery.minicolors.png. The PNG image will be needed to render backgrounds for each color picker input.
Color Picker Input with jQuery - Template Monster
Also create a folder named /js/ and copy jquery.minicolors.min.js into it. This plugin runs on top of jQuery so you'll also want a local copy of that library too. If you notice in my code sample above I've also included copies of Twitter Bootstrap libraries. My tutorial demo is running on top of Bootstrap in order to save time coding brand new CSS.
Just head on over to the Bootstrap website and download a local copy. All we really need is a copy of bootstrap.min.css but I've also included the JS file for good measure. Just in case you want to incorporate some dynamic components into your form.
Initial Page Structure
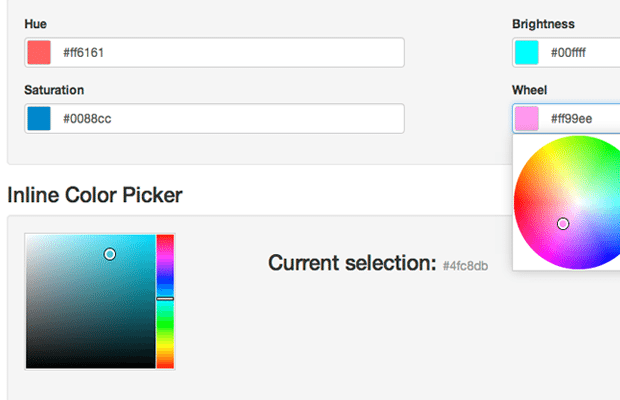
My tutorial example is broken up into two different segments. The first is a plain example of the 4 major types of color selector inputs: hue, saturation, brightness, and color wheel. The wheel has everything displayed in one interface while the other three have a color panel along with a slider.
Twitter Bootstrap can be sliced up into rows using 12 column grids. The class .well renders a grey page section to differentiate from other content. I've built this entire demo using only core Bootstrap styles without any further customization. It's really fun and also educational to anyone who is slightly unfamiliar with how Bootstrap works.
Please notice the attribute data-control is different for these inputs. Using a bit of jQuery we can run codes which automatically detect this attribute and designate which control type is required. Normally you could define a static value because most color pickers would not change once rendered on the page.
Also the value attribute will contribute to the default interface display. You can update this hex value to anything and it will automatically render as the preselected color for that input. Kinda cool huh?
Inline Color Picker
The second section of my page is devoted to an inline color picker which auto-updates the user's choice right into HTML. The MiniColors plugin allows for callback functions to run once the user changes to a new color. I'm using this to auto-append the hex value into HTML every time the inline color value changes.
Current selection: #4fc8db
In this case I'm using the ID value #inlinecolors so we can run the plugin twice on different elements. The plugin options used in the first 4 inputs will be different compared to my inline example. The following div #inlinecolorhex contains a default value which gets automatically updated on each color change.
The class of .form-control is used more within CSS than jQuery. But it is worth keeping on each input and then adding your own secondary class to reference from within JavaScript. That said, I think it's time we jump into the JS code and see how this all comes together.
MiniColors in jQuery
At the bottom of my index.html file I've encapsulated script tags for the initialization functions. Please take a look over the MiniColors documentation which explains all of the various options you could use. Each block is fairly lengthy but I will break them down so we can go over each one individually.
  var colpick = $('.demo').each( function() {
    $(this).minicolors({
      control: $(this).attr('data-control') || 'hue',
      inline: $(this).attr('data-inline') === 'true',
      letterCase: 'lowercase',
      opacity: false,
      change: function(hex, opacity) {
        if(!hex) return;
        if(opacity) hex += ', ' + opacity;
        try {
          console.log(hex);
        } catch(e) {}
        $(this).select();
      },
      theme: 'bootstrap'
    });
  });
I'm initializing a new MiniColors function on each of the .demo class elements. This is saved to a JavaScript variable, but that isn't necessary unless you're referencing these elements later in the code. You will notice the options like control or inline actually use bits of logic to determine the final value.
For example, the control option pulls from each input's data-control attribute to determine how the color picker should appear. opacity is another control which is optional and not always needed. This would include a separate scrubber bar so the user can switch between 0% and 100% opacity on any color choice.
It's very important to recognize the change option calling an internal function. This callback is referenced every time the user changes the value of any .demo input fields. If no hex value is selected then we terminate the function. Otherwise we output the value into console.log() which appears in every browser's JS console.
At the end you'll notice $(this).select() which automatically selects the whole input field value. This makes it easier for users to copy the new hex value and paste into an application or document as needed. There's also a theme option which is set to bootstrap for my example. This will formulate MiniColor's CSS styles for bootstrap or non-bootstrap layouts.
  var $inlinehex = $('#inlinecolorhex h3 small');
  $('#inlinecolors').minicolors({
    inline: true,
    theme: 'bootstrap',
    change: function(hex) {
      if(!hex) return;
      $inlinehex.html(hex);
    }
  });
Thankfully my inline code has been much more simplified because we're only targeting one field. $inlinehex is a variable referencing the small tag which displays our current hex value. This text should be updated every time the user changes hex codes - using a variable means we don't need to create a new jQuery selector every time.
All of the options should appear familiar as in the previous code snippet. The change callback function has been slightly updated. This time whenever there's a new hex value we don't output in the console, but instead replace the $inlinehex value with jQuery's .html() method.
Live Demo - Download Source Code
Closing
After testing out many jQuery plugins each month, MiniColors has to be one of my favorites. This is definitely an obscure plugin but it provides exactly the kind of support you would expect for a native browser color picker. I hope this tutorial can illustrate the process of embedding this input field within any web form. Feel free to download a copy of my source code and try building your own unique color picker ideas.
If you already have an HTML website with an existing admin panel, check out our Bootstrap Admin Themes to spice it up with some Bootstrap functionality.

First it was design, then writing, and now affiliate marketing. Over a period of 6-7 years he wrote a lot of content for many websites. You can reach Jake on Twitter.
Get more to your email
Subscribe to our newsletter and access exclusive content and offers available only to MonsterPost subscribers.

Leave a Reply
You must be logged in to post a comment.