How to Add an Attractive Headline with an Image Inside the Text with JetElements
A catchy headline is just as important as a friendly invitation for a party or the opening of a new shopping center. Make sure that your headline is nice to look at and inviting to your visitors. After all, it’s the first thing people pay attention to, especially while being in a hurry.
As a rule, any effective headline is responsible for:
- Being search engine optimized. (That is really good for increasing the quantity and quality of organic traffic to your website.) How else can your message (an advertisement, article, or a blog story) reach people on the Web?
- Being an attention getter. It is important that in a sea of similar articles, yours stands out the best.
- Plunging a reader into the story. (No secret here!)
- Emphasizing the main theme of the story
As for the latest trends in web design and recommendations for better content awareness, the recommendation is visualization. Beautiful images not only make your page more eye-pleasing but also more understandable. Still, how can you make a modern looking headline with an image inside the text?
That’s not a challenge for the striking number of Elementor Page Builder supporters. Truly, it is one of the most useful WordPress page builders. Elementor can also be enhanced with varied add-ons for more effective and stress-free work. It won’t take you long to find all the great features here → WordPress Elementor Plugins.
If you are not skillful enough with Photoshop you can always add a picture to your headline using JetElements. It’s a cool layout created to accomplish your goals with WordPress Elementor. This plugin adds many modules to the existing Elementor features and allows you to overlay web pages on several blocks of content.
Here is the instruction on how to add a unique new headline with an image inside the text. As well, don’t forget to watch the tutorial video made by ZEMEZ team below.
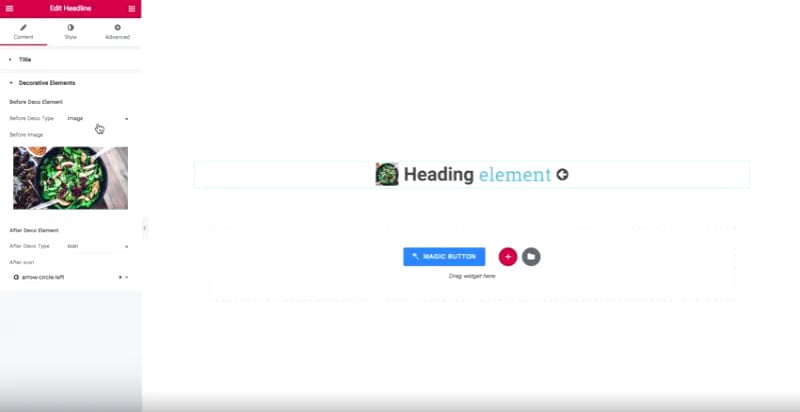
- Having started your work with Elementor, drag the Headline Widget and drop it somewhere on the top of your page where the blue line is visible.
- From here, you start editing your title which consists of two parts (Heading and Element). There are three steps to control all the available settings of the Headline Widget: Content, Style, and Advanced Settings.
- Working in the Content Section you can easily add a link to make your headline clickable. Or, you can choose some decorative elements. They are Icons and Images. Feel free to choose which one you want to add to the first and second part.

- To make some more interesting effects, try changing the size and headline position. Check the HTML tag in the Content Section but without adding any pictures just yet!
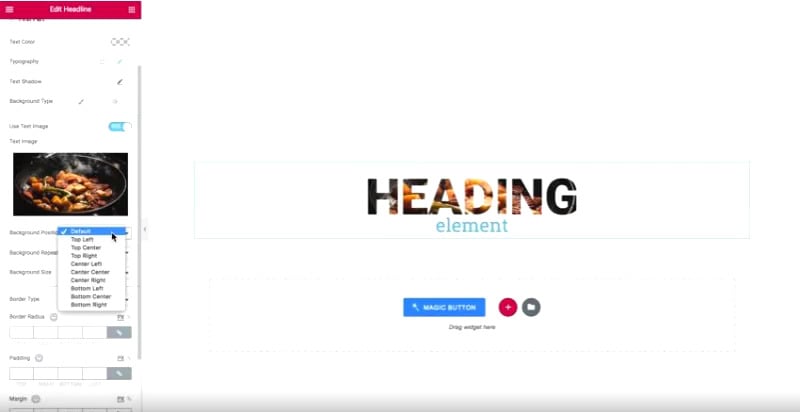
- Now, go ahead to the Style Section. Here, you can see such options as Direction, Background Type, Margins, and Border Radius. You need to work on the style for both parts of your title (Heading and Element) separately.
- Pay attention to Direction Option and decide what is better for you–vertical or horizontal position of the headline parts.
- Make some changes to the Margins letting your Heading and Element overlay each other.
- For your title, choose any Google font you like and make it large enough to fit an image inside the text.
- Now find the option called Use Text Image. Choose the picture you need and watch it work. From this point, parts of the chosen image should be inside your headline.
- You can also make adjustments to other settings by going to Advanced Settings. Here, you can adjust the border type, background position, and size.
- If you like the result, just save it.
So, without Photoshop and other different programs, you can see just how quickly and easily an attractive original headline can be made with JetElements. There are many more features available. Don’t hesitate to check it out!

Read Also
Elementor Tip: Image inside Text – Elementor Tutorial
How to Add Contact Form 7 Using JetElements Add-on for Elementor – Tutorial
How to Create a Responsive Parallax Scrolling Effect with Elementor

Get more to your email
Subscribe to our newsletter and access exclusive content and offers available only to MonsterPost subscribers.

Leave a Reply
You must be logged in to post a comment.