


Austin Kleon is a genius. He gave all creative people that have writer’s block the best possible advice – “steal like an artist.” He’s not saying that you have to steal someone’s else idea, but rather that you can be inspired by someone’s work and receive a powerful kick that will skyrocket your imagination. Yeah, it’s an obvious recommendation, and some of you undoubtedly searched for new ideas not only in other people’s works but also in natural patterns. And now you can use this advice to get some new ideas and create a WordPress blog that will rock.


Here’s what we’re going to do: I’ll search for a popular blog that has an interesting element you could “steal” and describe how can you build it into your website the easiest possible way. You take the cases you loved the most (if that helped to make your blog awesome - don’t forget to mention it in comments, I will be really honored), perform it and observe the traffic growth.
Now, a few words about the tools. I created a sample blog on WordPress (in this article you can read how to do it without spending a single dollar) and customized it with Elementor Page Builder. That was fast, convenient and easy, so I guess you should do it the same way. The building process could be completely free, and the only paid thing I will be using is JetBlog plugin for Elementor. The reason for using it is the increase in speed it provides. You don’t pay much, but get a set of ready-made elements to embellish your web-platform. I evaluate time as the most precious resource, so that’s why I’ll recommend you get a JetBlog Elementor plugin too. You will need it to repeat my actions.

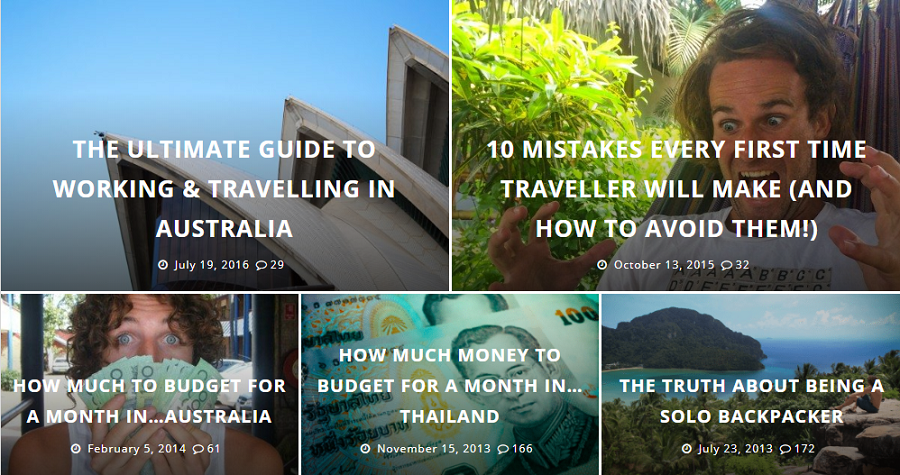
HuffPost. Elegant posts list

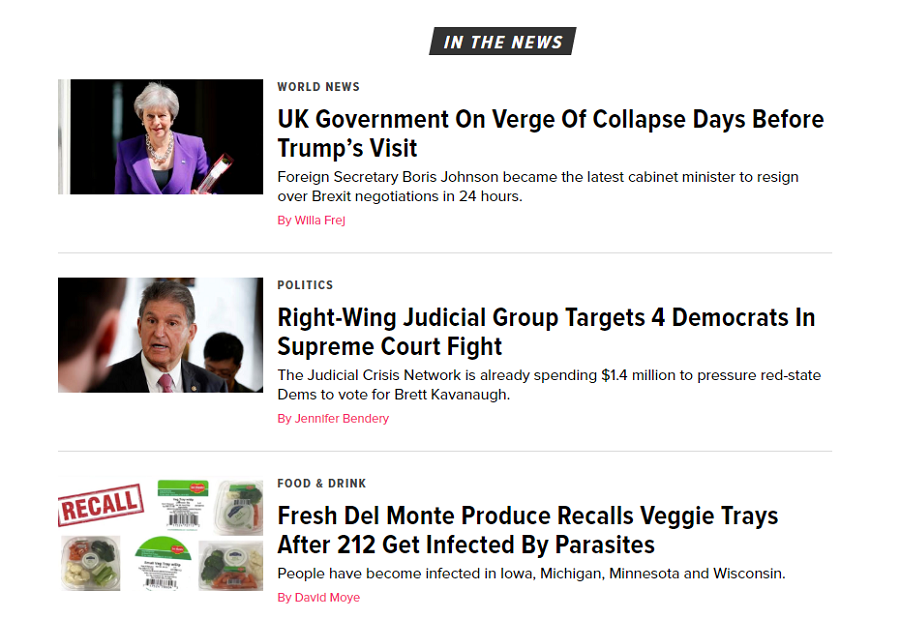
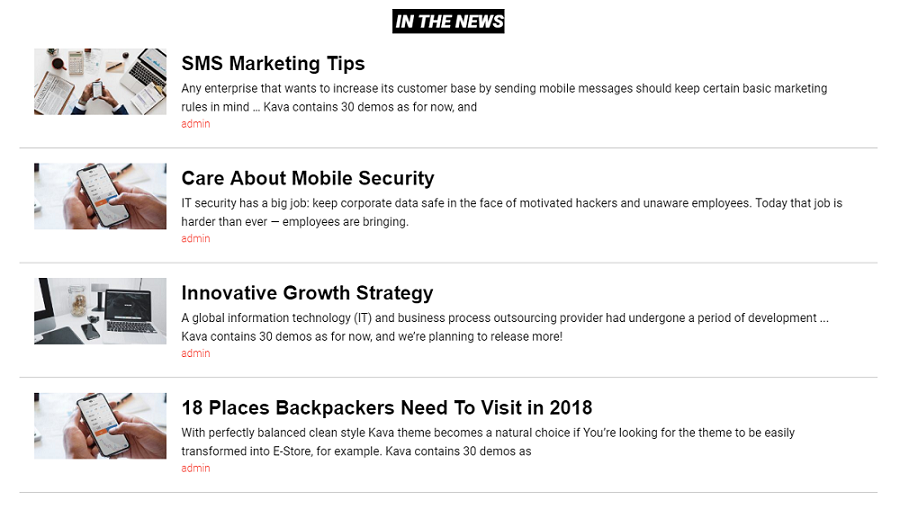
Elegant and accurate, just like a newspaper has to be. Huffington Post is in the top of most popular and readable news blogs on the internet. A big part of its success is an accurate and easy to navigate design. With JetBlog plugin you will be able to create almost similar posts list as HuffPost have. Here’s what I came up with:

The only difference is that you can’t show the posts category the way it is shown in the HuffPost list. All other features are just the same. So, let’s take a closer look at the customizations I made and sort out the instructions about how to create the same posts list.

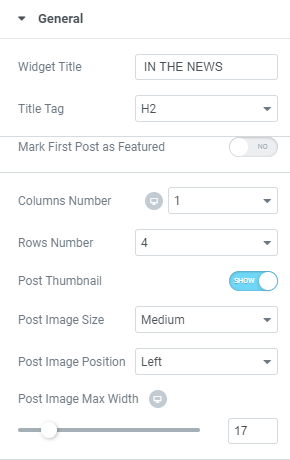
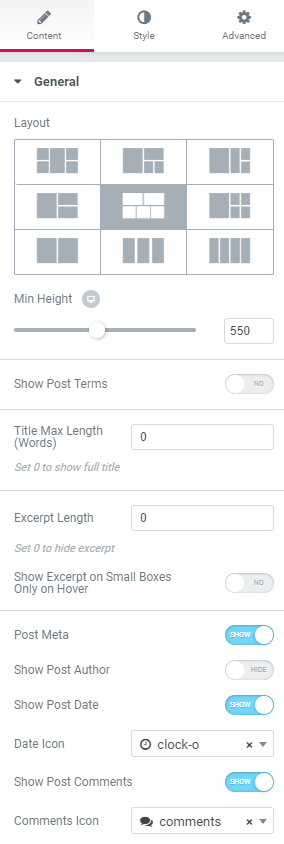
First, you need the “General” section of “Content” tab. I will mention only those settings that I used for this post list, and if you would like to know more about others – go through the documentation that goes with the plugin.
Widget Title. That’s how the whole list will be named. The title is shown at the top of the list and to match the HuffPost I typed “In the news”.
Columns Number & Rows Number. Those define how many posts will be shown in the list and how much columns they will be organized into. You can leave it as it is by default.
Post Thumbnails. With this switcher, you can show or hide the featured pictures of the posts. You can get rid of them, but IMHO it’s much prettier with the picture. And to make the same postІ list as Huffington has you’ll need them one way or another.
Post Image Size has to be “Medium” because that is the smallest of available. Choose the “Left” Post Image Position and set Post Image Max Width at about 17.

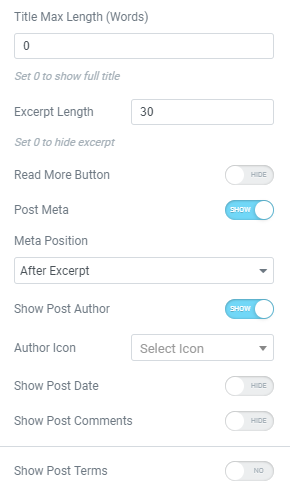
Leave Title Max Length as it is by default (when there is “0” in the bar the whole title is shown) and set Excerpt Length at about 30 – that’s the text under the title. When writing posts keep in mind that number and combine the first phrases to match it.
Post Meta has to be switched to “Show” position (if you turn it off the author, date, and comments won’t be shown at all) and Meta Position set to “After Excerpt”. For the posts list similar to Huffington’s only the Show Post Author has to be switched on, another meta has to be left hidden.

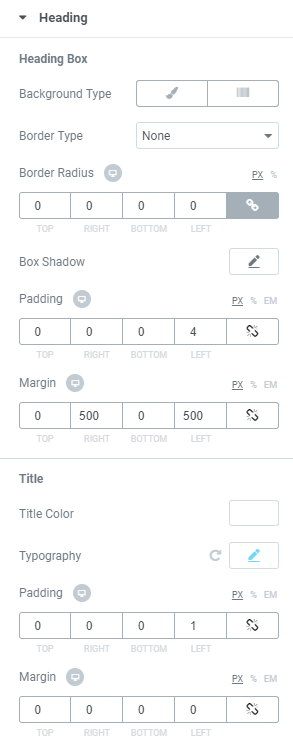
When you finish setting the basic settings the time will come for some styling. Go to “Heading” section of “Style” tab. To create a fancy black box with the white title, choose the “Classic” Background Type. In the drop-down options set the solid black background color. To make the box smaller set the right and left Margin to about 500 and center the title with a little Padding. Title Colour has to be white and in Typography drop-down do the next settings: Size - 24, Weight - 800, Style – Italic.

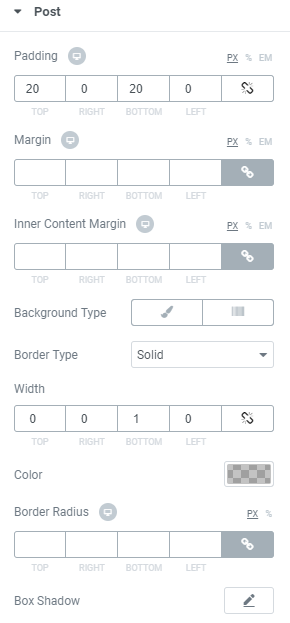
To insert that elegant divider between the posts, go to the “Post” section of “Style tab. Some Padding (20 will be enough) at the top and bottom of the post will make it less crowded. Choose the “Solid” Border type and set the “0” Width to all sides but the bottom. Huffington has a narrow and sophisticated divider, so I did the same. Choose the grey colour and make it light with a special slider.

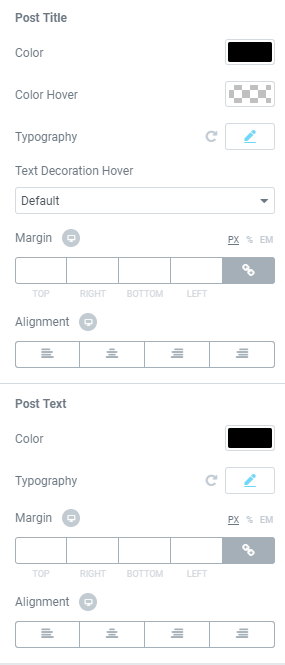
Choose the black color of Post Title and set the next Typography settings: Family – Arial, Size – 27, Weight – 600, Letter Spacing - -1.1. You also have to make Post Text colour black and do the next Typography customization: Size – 15, Weight – 400.

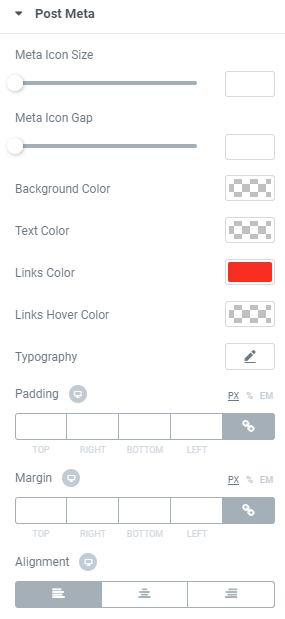
To add the bright red author meta go to “Post Meta” section of “Style” tab. Since it is a link, set Links Colour to red, and that will be the end of creating the HuffPost-like posts list on your blog.


Backpacker Banter. Eye-catching post tiles

Since I can’t go traveling by myself, I like to read travelers blogs. One of my favorites is Backpacker Banter, his detailed articles about life cost in different countries are great. He also built a nice website design, that catches visitors attention. Post tiles with big, sharp photos will definitely make your blog more efficient, so I used Smart Posts Tiles of JetBlog Elementor plugin to show you how you can add the same feature to your website.

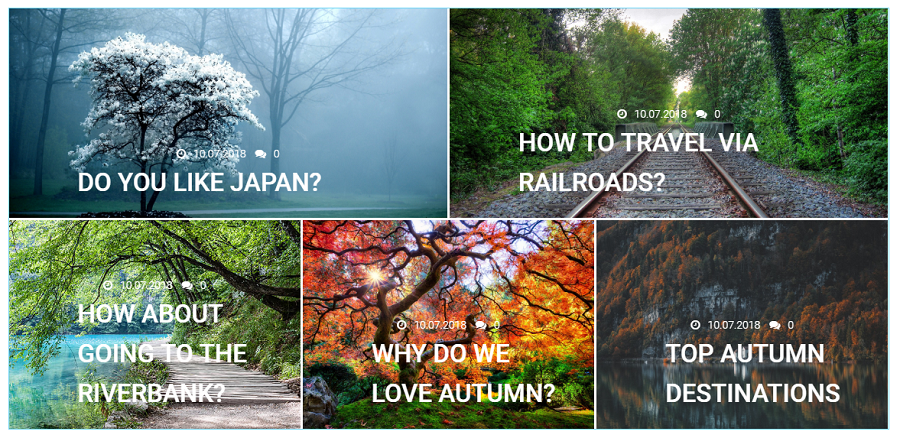
You start from the “General” section of “Content” tab. Choose the Layout that has two tiles at the top and three in the bottom. Min Height should be about 550 to look accurately. Set the Excerpt Length to “0” and hide all the text except the title. Switch on the Post Meta and then choose to show the author and comments. There are lots of available icons for meta, so choose those that are similar to the ones Backpacker use.

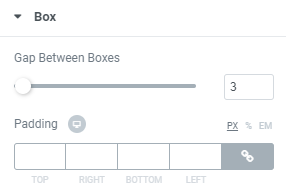
Now, let’s add some style. In the “Box” section of “Style” tab set the Gap Between Boxes to 3.

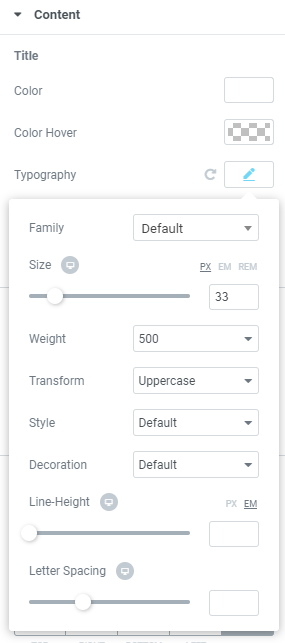
In the “Content” section set the color of Title to white. The Typography settings: Size – 33, Weight – 500, Transform – Uppercase. Set the Margins to center the title on the tile.

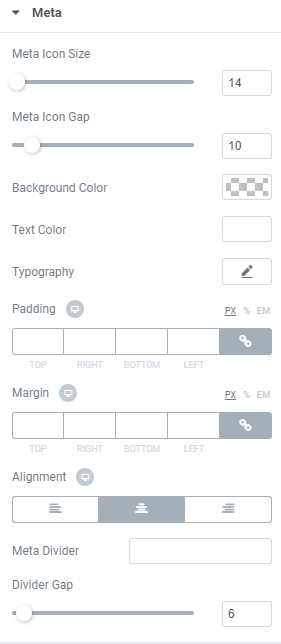
To make the date and comments visible in the “Meta” section set the Meta Icon Size to 14 and Meta Icon Gap to 10. The Text Colour should be white, Alignment changed to central and Divider gap set to 6.

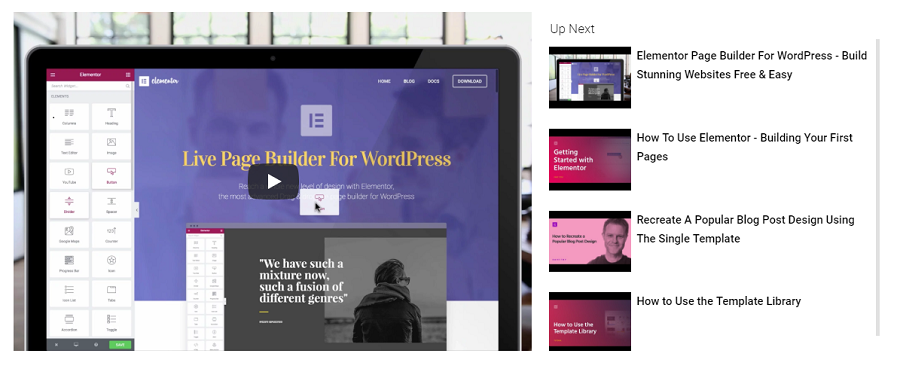
YouTube. Understandable video playlist

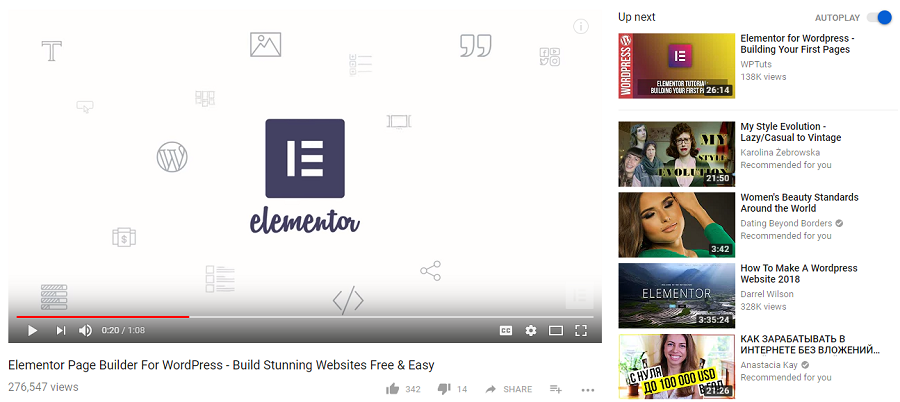
I’m sure that you went to YouTube for tutorials or other useful information at least once during this month. Dozens of vloggers have their channels there, and if you do videos, you should place them there too. And, to make it more efficient, you should also place your videos to your website, so that your visitors will not only know you, actually, do videos, but also get the opportunity to watch them without going to YouTube – directly on your site. Here’s how you can do it with JetBlog plugin.

You will need the Video Plugin widget, so drop it to the workspace and open “Items” section of “Content” tab. Add your YouTube videos titles and URLs to make them visible. The more videos you add, the more videos will appear on the list.

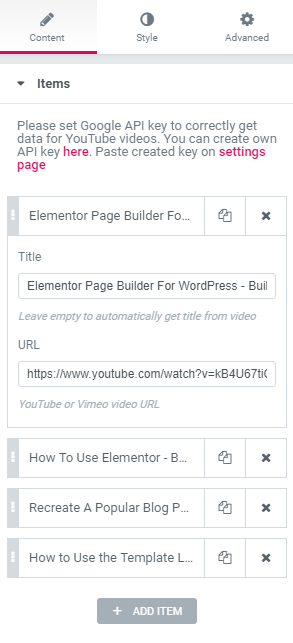
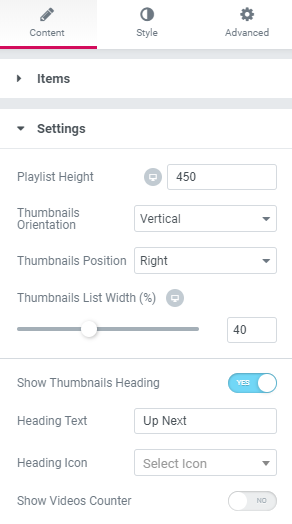
In the “Settings” section set the Playlist Height to about 450 – this value is ideal for an accurate look of the widget. Thumbnail orientation should be “Vertical”, Thumbnail Position to the “Right” and Thumbnail List Width about 40%. Choose to Show Thumbnails Heading and type the video lists title. I’m trying to repeat YouTube, so I typed “Up next” there.

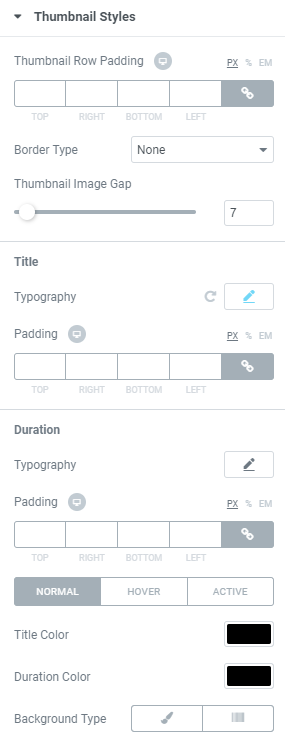
In the “Thumbnails Styles” section of “Style” tab set the Thumbnail Image gap at about 7. Title Typography: Size – 15, Weight – 500, Line-height – 25. Don’t forget to set the black color of Title text.

Wrapping Up
JetBlog Elementor plugin could help you add some more interesting features that are not usually used in blogs. For example, you will be able to add a cool Post Pagination slider or the latest news Post Ticker. Elementor has a vast amount of tools that could help you make your blog absolutely divine. That’s all up to you, so good luck!
I hope that some of these cases helped add an interesting feature to your website. I would be really pleased to hear about your experiences and, maybe, I could add some information about your experiences in this article. Feel free to leave comments.
Read Also
JET Plugins for WordPress Elementor Builder [Review]
JetElements: Build a Better Website With Our New Elementor Add-on
WordPress Developers about Elementor Builder Pros and Cons [Is The Game Worth the Candle?]
Elementor Marketplace Just Hit the Web Templates Market
10 Lit WordPress Themes With Elementor Page Builder To Try in 2018