MailOptin Review – WordPress Email Opt-in Form Plugin
Retaining visitors on your website is one of the hardest puzzles to crack; it is crucial to the success of any online business. Without a doubt, SEO and social media traffic are great options, but once you have a new visitor on your website the natural desire is to keep them coming back.
To do this, you need to build an email list; a challenging task for people without the right set of tools.
Your strategy determines success in building an email list; it involves the wise use of the best lead generation tools, and this is where MailOptin comes in.
Discover MailOptin
MailOptin is a lead generation plugin that has altered the way people interact with opt-in forms. It is built to make list building very easy. This is achieved with some built-in features that ensure conversion is maximized.
In fact, many email marketers claim to have increased their subscription from 300% to 700%. It is hard to doubt the authenticity of the numbers because the plugin brings several functionalities and diversity to the aspect of list building.
MailOptin is built by the same team that created ProfilePress, a widespread custom registration and login form WordPress plugin. Their team surely knows their onion and have created another impressive plugin that’s shaping the way lead generation and email automation is done.
Unlike other alternatives in the market, MailOptin goes a step further to ensure your email list subscribers, readers or customers are nurtured and engaged continuously using its suite of event-triggered and automated emails such as new post notification and email digest with lots of other automation continually being added.
Let us see some of the exciting features in MailOptin.
Some Key Features of MailOptin

The moment you install and activate the plugin on your WordPress site, you will have access to the following features. Note that they are by no means all the features in MailOptin but the ones I consider notable.
- Beautiful, professional, customizable opt-in form templates.
- Multiple high-converting opt-in types.
- Email triggers such as “new publish post” newsletters.
- Page-level targeting.
- A/B testing.
- Exit intent technology.
- Display rules.
- Optimized for small screen devices.
- Integration with major email marketing services.
- Create hyper-targeted opt-ins and schedule them.
- Click link trigger.
Installing The Plugin
Just like any other WordPress plugin, installing MailOptin is easy. After uploading the plugin’s installation file, activate it to reveal a new menu labeled “MailOptin” added to your WordPress dashboard sidebar navigation.
Pricing
As at the time of writing, MailOptin has two paid pricing plans. The Standard plan is priced $69 for a single site and $99 for up to three sites usage. Users on this plan will have access to unlimited opt-in campaigns, exit intent, click launch trigger, one-year support and lots more.
The Pro plan is $199 per year and comes without restrictions. This license key will give you access to all features in the Standard plan such as ad-block detection, opt-in scheduling, Lead Bank, Advanced Analytics/Reporting, priority email support and lots more.
There is a Lite version of MailOptin available for free in WordPress plugin repository. Get more information about the pricing and features on the pricing page.

Opt-in Types
Take advantage of MailOptin multiple opt-in types to grow your email list. Whatever strategy you intend to implement in your list building, the plugin has got you completely covered.
The lead generation plugin has the following opt-in types for improved conversion:
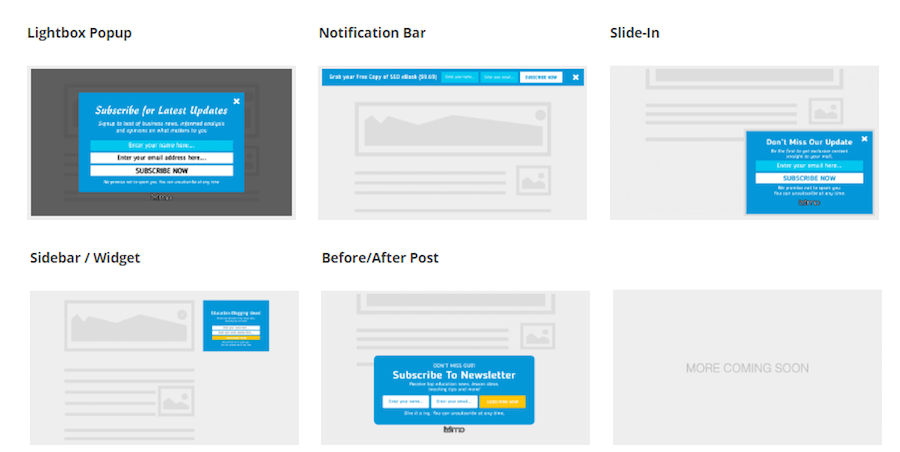
- Lightbox: This is one of the best and oldest forms of building an email list. It is easy to create popups or lightbox in MailOptin as it requires no coding knowledge.
- In-Post Email Signup Form: MailOptin allows you to create and display opt-in forms either before or after your posts and pages content.
- Notification Bar: You can also display enticing call-to-action and lead capture forms on your sites with notification bar, also known as the top bar or hello bar. This notification bar can either stick on the top or bottom of your users’ screen.
- Slide-in: This opt-in form appears at the bottom corner of your site. Combined with the scroll trigger display rule, you can choose to display the opt-in in your blog posts after readers have scrolled to a given percentage depth.
- Sidebar/Widget: Sidebar opt-in form is generally for the sidebar placement; you activate it from the WordPress widget area.
Setting Up MailOptin for The First Time
After the installation and activation, set up the plugin and start creating opt-in forms in few minutes.
There is no complicated setup for the plugin, and its options are straight-forward. Each option describes its functionality simply, so it is impossible to get stuck when setting up the plugin.
On your WordPress admin dashboard, you will find MailOptin and a couple of links, the first thing to do is to connect the plugin with your email marketing service provider.
The plugin has support for a lot of email marketing services including MailChimp, Sendy, Constant Contact, Campaign Monitor, Drip, MailerLite, GetResponse, ConvertKit, and AWeber.
Here, we have connected to MailChimp.
The next step to create an opt-in campaign which is equally easy. All you need do is click the “Optin Campaign” menu, select a template and then, you will be redirected to the form builder where you can customize the opt-in form to your heart content.
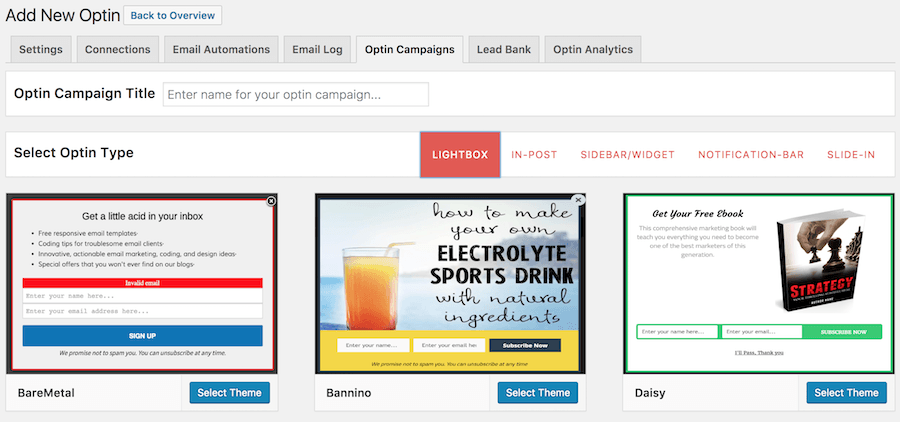
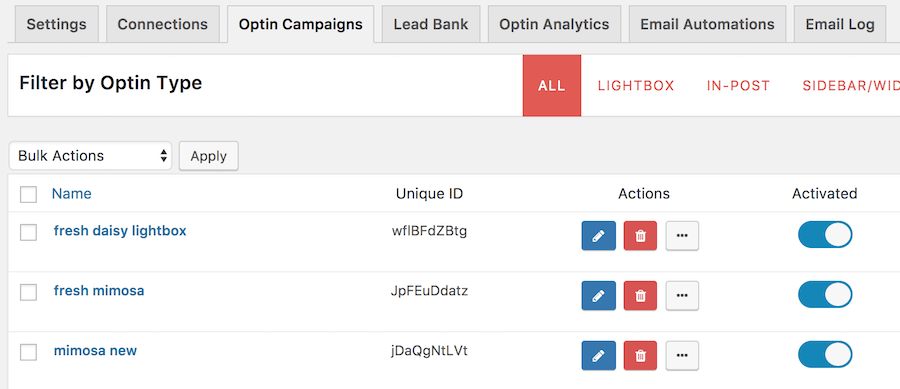
Once your opt-in campaign has been created and you have selected a template, click the “customize” button on the opt-in campaign list to begin your full customization process.
There is a live editor that shows your customization progress. You can change everything on your opt-in form; there are no limitations when it comes to styling your email opt-in form. Some of the things you can customize are the message, the image, the image orientations, borders, effect, and colors.
Once the styling is complete, you can start using the plugin’s advanced control to convert your opt-ins into smart forms. These advanced controls are determined by the plugin’s Display Rules which make your opt-ins be triggered based on your visitors’ interaction.
There are a lot of display rules for your opt-in campaigns, but you still need to set it up as you so wish. For example, you can force your opt-in forms to be triggered “only” after a user has spent a certain amount of time on your site or visited a specific number of pages.
Now that your opt-in form has been created, the final step is to activate it so it will start displaying.
Exit Intent
The use of Exit Intent trigger is one of the smartest and highly efficient ways to build your email list and convert visitors into customers without being intrusive. This feature displays your opt-in campaign at the precise moment your visitor is about to leave your website.
Shortcode and Template Tag Embed
Embedding your opt-in form anywhere on your website is also possible. You can either use shortcode or template tag.
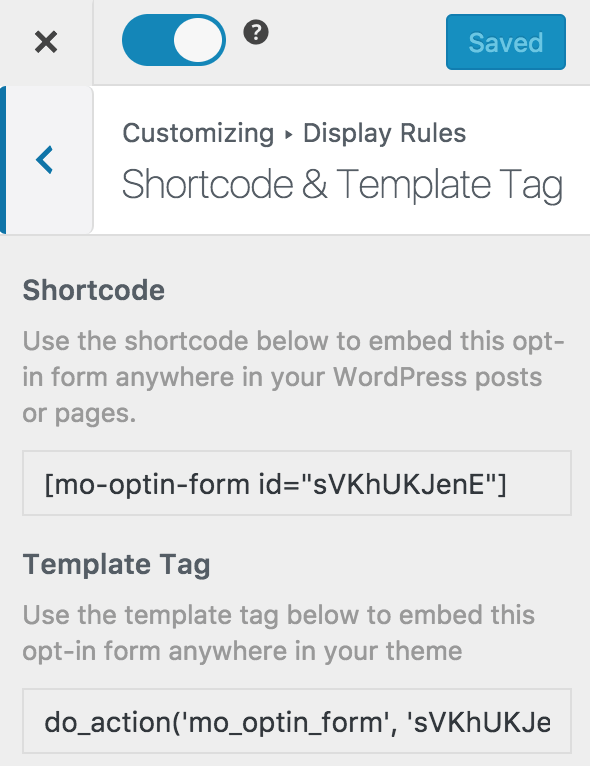
The Shortcode option is used to embed opt-in forms anywhere within your posts and pages while the template-tag embeds opt-ins anywhere within your WordPress themes.
Actionable Insights & Analytics
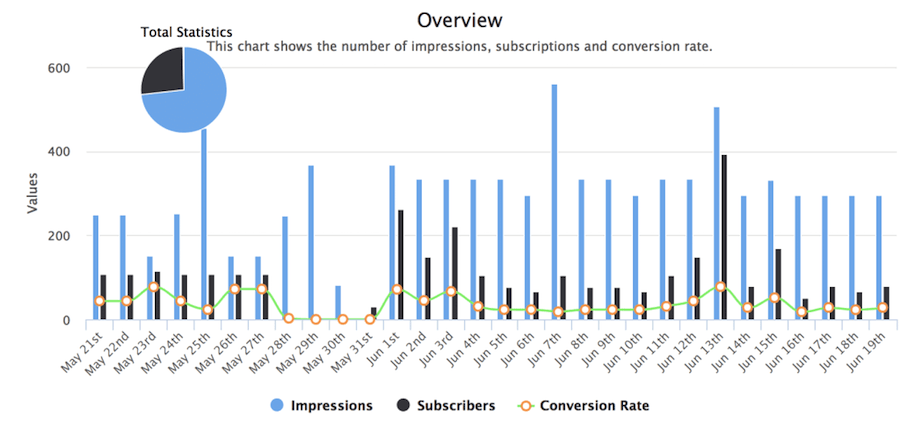
The built-in analytics will give you information about the number of impressions and the conversion rate. This piece of information is convenient and can be used to track the performance of your opt-in campaigns.
This way you are not working in isolation or with assumptions, you can always modify opt-ins with poor results and test again until you get the desired result.

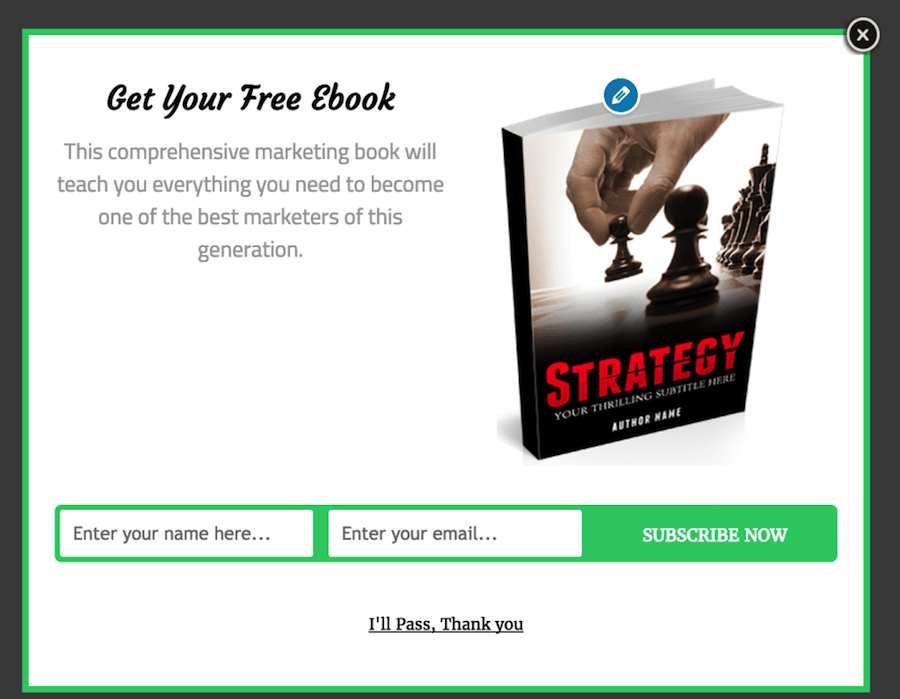
Click Launch Trigger
One of the best ways to quickly grow your list is to offer incentives to your visitors. These incentives could be downloadable content, a free game, access to report, or anything enticing to your visitors.
In doing so, visitors have to subscribe to your mailing list before they get the offer. This is what MailOptin click launch trigger is designed to do.
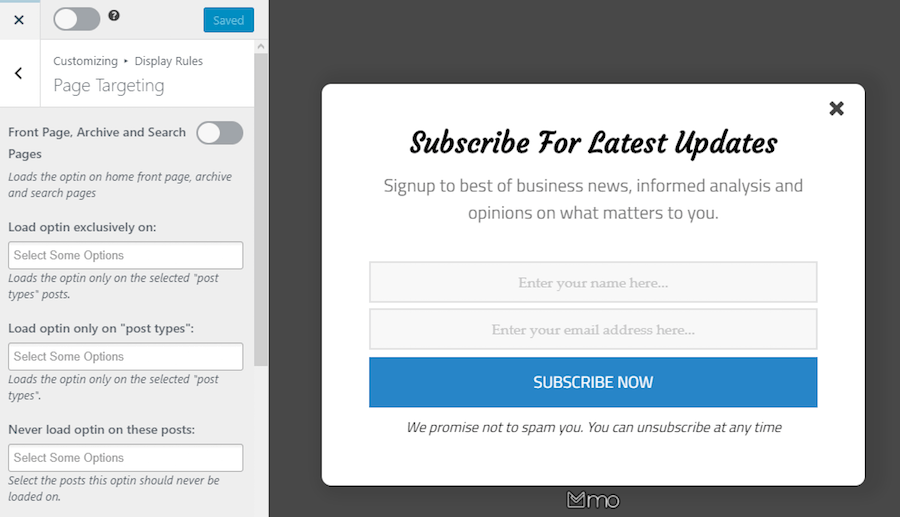
Page-Level Targeting
MailOptin makes segmenting emails very easy. With the page-level targeting feature, you can separate your email list and create a group based on your visitor’s intent.
You can build a target audience because you can trigger opt-ins on a specific page in your site. Eventually, you will have created a system where relevant emails can be sent to your target audience which in turn improves click-through-rate.
Wrapping Up
MailOptin is a complete lead generation solution that is capable of monstrously growing your email list quickly. It is straightforward to set up. In few minutes, you can start creating opt-in forms.
Besides the features mentioned above, there are many others. For example, you can set up “After Conversion,” which gives your opt-in forms a predefined outcome after a user has subscribed. You can force the opt-in to disappear or redirect the user to another URL after signing up.
There is also a scheduling feature that allows you to schedule your opt-in forms to display within a period.
If you want an easy solution that monstrously grows your email list through email automation and keeps people engaged, get MailOptin today.
Read Also
AWeber Vs. MailChimp: Email Marketing For WordPress
Best WordPress Popup Plugins For Email Form
Top 5 Email Marketing Plugins for WordPress
5 Free Email Marketing Plugins for Your WordPress Blog
How to Build a WordPress Website in Under 40 Minutes?

Posting contributed articles about the major web design highlights and novelties. Come across a handful of useful tutorials and guides shared by experts in the web design and online marketing fields.
Get more to your email
Subscribe to our newsletter and access exclusive content and offers available only to MonsterPost subscribers.

Leave a Reply
You must be logged in to post a comment.