How to Add Before and After Images for Comparison with Elementor
Today you’ll learn how to add the Image Comparison widget to your website with JetElements plugin. This plugin is the most multifunctional among all Elementor add-ons. It has a lot of high-quality content elements which you can use while building your site. Before we start, make sure that you’ve installed JetElements plugin and open your site in Elementor. Today we’re going to create something awesome!
- Look for the Image Comparison widget in the search field.
- Then grab it and drop it onto a new section.
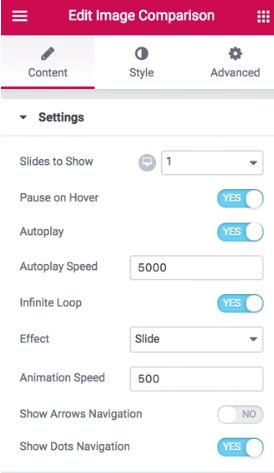
- On the left in the sidebar menu, you will see the settings block. Here, you can increase the number of slides to show.

- You can toggle the Pause on Hover option to “yes” and the slide will pause once you hover over the image.
- Also, you can turn on the Autoplay and adjust its speed.
- Toggle Infinite Loop to “yes” if you want your slide to change infinitely.
- Then you can opt for either slide or fade effect.
- The next step is Show Arrows and Dots Navigations. These are the two options that will help you make the navigation more intuitive and user friendly.
- Now, let’s go ahead to the Items block and add images.

- By default, the labels are called “Before” and “After”. However, you can change them to whatever you need.
- To add images just click on “Choose Your Image” and upload a picture from Insert Media.
- After the images are added, you can change their ratio simply by grabbing the slides divider in the center and pulling it to any side.
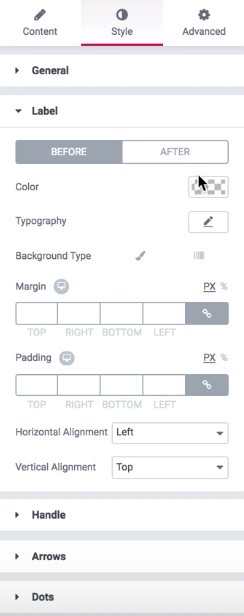
- Now, move to the style settings.
- To change the look of labels go to the second tab.

- Here you can change the colors of before and after labels separately, their horizontal and vertical alignment and background type.
- Next, go to the handle settings. You can control its width, height, background color, and the handle arrow type.

- In this block, you can also customize different parameters (including starting position) of the divider between those images.
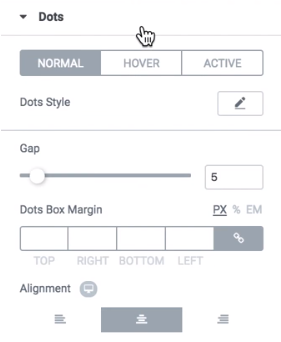
- And the last two blocks are style setting of the arrows and dots that allow you to control the slider. These settings should be familiar to you if you have ever created the slider with JetElements.

On the market, there are also many subscription services you can get multiple tools from. But have you ever seen so many web products in a single bundle like in ONE? TemplateMonster has entered the market with a brand new, flagship subscription service including 8,500 items. This is a service with the fullest product range ever including WP themes, plugins, graphics, extensions, eCommerce, and other templates.
Its cost will definitely impress you because you’ll have to pay only $19 per month. This is less than if you purchase multiple templates separately for different projects. And if you are a regular MonsterPost reader, you have a chance to save on subscription a little bit more. With promo code BecomeThe1, get a 5% discount on the service.
Final Word
And now we’re done creating images comparison with the help of JetElements plugin. I hope you've enjoyed this guide and found it useful.

Read Also
How to Create a Countdown Timer with Elementor Page Builder
Image Accordion on WordPress with Elementor
Add Instagram Feed to WordPress Page with Elementor Page Builder
5 Image Manipulation Techniques You Can Use to Cut Load Time by 80%

I'm an Elementor lover and a specialist in TM templates. It is much more convenient to get a theme from a thematic listing than seeking it by yourself, isn't it? Everything for your convenience! Victoria Maksimenko on LinkedIn
Get more to your email
Subscribe to our newsletter and access exclusive content and offers available only to MonsterPost subscribers.

Leave a Reply
You must be logged in to post a comment.