The All-in-One Guide on How to Animate in After Effects
- After Effects Basics: What can You do with Adobe After Effects?
- How to Move from Photoshop to After Effects
- How to Create and Animate Text in After Effects
- How to Create Custom Transitions in After Effects
- How to Create Animated Backgrounds
- How to Create After Effects 3D
- Adobe After Effect Animation Templates
Looking for a guide on how to animate in After Effects? Great! You are in the right place at the right time because this is advanced After Effects tutorials for beginners and proficient Adobe users.
In this article, you will discover tips on how to create:
- After Effects animation
- animated text
- custom After Effects transitions
- animated backgrounds
- After Effects 3D
Also, you will learn to solve some technical issues. For instance, you will find out how to move a video or an image from Photoshop to After Effects. Finally, you will find a couple of inspiring intro templates!
Before striking into the subject, let us explain to non-techies what the application constitutes.
After Effects Basics: What can You do with Adobe After Effects?
Simply put, it's a mix of Adobe Premiere Pro and Photoshop. If you are familiar with color effects, masking, blending mode capabilities for images in Photoshop, you can imagine that very similar effects can be applied to video footage with After Effects.
First, you make basic editing (e.g. layering and chopping video footage together and adding simple transitions) in Premier. You deal with a production of raw video edits. Then, you dive into advanced configurations with After Effects. You deal with a post-production process.
What can you do with Adobe After Effects?
This application is commonly used for keying, tracking, transitions, 3D effects, and light particle. You can apply the effects not only to the video footage but also to the images, audios, and other files moved from Adobe Photoshop, Illustrator, Premiere, and other 3D programs to create video presentations.
So, Adobe After Effects is used for:
- post-production
- visual effects
- motion graphics
- animation sequences
Together with Adobe Premiere Pro, After Effects represents a powerful software tool for video editing and animation.
Adobe Premiere Pro is the first step in video editing. Once you make basic editing, you export footage to After Effects (further you will find out how to do it). There, you can configure color parameters, add visual effects, audio, and motion graphics.
That was the answer to the question “What can you do with Adobe After Effects?”.
Now, let’s take a look at the After Effects interface:
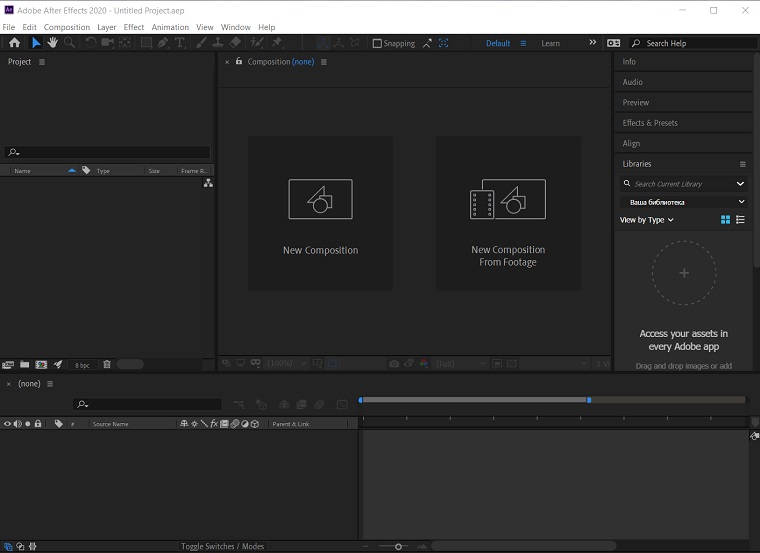
Don’t worry if you use another version and your interface doesn’t look like that. There might be small differences but the functionality is the same.
The interface might look confusing first but let’s divide it into 5 sections and figure out what they are responsible for.
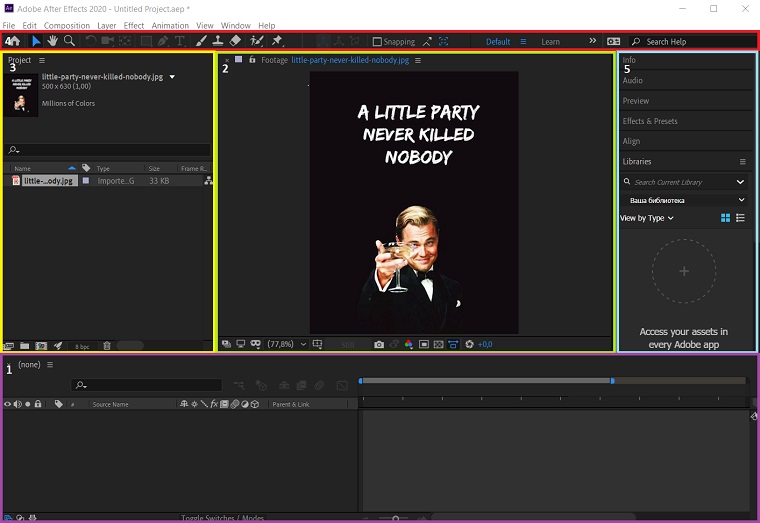
- Timeline panel
- Composition panel
- Project panel
- Tools panel
- Works panel
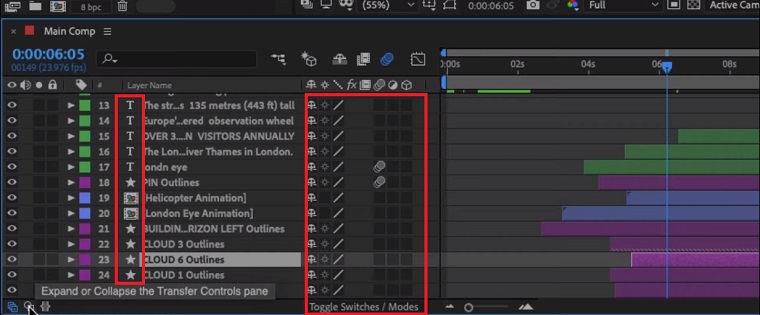
The timeline panel is the main one. There, you will manage the elements of the project. It consists of several sections.
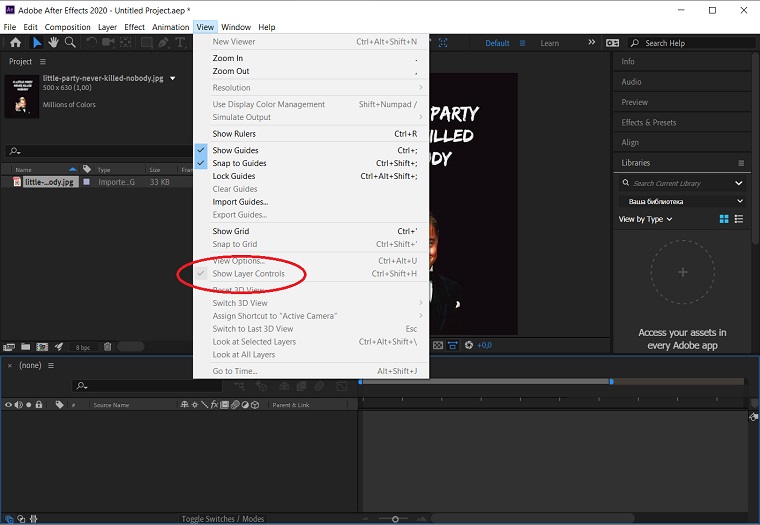
The first one is the timeline that shows the length of a project. Below, you will find layers – each of them represents a particular element of the project. You see, that layers are displayed as green bars and they appear in the same sequence as in the video. If you click on the layer on the timeline panel, you will see that the related element will be selected on the composition panel. If it doesn’t happen, click View and check out if Show Layer Controls option is selected:
On the left side of the timeline panel, you will see the names of layers and their types of media. Also, there are icons with switches and modes that can be used to the layers:
There is more to learn about the timeline panel but now let’s move to other sections.
The project appears on the Composition panel. All elements are independent of each other. Once you click on the element, a blue box appears around it. Now, you can modify the object or move it around.
Right below the composition panel, you can see the number of buttons:

The key buttons on the panel are:
- the magnification that enables zooming of the composition
- grid to activate grid guides and rules, as well as proportional grid
- guide options
- preview time
- resolution display that allows to downscale the resolution of the visual elements. This option is often used for previews to make them faster or slower.
The next panel to explore is the Project panel. It includes all kinds of project files. You can organize the individual elements into folders according to own sorting criteria.
The next panel to mention is the Tools panel. It contains all of the tools you can use for the project – from adding a text to drawing a sketch.
The last section is the Works panel. It’s important in terms of enabling and controlling such processes as aligning objects, adding effects, presets, smoother, brushes, and more:
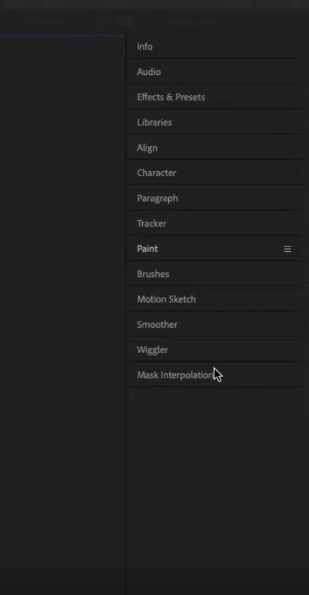
It’s not an ultimate list of panels. Click on Window on the top bar above the Tools panel to discover the full list and add more panels.
Of course, this overview was a once-over to understand what is After Effects. On the Gareth David Studio YouTube channel, you will find a step-by-step guide with a detailed overview of all After Effects opportunities.
Now, let’s focus on the “How to animate in After Effects?” question!
How to Move from Photoshop to After Effects
After Effects supports the import of files from Photoshop including layers with their properties such as opacity, location, blending mode, visibility, groups, masks, adjustment layers, etc. Remember though, that a PSD file overwhelmed with properties will slow down the work in After Effects.
In the After Effects text tutorials you will find out how to move files from Photoshop to After Effects but before check out a couple of tips to speed up your work after import.
1. Arrange the layer.
You change the name of the imported file in Photoshop. After Effects will maintain the connection with an original layer. Still, if you delete a layer, After Effects will show an error about missing layers.
2. Make sure that the layer is named properly.
It’s not a software imperative but it can help you not to get mixed up, especially when the number of layers is not small.
3. Unlock the layers before import
It isn’t imperative for all layers but for some of them, it might be important. For instance, the background layer can’t be transformed into RGB mode if it’s locked.
To import the PSD file with all layers correctly, open After Effects > File > Import > Photoshop as Comp. This command guarantees that layers, including adjustment layers, layer effects, blending modes and alpha channels will be imported unchanged. Layer masks will also be imported and correctly rendered by After Effects.
The clipping group from Photoshop will be also imported into After Effects as pre-built. It allows editing a file as a whole. If you double click on an object in the After Effects Project window, the individual layers of the clipping group will be displayed in the Time Layout window.
You can apply the Set Matte Effect command to the alpha channels contained in the Photoshop file. Any other channels will be ignored.
Sometimes the same image is used both for printing (the usual resolution of such images is 250 dpi and higher) and in the After Effects project. Instead of using high-resolution files it’s better to create a copy of the file with proper resolution and size using the Image Size command from the File menu in Photoshop.
Now, let’s move to the main part of the “How to animate in After Effects” tutorial!
How to Create and Animate Text in After Effects
If you puzzle over how to create and animate text in After Effects fast, the software has awesome ready-made effects. They are handy when you need to animate the slides or a logo in a matter of minutes. In the advanced After Effects tutorials we will:
- create a new project and prepare the space for animation
- apply a couple of standard effects
1. Creating a Project
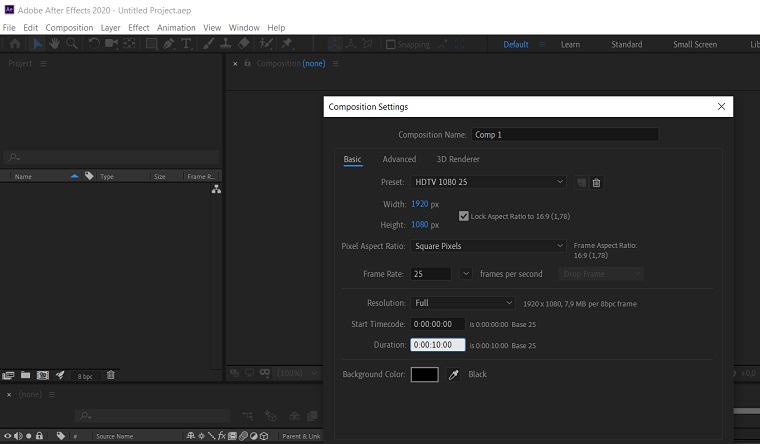
You will start by creating a project and composition: File > New > New Project > New Composition.
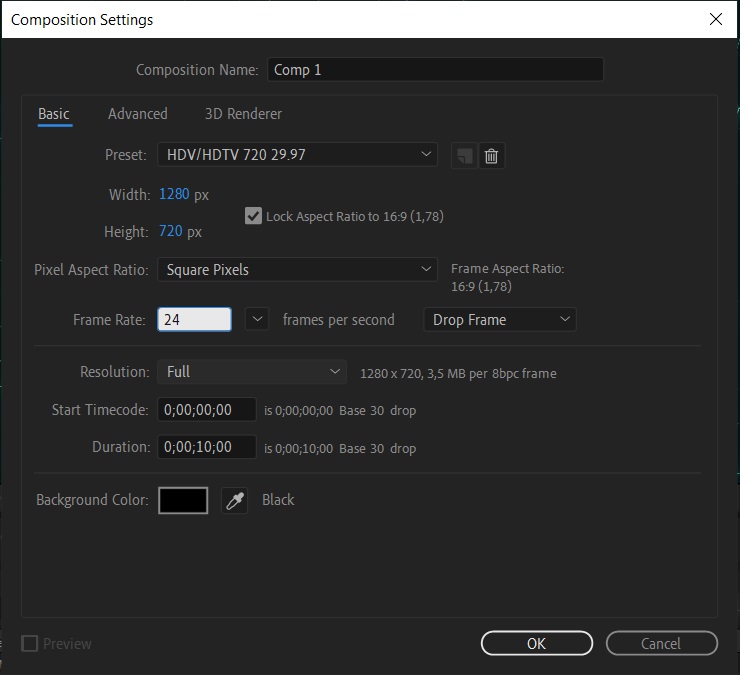
You will see the Composition Settings. You can configure them to your needs. Frame Rate is a number of frames in a second. It’s responsible for the fluidity of the animation: the higher it is, the smoother the animation. Duration is the length of the animation.
2. Creating a Text Layer
To create a new text layer, you have three options:
- Click the T button on the Type Toolbar
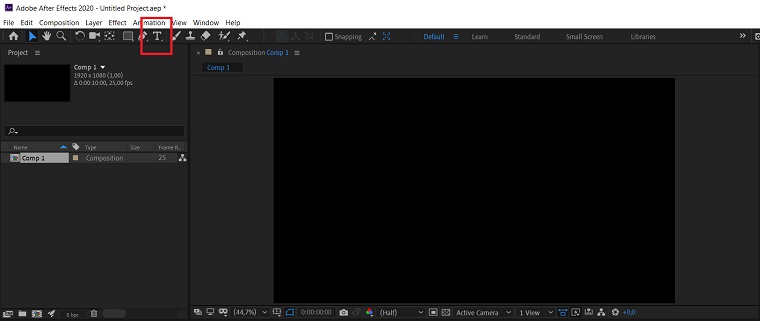
- Use the combination of Ctrl+T
- Put the cursor on the layers panel and choose New > Text in the right-click menu
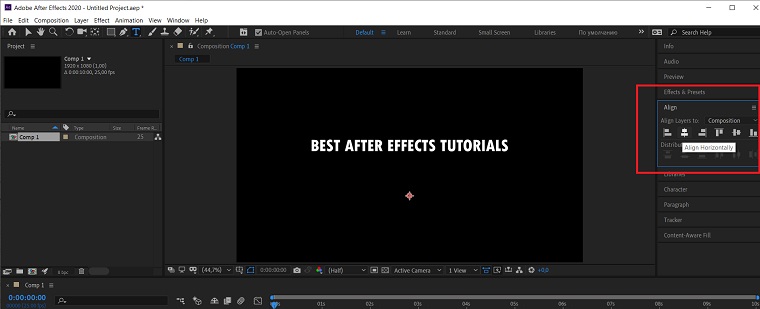
Type the text you will apply After Effects animation to.

To apply a center alignment, go to Align > Align Horizontally on the Works Panel.
3. Applying Standard Text Effects
Now, let’s explore how to apply standard After Effects animation effects.
To apply any effect, go to Works Panel > Effects & Presets > Animation Presets > Text. No need to describe every single effect. There are 15+ categories with subcategories from cycling out the letters to rotating the words gradually until the entire phrase appears.
To apply an effect:
- select a text layer and double-click on the effect
- or hold the desired effect with the cursor and drag it to the text layer.
Press the spacebar to see the result. You can control animation manually by dragging the blue dot on the Timeline panel.
To save text animation in After Effects, go to Composition > Add to Render Queue.

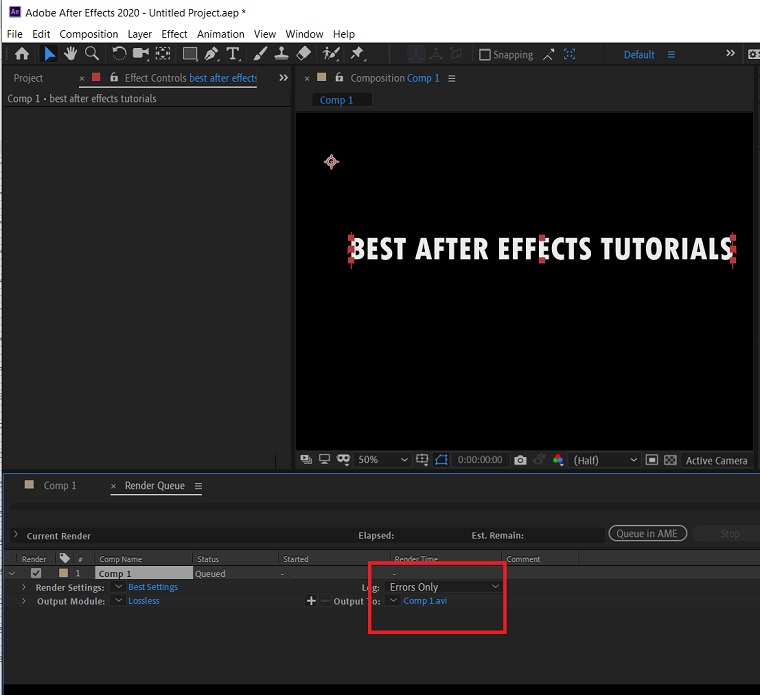
On the Timeline panel, you will see the window with 3 active lines:
- Render Settings (Best Settings)
- Output Module (Lossless)
- Output To
Click on the text near Output to. In this case, it is Comp 1.avi and in the opened window, choose the folder to save the file. Then, click the Render button.
You can wrap it up at this point if the size of the file, let’s say 1GB, is okay for you. If you need a lighter file, open Composition > Add to Render Queue > Output Module > Lossless. The following window will open:
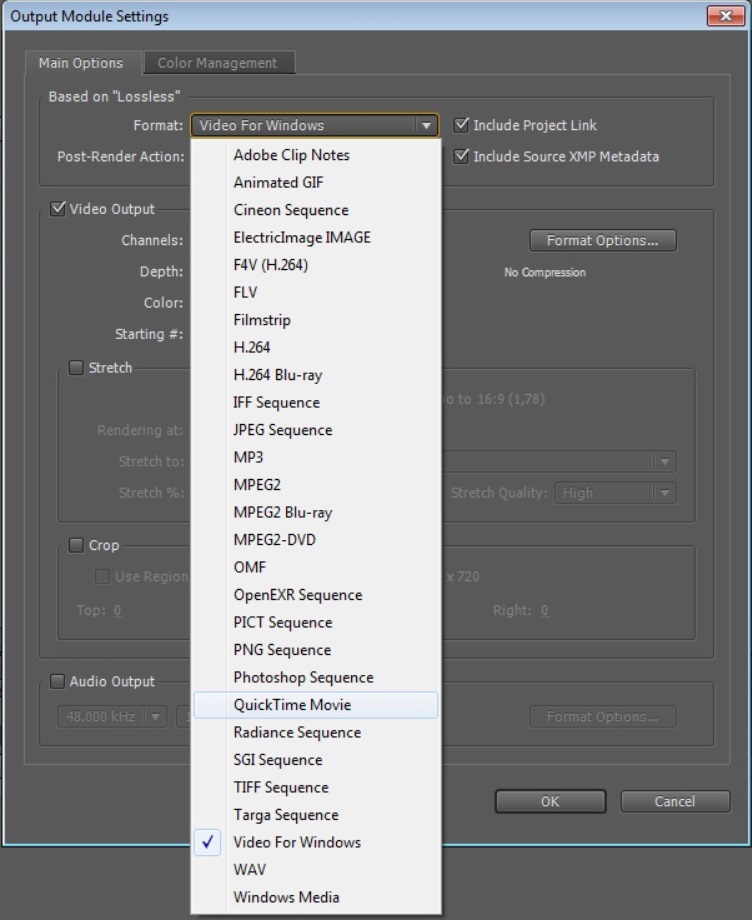
In this window, go to Format. Put a check near the Quick Time Movie instead of Video For Windows. Then, open Format Options > Compression Type and choose H.264. To save a video with a sound, put a check near Audio Output and click Render.
If this option is unavailable, you will have to download the “Quick Time” codec (just google it, dude) and restart After Effects.
How to Create Custom Transitions in After Effects
Now, let’s figure out how to create After Effects transitions.
Unfortunately, no instruments allow applying transitions automatically, Thus, you will have to go through a couple of manipulations covered in these advanced After Effects tutorials.
In these tutorials, you will learn how to apply a transition effect between two videos. On the timeline, you will see that the videos are overlapped a little. That’s was made on purpose.
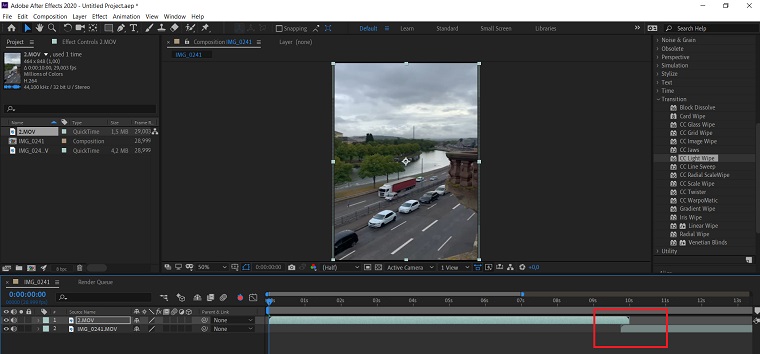
To explore After Effects transitions, open Effects & Presets > Transition on the Works panel. There you will see 17 transition effects that can be applied between videos and other content. As an example, let’s pick up the CC Light Wipe effect.
Before adding an effect, make sure that the Auto-keyframe on the Timeline is active:
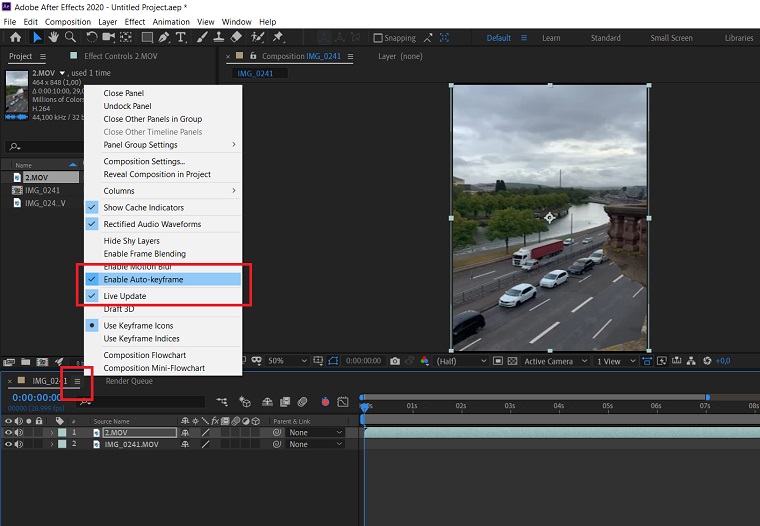
Now, click on the layer that must overlap and place it over another layer on the Timeline panel. Then, double click on the effect – it will open the settings. Now, put the playhead on the Timeline at the point of the last frame before the transition and put 0 in the Completion parameter:
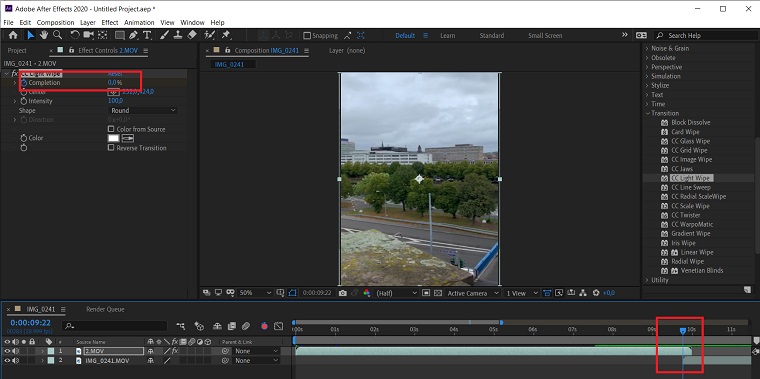
Then, move the playhead to the beginning of the second frame (video) and put 100 in the Completion parameter. Here, the transition ends:
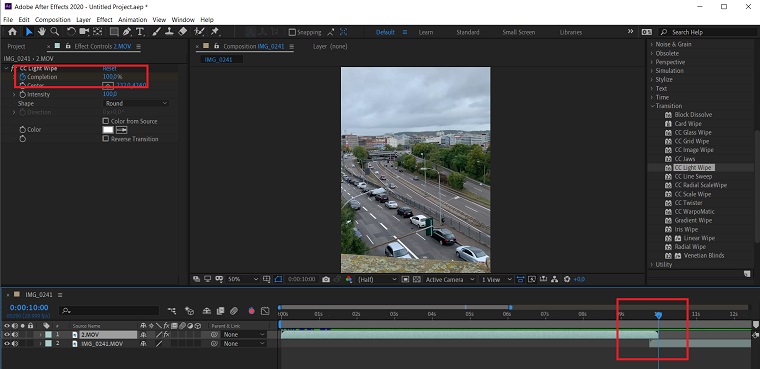
In this case, the duration of the effect is too short – just 10 seconds – and the transition looks quite dynamic.
Press the spacebar to see the result. Likewise, you can apply other After Effects transitions.
How to Create Animated Backgrounds
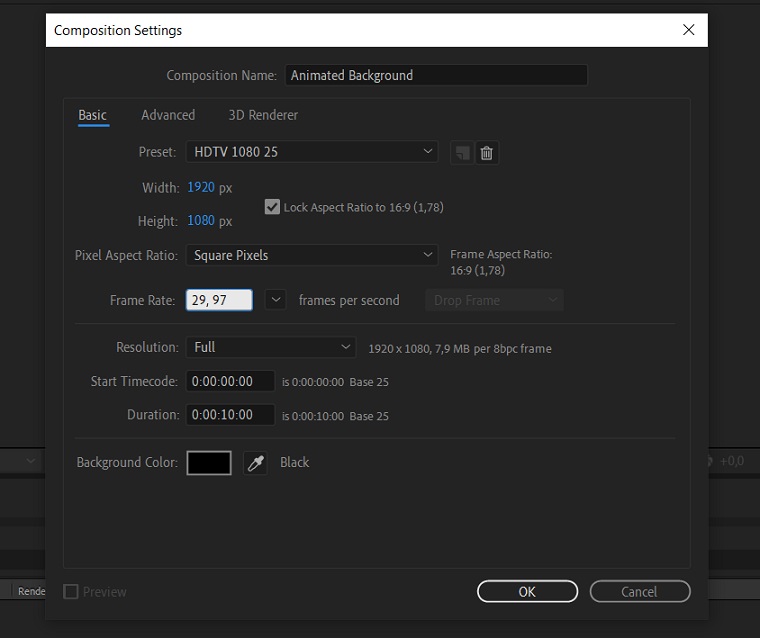
To create an animated background, create New Composition and change the settings if needed. The composition settings of the following animation are:
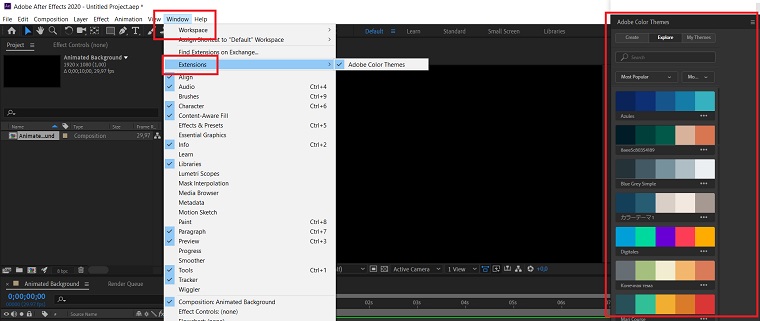
Now, select a color theme. Go to Window > Extensions > Adobe Color Themes. You can create your color theme, use previously used themes, or explore already created themes. We will choose the second variant now and pick up the Ocean theme.
Next, you must create a new layer. Go to Layer > New > Solid. All configurations of the layer are automatically adjusted according to the configurations of the composition set in the beginning. The only parameter you will change is the color. Now, choose the darkest color of the theme with the help of the color picker:
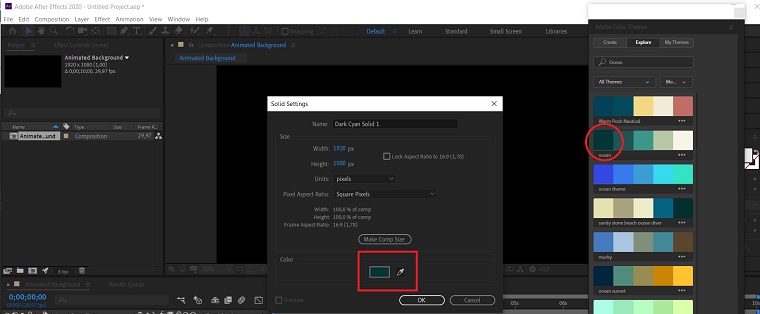
By clicking the color icon, you can change the saturation of the color and some other settings.
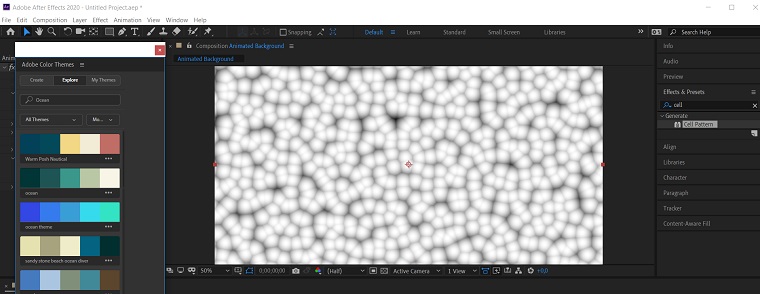
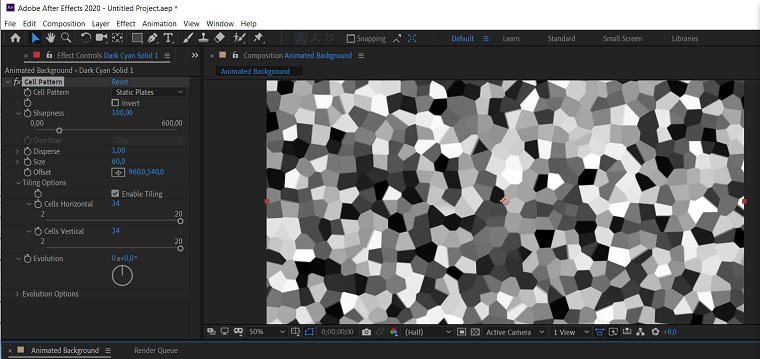
Next, you can apply an effect that will be the foundation of the background – go to Effects & Presets. For our background, we will apply the Cell Pattern effect – find it and apply it to the background by dragging and dropping an effect from the Works panel to the Composition panel.
That’s what you get after applying an effect.
Now, let’s make a couple of configurations.
For instance, let’s change the Bubbles structure to Static Plates on the Project panel and move to the Tiling Options. If you enable tiling, you will get a so-called pattern with plenty of recurring elements:
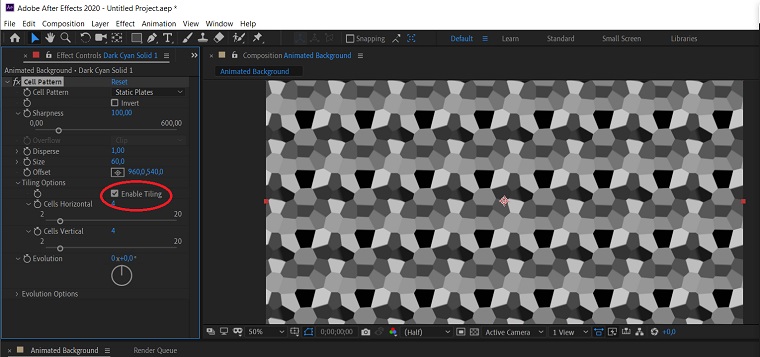
It doesn’t look appealing, so let’s change horizontal and vertical cells to 34 instead of 4.
There is some randomness in the background now but it still looks static. The Evolution animates the background. Make sure that the playhead stays in the beginning and click on a little stopwatch left from the Evolution.
Now, decide how long should animation last and put the playhead at the point when the animation should stop. In this case, let’s make a 5-seconds animation – put the marker and press N on the keyboard to cut the animation. Then, increase the Evolution by rotating a bigger stopwatch.
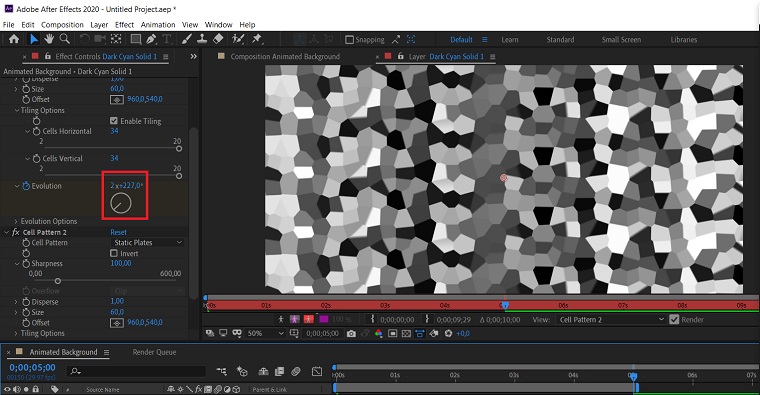
The background is animated now.
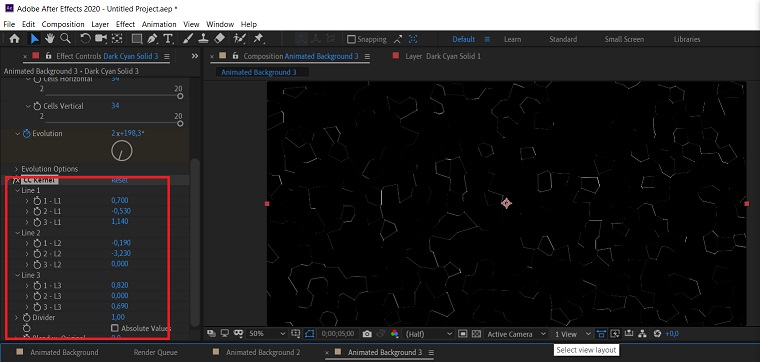
The next effect that we will apply is CC Kemel. To understand how it works, try to change parameters in Line 1, 2, and 3. For instance, try to adjust the same parameters. Spoiler: don’t worry if it doesn’t look appealing now.
The next effect we will apply is Curves to change the brightness of the lines by changing the position of the curve on the Project panel.
After applying Curves, we can move to the Tritone Effect that will color the animation. The effect has three subcategories: Highlights, Midtones, and Shadows.
In the Shadows category, we pick up the darkest color in the Ocean theme and make it even darker. The Midtones is a color of the lines – we pick up the third lightest color in the Ocean theme. The Highlights are responsible for the lightest areas of the animation. So, we pick up the lightest color on the Ocean theme.
It already looks good but let’s make some additions.
For instance, let’s add the Glow effect. Go to Works panel, search for the effect and apply it by dragging and dropping to the Composition panel.
By changing the Glow Radius, you will make the glow more or less saturated. The closer the radius to zero is, the more concentrated at one point the glow. You can also duplicate the effect (Ctrl+D) and adjust another radius.

That’s it! Your After Effects animation is ready.
It can be a background for an intro or a full-fledged element of the video. Of course, it’s just an option among hundreds of them. Other tutorials will teach you how to animate in After Effects : )
How to Create After Effects 3D
Now, let’s proceed to an indeed advanced level in Adobe After Effect animation and learn to create After Effects 3D effect. Still, both beginners and advanced users can exploit it.
So, let’s go through 16 steps of this After Effects CC tutorial to get a splendid three-dimensional animation!
1. Create a text layer.
Create a New Composition with the following settings:
In this tutorial, we will create a 3D text. So click the Type tool in the Toolbar, type the text, and adjust the settings in the Character on the Works panel.
A tip: Sans-serif fonts look the most appealing in 3D.
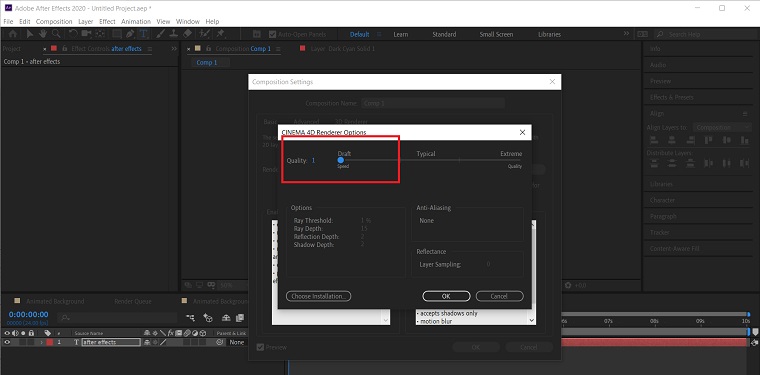
2. Enable 3D Renderer.
The next thing to do is to ensure that you use the correct renderer. Go to Composition > Composition Settings > 3D Renderer and select Cinema 4D. Then, open Settings and set the quality 0 for now. We will change this parameter later but now we need 0 to see the changes clearly.
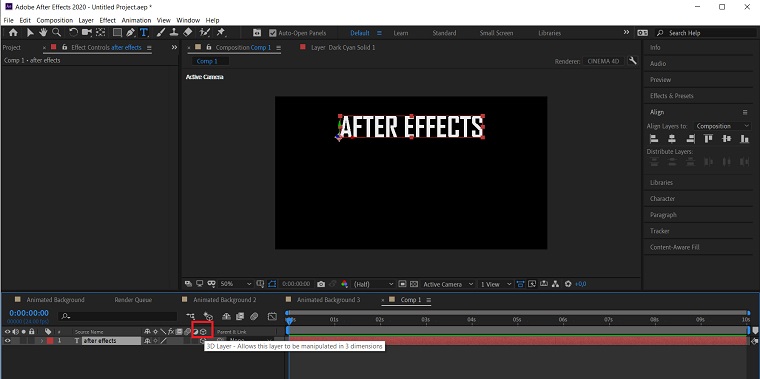
3. Create a 3D text layer.
Now, click on the 3D Layer icon (the Box icon) on the Timeline panel to make the text layer three-dimensional. You can rotate the text in 3D space but the text remains flat so far.
4. Add depth to make a 3D text.
To make a text three-dimensional, open a triangle on the Timeline panel, go to Geometry Options and change Extrusion Depth.
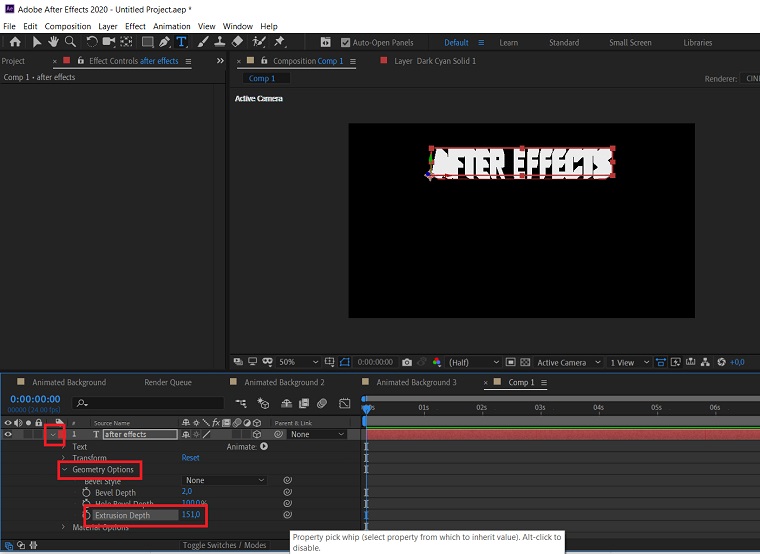
The picture changed indeed but it’s still not what we need. From now, we deal with lightning and texturing because these two parameters will modify the text until it looks good.
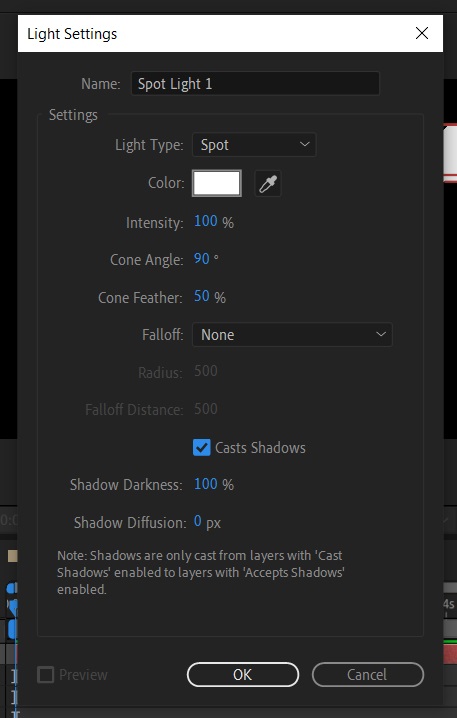
5. Light a text.
Go to Layer > New > Light > Light Type and choose Spot. For now, use a regular white color with 100% Intensity and 100% Darkness (select Casts Shadows).
We got something that looks way better but still, there is a lot of work to do.
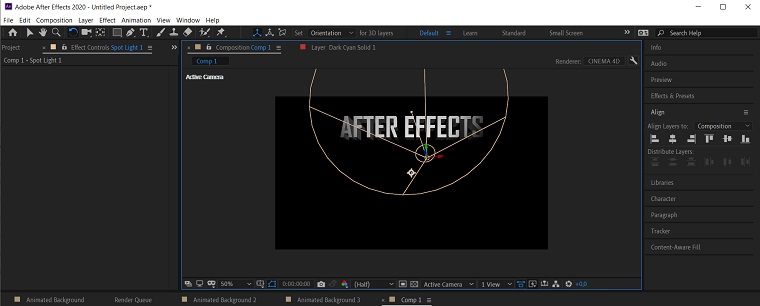
You can move the light to choose its intensity and the highlighted space.
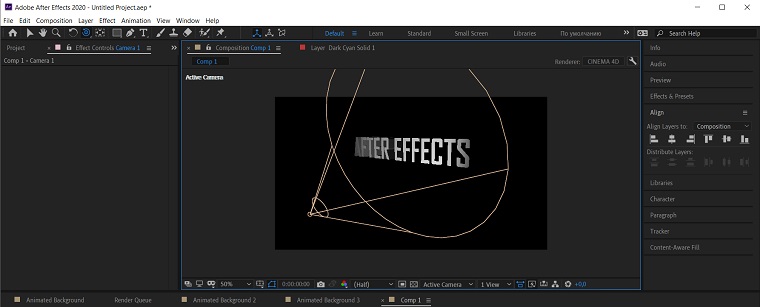
6. Add a Camera
The camera enables such tools as zooming, rotating, and moving the composition to check the light, for instance. To add one, go to Layer > New > Camera, select Two-Node Camera and set 30mm Focal Length.
Use the C button on your keyboard to zoom, tilt, and pan the camera.
Then, rotate the camera to find the best angle for the composition:
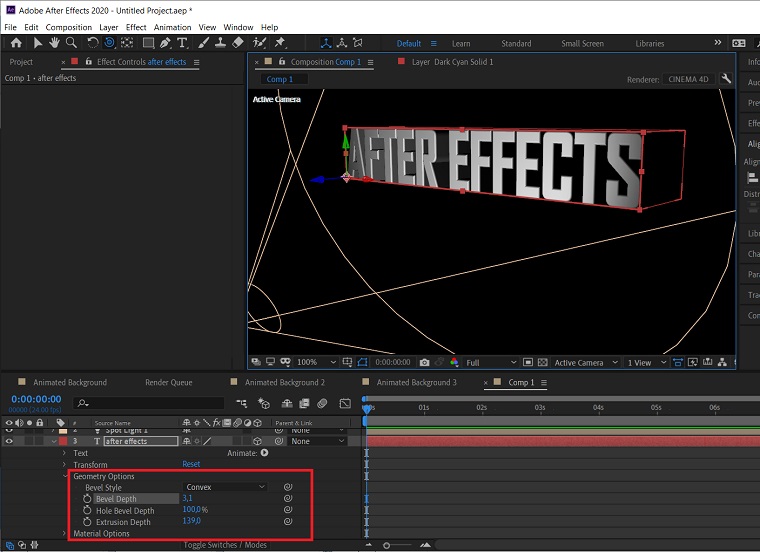
7. Add bevels to the text.
Bevels make the 3D composition look better. Go to the Timeline panel and select a 3D layer. All options applied to a layer will appear and you will see the Bevel style. Change it to Convex and adjust it by adding more or less Bevel Depth.
See how bevels transformed the composition:
8. Adjust the light.
Now, we will adjust the light by duplicating it. Go to the Timeline panel, select the Spotlight and press Ctrl+D. Then, press the P button to access the Position settings. There, you will see three indicators that represent three axises X, Y, and Z. Change the indicators to adjust the light.

9. Add Shadows
To enable shadows, go to the 3D layer on the Timeline panel and turn the Casts Shadows in the Material Options.
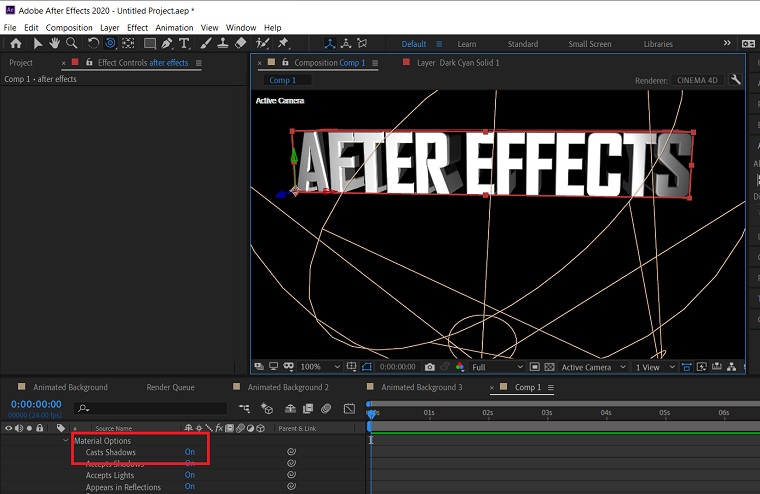
You see now that the lights produce nice shadows. Try to rotate them to adjust them.
The text already looks better but we don’t stop.
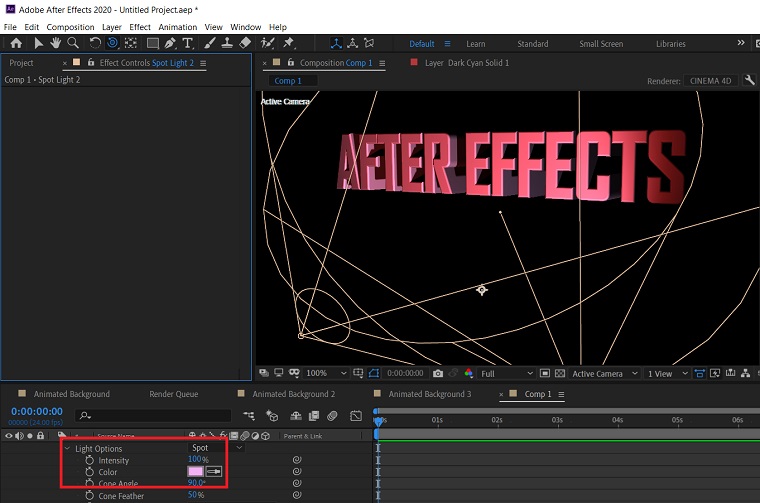
10. Add a Color
Go to the Spotlight 1 > Light Options on the Timeline panel and pick up a color. Let it be red. Then, do the same with the Spotlight 2 and pick the additional color. Let it be light purple.
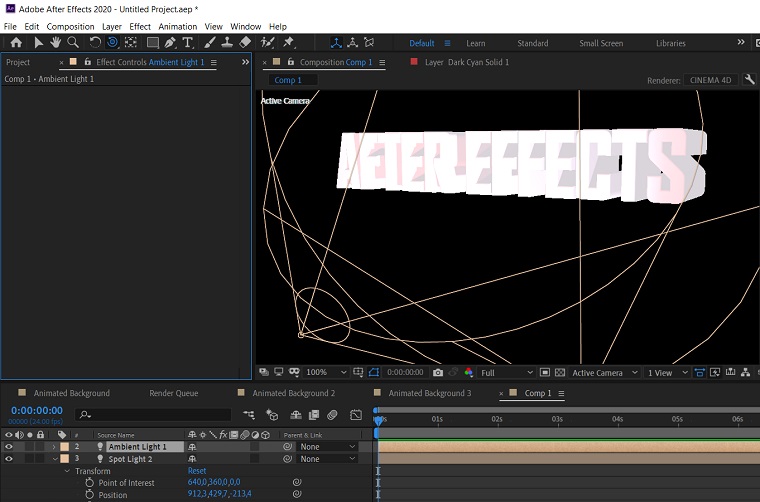
11. Add Ambient Light
Apart from the fact that ambient light looks good, it also adds more dimension. So, go to Layer > New > Light and change the Light Type to Ambient. Choose the color and don’t worry about the results.
We picked up very light purple and got that:
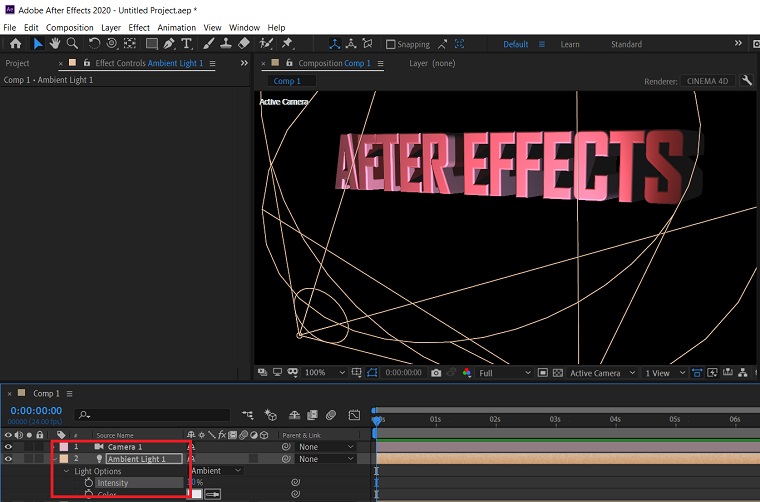
Now, change the intensity to 10. Go to the Timeline panel > Ambient Light > Light Options > Intensity.
12. Add a rimlight
To add a rimlight, duplicate your Spotlight 1, choose the color, click the P button and adjust the Position. Move the indicators of the axes to change the rimlight.
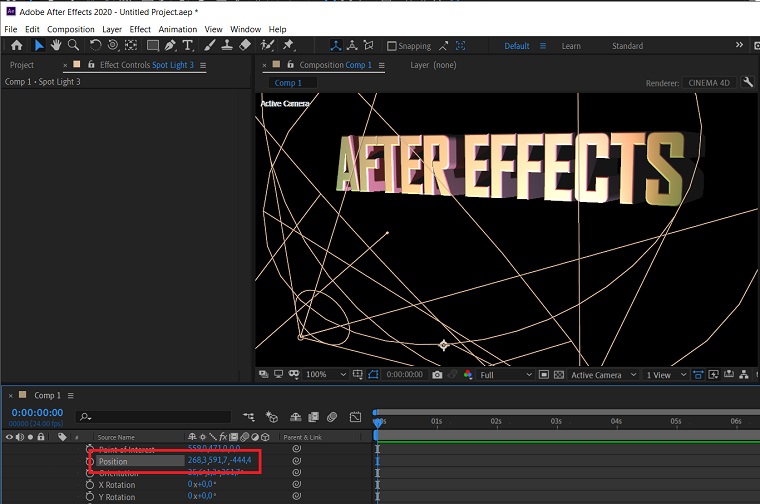
No strict rules here – adjust the light to your taste.
13. Adjust material specular configurations.
If you deal with spotlights, the specular intensity is the main option to configure. But first things first. Go to Material Options and adjust the Specular Intensity and Shininess.
By turning the specular intensity up, you will increase the brightness of the lights. So, it deals with a shiny part of the lights. When you adjust the shininess, you also change the look of the composition, namely the look of the highlights. Try it out but don’t go too far. In this case, let’s just stop at 20%:
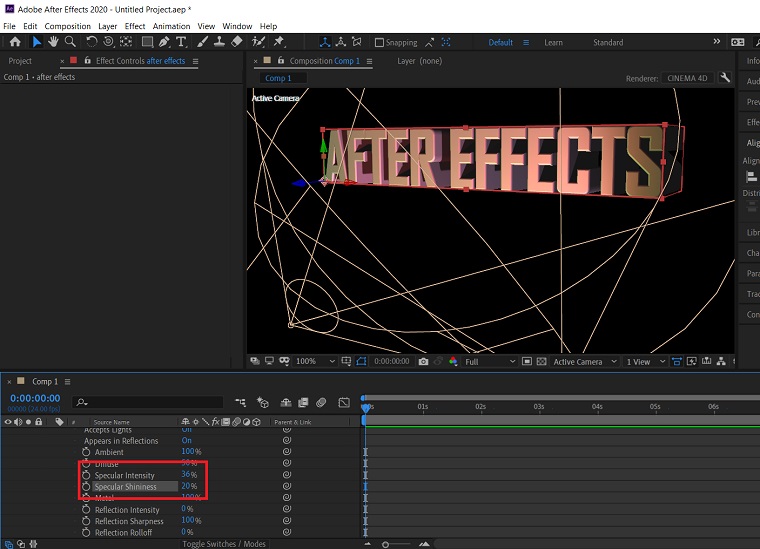
Adjustment of the Specular settings adds nice spots and reflections.
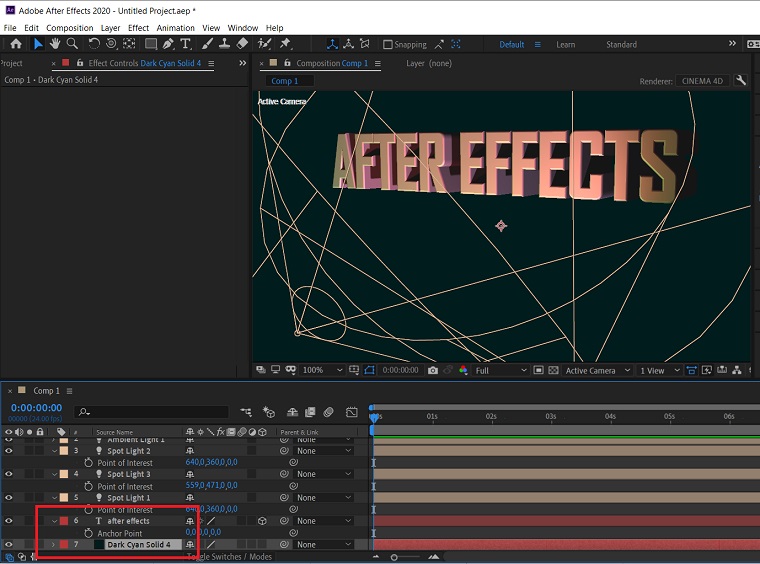
14. Add a background.
As more or less advanced After Effects CC tutorial, we will dive into advanced background configurations. The spoiler: the result will be better than a black background : )
Go to Layer > New > Solid and select the color – let’s say dark green, in this case. Drag the layer to the bottom of the Timeline panel.
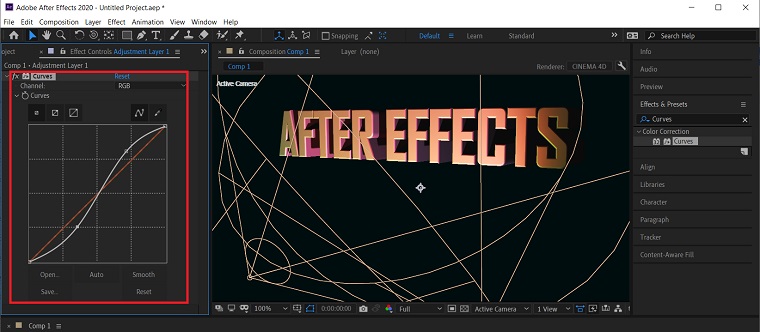
15. Adjust the colors.
First, create an adjustment layer. It gives you control over the final look of the final view and if you want to change something slightly, you can do it in the adjustment layer.
So, go to Layer > New > Adjustment Layer and drag it to the top of the Timeline panel. Then, go to Effects & Presets, select Curves and drag it onto the Adjustment Layer. By creating S and adjusting it, you can make the composition darker or lighter. Yes, you could do it in Spotlights but instead of puzzling over them, you can do it faster in Curves.
Another nice trick lies in dimming down the blue highlights and making the blue shadows more saturated to create a deep color. Go to the blue channel of the Curves and move the blue curve until you like the result.
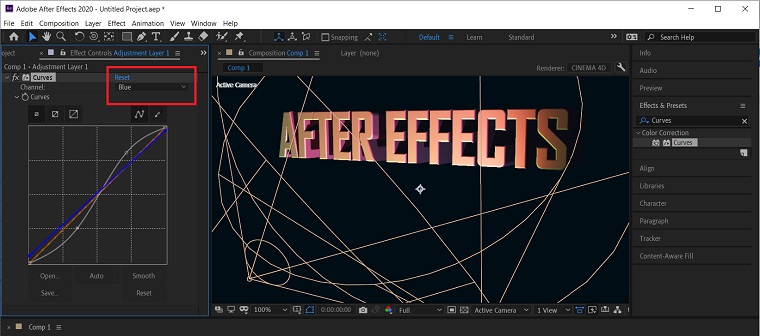
That was the last touch in the animation in AfterEffects. Of course, you can add more effects because the opportunities of animating in After Effects are impressive.
For now, you have a simple After Effects 3D composition that still looks splendid!
Adobe After Effect Animation Templates
Since you know now the basics of how to animate in After Effects, you, probably, noticed that it’s not an easy and fast process. Thus, a couple of templates will be always handy and save your time while creating the next animation. TemplateMonster marketplace offers 140+ After Effects intro templates, so, let’s check out a couple of them.
Devil Roy Barman Minimal Resume After Effects Intro

The next template to use for animation in AfterEffects is Devil Roy Barman. It’s a minimalistic template suitable for any kind of business. You can also adjust all elements to any kind of project.
You don’t need any plugins – only After Effects CS5+.
Managed Infographic Elements After Effects Intro
Creating an intro for a video or a project to capture the audience’s attention is a challenge. Creating it in After Effects is a double challenge, especially for non-techies. This template with animated infographics facilitates the process because all you need is to select a chart and fill it with data.
If you already have a video, you can adjust its intro by changing colors, icons, and additional elements. You can also add maps, callouts as a template includes:
- 86 editable graphics
- 26 editable callouts
- 93 animated icons ‘
- 17 maps
- 1249 text placeholders
- easy color control
You don’t need any plugins – just download this template that is compatible with After Effects CS6+ and let the magic begin.
Colorful Opener After Effects Intro

If you search for something colorful and juicy, this template might be the right choice. With it, you will also create an intro in After Effects fast because it has plenty of pre-made elements.
We gradually reached the end of the After Effects text tutorials. If you still have questions, feel free to leave them in comments and stay tuned for more tutorials! : )
Read Also
Elementor Motion Effects: Best Practice to Liven Up Your Website
6 Types of Motion Tracking in After Effects
How to render in after effects? A few useful tips about Rendering

A freelancer, who is nuts about traveling, art, and learning foreign languages. Excited about exploring new cultures. Particularly jazzed about conveying ideas with words in an outstanding way. Instagram
Get more to your email
Subscribe to our newsletter and access exclusive content and offers available only to MonsterPost subscribers.

Leave a Reply
You must be logged in to post a comment.