Elementor Menu Tutorials: How to Create a Hamburger Menu & How to create Elementor Mega Menu
- Hamburger Menu: Its Benefits and Drawbacks
- How to Create a Hamburger Menu with Elementor Page Builder and JetBlocks Plugin
- How to Create a Elementor Mega Menu with Elementor Builder Quickly and Easily
- How to Create Advanced Mega Menus with Elementor Page Builder
- Top-3 Elementor Themes
here you'll find elementor menu tutorials: how to create elementor mega menu, how to make a hamburger menu, elementor nav menu, elementor sticky menu etc.
How to Create a Hamburger Menu with Elementor Page Builder and JetBlocks Plugin

While building a website, one looks for elements that will save space on the site and improve the user experience. One of these elements is the well-known hamburger menu, a navigation element that can be applied to websites, web apps, and programs. In this article, you’ll find out what a hamburger menu is, its benefits and drawbacks, and how to create it using Elementor Page Builder. So, let’s read on.
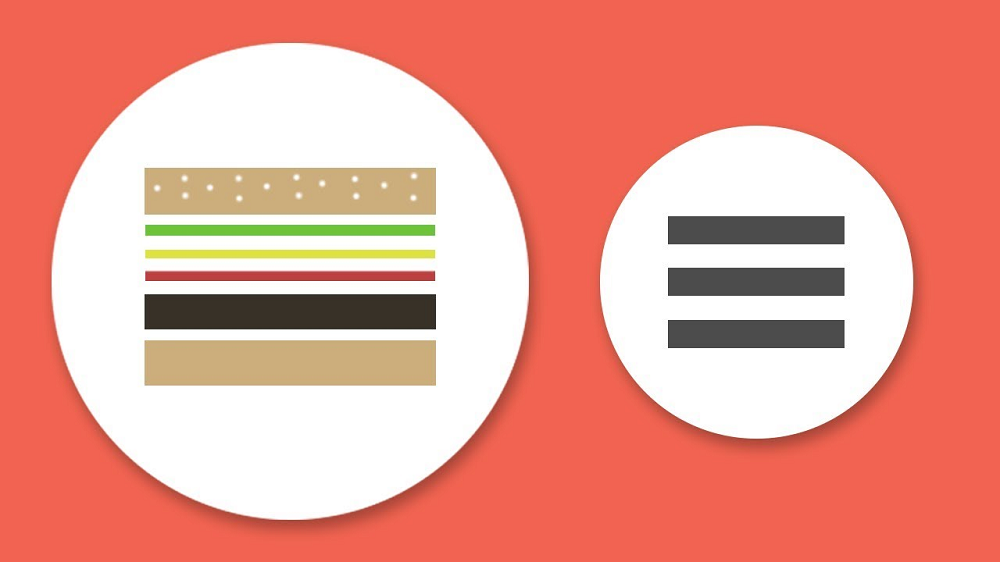
Hamburger Menu: Its Benefits and Drawbacks
To find out what the hamburger menu is, let’s refer to Wikipedia which explains it as “a button typically placed in a top corner of a graphical user interface.” It is responsible for switching between the menu or nav bar while being folded behind the icon or output on the screen.
Some users find the hamburger menu to be a top-notch solution meant to improve navigation, while others claim that the use of the menu on websites doesn’t make sense because it is not easily visible, hence making it confusing. We don’t recommend taking someone’s side before delving deeper into the benefits and drawbacks of the menu. After considering all the facts, decide for yourself if you like or dislike the hamburger menu element.
So, let’s start with the benefits:
- It is widespread and used for websites, web apps, computer programs, and even video games.
- It is a great solution for those of you planning to clear up a messy web page and prevent users from chaos frustration and leaving your website.
- It is a perfect place for nav buttons that are important for specific tasks, but don’t actually serve the main goal of your website and therefore, shouldn’t take too much space on the homepage.

Here are a few reasons why people reject the hamburger menu:
- It communicates that the items placed in the hidden menu aren’t really all that important so visitors aren’t likely to go there.
- It consequently results in lower click rates and engagement. Not only is it invisible and hard to see or notice, but the hamburger menu also fends off any urge to engage with the navigation options.
- It makes visitors go the extra mile to reach the end goal.
As long as you know the major benefits and drawbacks that the hamburger menu has, you can then make the final decision about whether you need it on your website. If so, check the guide below that will help you create the nav menu with ease.

How to Create a Hamburger Menu with Elementor Page Builder and JetBlocks Plugin
To build a hamburger menu at the push of a button, you need access to creating custom headers and footers. Here’s how you can get it:
- Pick a free solution like WordPress plugin (which is actually not the safest solution because no one will follow up on plugin performance and provide technical support).
- Choose the Elementor Pro subscription and get the ability to edit custom headers and footers according to your preferences.
- Opt for the Monstroid2 custom WordPress theme and get the opportunity to create custom headers and footers aside from the other advantages like Jet family plugins, a myriad of ready-made pages and sections, and other outstanding features.
If you’ve decided to apply a hamburger menu to your website, you will need a separate Jet plugin in addition to Elementor Page Builder. This is a JetBlocks add-on that comes with the widgets needed for creating functional headers and footers.
If you use Monstroid2 to develop a website, you can discover the JetBlocks plugin at the dashboard panel. All you have to do is just find Monstroid2 in the menu, go to plugins, and see all the add-ons which are installed and activated. In case you select another theme that doesn’t include the necessary plugin.
Now that you know what you need for building a hamburger elementor menu, let’s jump to the actual creation process. While using any template different from Monstroid2, you can access the header from the theme library and configure it via Live Customizer. But, in this guide, we are going to demonstrate how to create a hamburger menu based on the Monstroid2 WordPress theme and with the help of Elementor Page Builder. So, let’s get started.
- Locate Elementor Editor and click on Header Home.
- Start by creating a new section.
- Find the Hamburger Panel through the search bar and drag and drop it to the section. It will consist of two elements, panel, and toggle, and both of them need to be customized.
- Navigate to the “Style Settings” menu and play around with the parameters for panel and toggle elements.
- Go to the “Content” menu and choose the template for the hamburger panel. After choosing it, you may want to apply changes to the template. In this case, click on the “Edit Template” button. Once done, you’ll be redirected to another Elementor window where you can change the way the template looks.
- Navigate to the “Style” section, change the background to transparent and play around with border, background overlay, shape divider, and typography settings. Once done, save the template to complete the hamburger menu creation.
How to Create a Elementor Mega Menu with Elementor Builder Quickly and Easily
The bigger your online shop is, the more categories you need. The more categories you create, the harder it is to navigate them. The harder it is to find something, the fewer customers you have. That’s all obvious and ruthless, but it is true. Of course, you would be happy to place all those categories of products right to the header menu, but eventually, there will be no spare place there. That’s where a mega menu will come for rescue.

Certainly, there are solutions to the problem of navigation. You can sort the categories in the sidebar, create a pile of links with icons directly on the homepage or create a sitemap, but a mega menu is much more convenient.
Table of contents
What’s a mega menu?

When I was a child, one of my friends had Dandy and spent lots of time playing Mega Man on it. The mega menu sounds a little the same, so I have a lite nostalgic feeling writing about it. Of course, there’s no connection between the heroic android and website feature, but who says it has to be some logic in our associations?
Mega menu is, as you can understand from the name, is a huge menu. When you click on one of the header items and see a big section that can contain links, images, and even videos – you are looking at the mega menu. You can put the entire website navigation into a mega menu and help the customers see a whole picture.
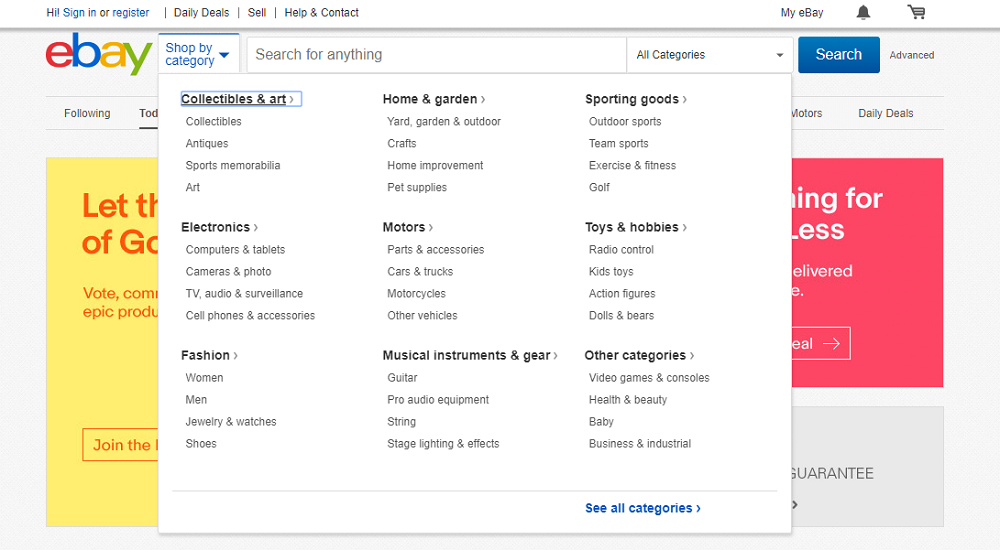
This feature often increases sales, and the reason for that is very simple – a mega menu shows a visitor lots of stuff he wasn’t searching for right now, but may decide to buy, since he is ordering other products from you. To understand what I’m talking about you should go to the Amazon or eBay website. They have carefully thought out mega menus and get lots of profit from it.

What sites need mega menus?
Elementor mega menu for online stores
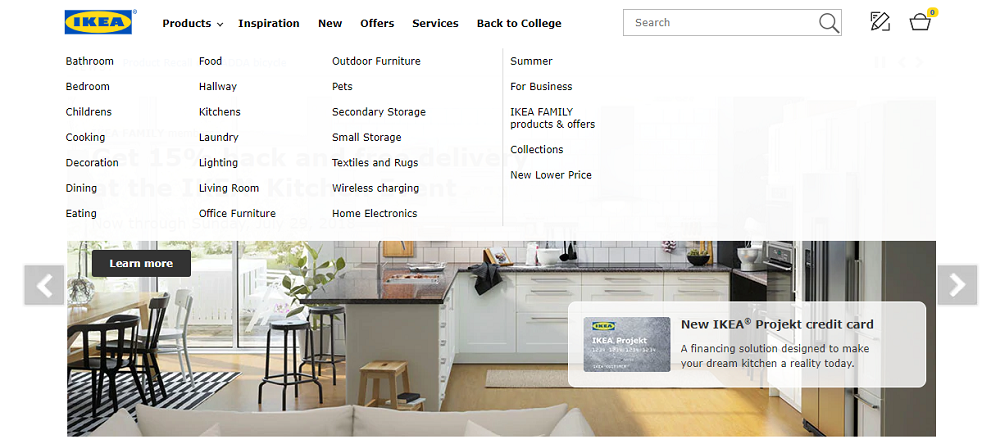
As I mentioned previously – the mega menu is necessary for any medium and large eCommerce project. The better your products are organized – the more sales you get. Even a small online store could gain profit from an accurately crafted mega menu with bright pictures. All big stores that have a huge number of products use mega menus. For example, look at IKEA’s website:
Information hubs
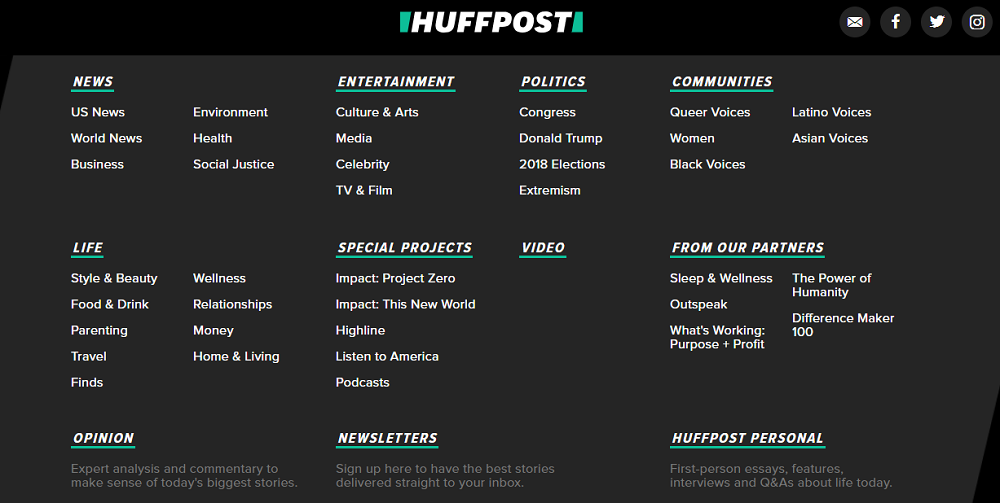
News websites, content aggregators, online libraries – all that websites deal with a vast amount of information. All those precious treasures have to be easy to find. Otherwise, it will become a bunch of useless crap. The mega menu will help to organize the information so that a user will be able to intuitively understand where to go. Huffington post has a nicely organized mega menu:
Government offices
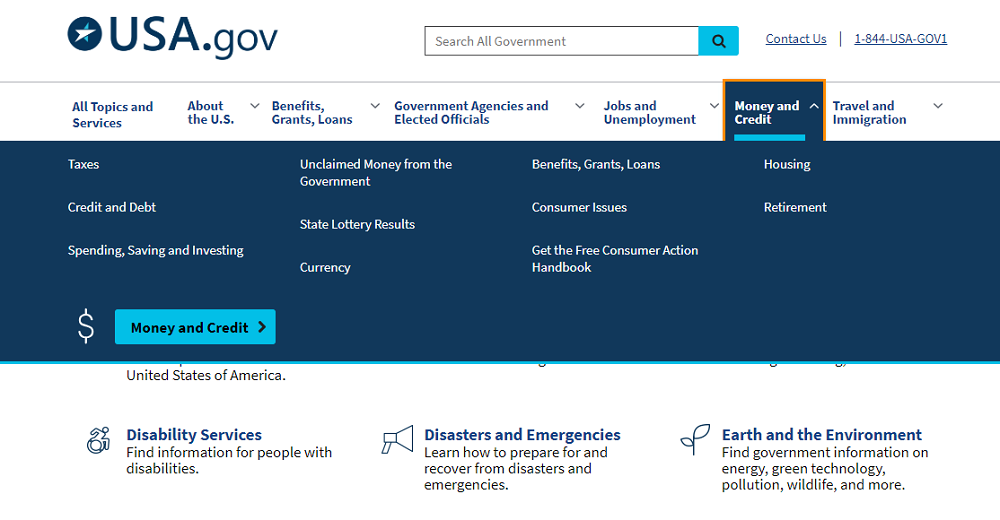
Bureaucracy, especially government bureaucracy is equal to tones of documents. And some of them could be necessary for people. For example, “how much taxes do I have to pay?” or “how and when could I get an ID card?” are the questions people want to find answers to without any issues. Some government offices use mega menus to make their information more accessible. It works perfectly on usa.gov website:
Renting services or cafés
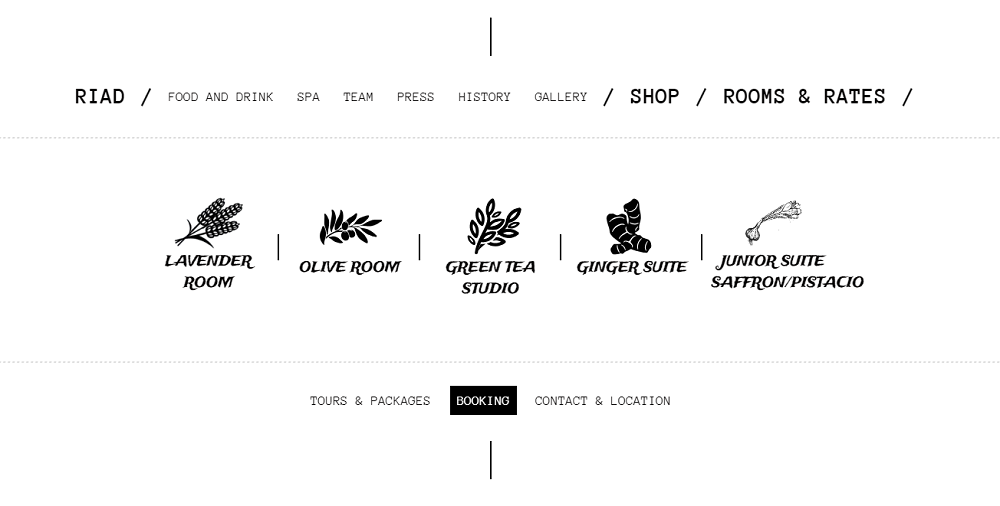
The pictures of beautifully served food or nicely designed room is more likely to attract a visitor to make an order in your restaurant or hotel. A café menu with sharp pictures that drop down from the header or a list of the rooms organized in a mega menu will be a creative and attractive solution for your business. Riad hotel and restaurant has a very original mega menu that gets a user to all the rooms of a house.
How to create mega menu rapidly and efficiently with JetMenu Elementor plugin?
The website is ready, you have a fancy template and are at idle to add a mega menu to the header. Certainly, there are plugins to do it from WordPress, but I have Elementor page builder installed, and it is really much easier to create a mega menu from its visual panel that from WP dashboard - that’s why I’m going to tell about how the JetMenu plugin could help you to create a mega menu.
First of all, you will need a JetMenu Elementor plugin. Download and install it in the “Plugins > Add New > Upload plugin” tab of your administration panel. After activation, JetMenu will appear in the dashboard menu and will be available for work.
Now, when all the tools are ready – it’s time to do some magic. Go to the Appearance > Menus. JetMenu appeared in a list of settings, open it, enable the plugin for “Top” and “Main” locations and hit the “Save” button.
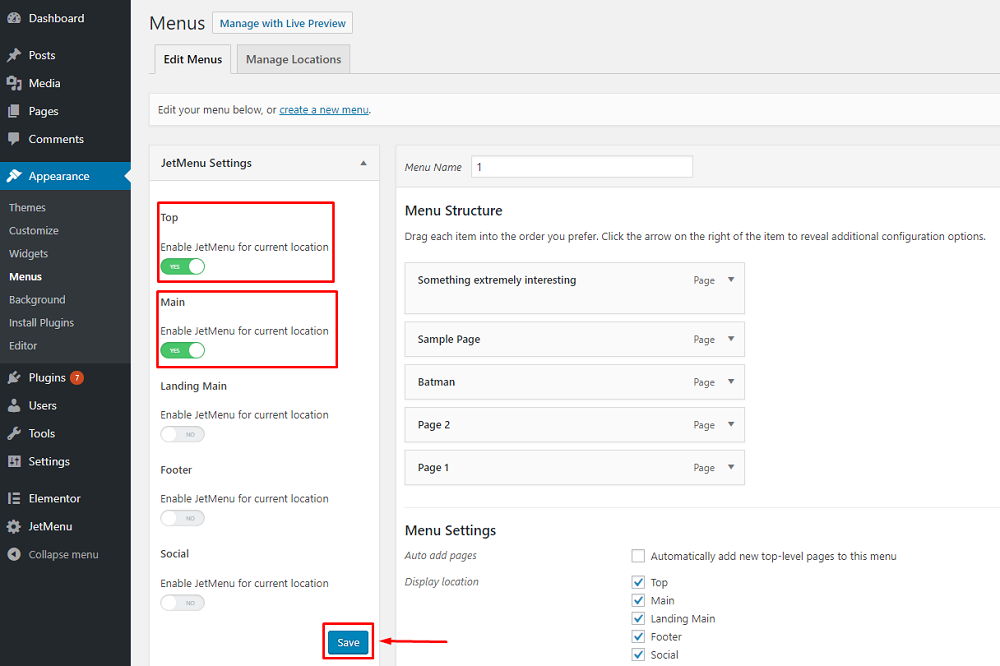
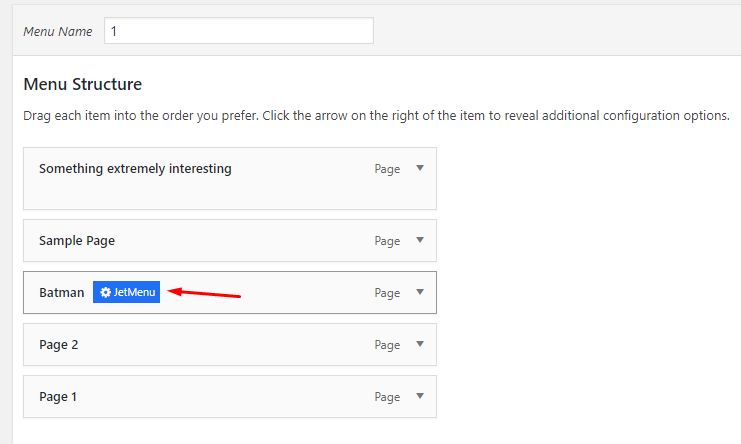
The window to the right shows you the menu name and structure. Every line could be customized not only via WP functionalities but also via JetMenu. Hover the pointer over the list and click the “JetMenu” button on the proper item.
Enable the mega menu for this item and press the big green “Edit Mega Menu Item Content” button.

Elementor interface is the same as you are used to – the construction elements are gathered in a table to the left from the workspace. The user will see all you put to that space after clicking on the menu item.

You can drag-and-drop everything you want/need to the field. You can customize the chosen fields via the settings - that will open in the table to the left. To my mega menu, I added the custom posts block, Google Maps, and a video tile. The map and video are placed in the two-columns section so that they are accurately located in the mega menu. When you finish the building process – hit the “Update” button.
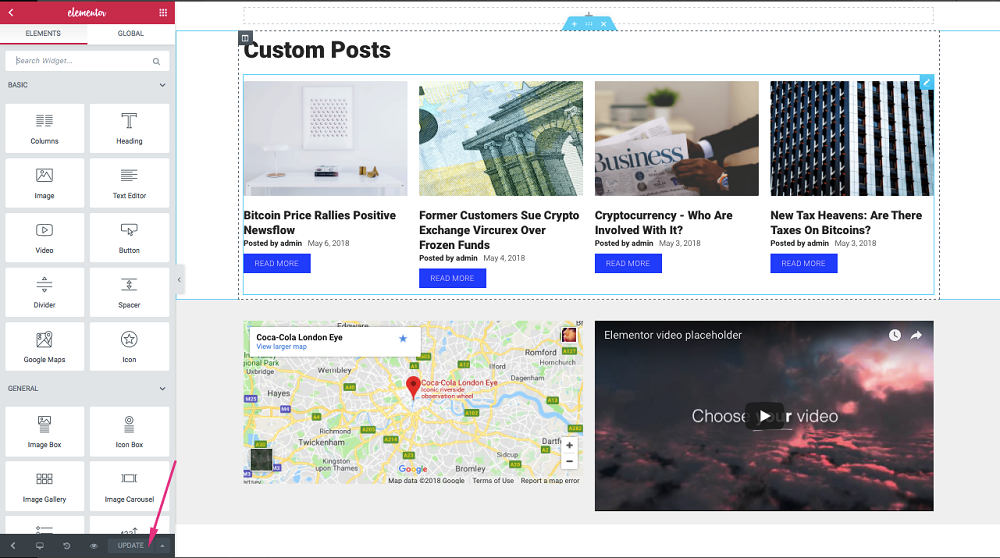
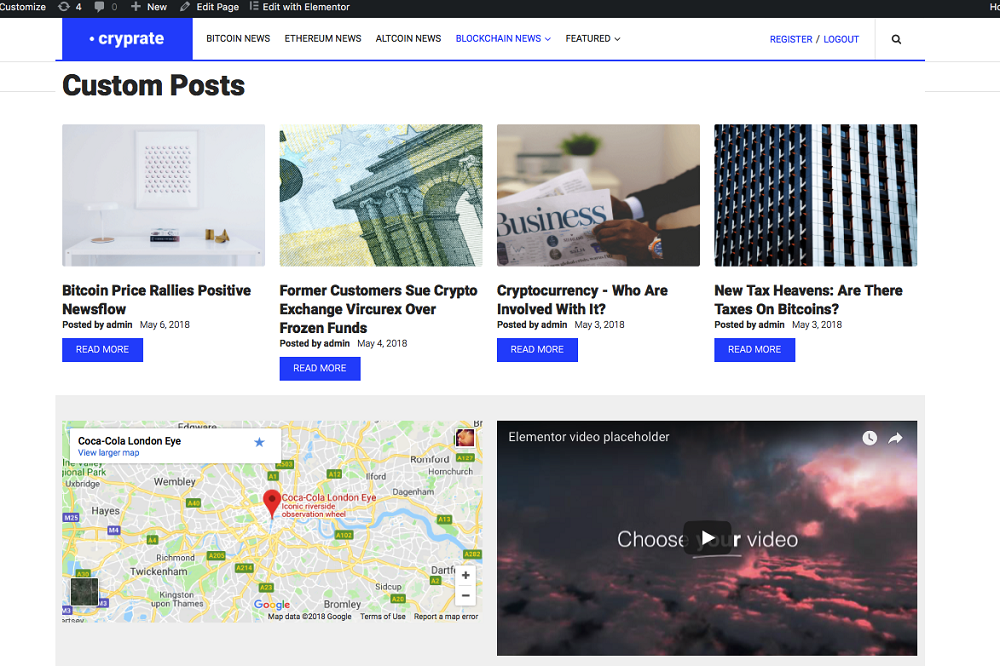
On your website it will look something like that (your template could look different and, besides that, you will definitely customize the look according to your taste):
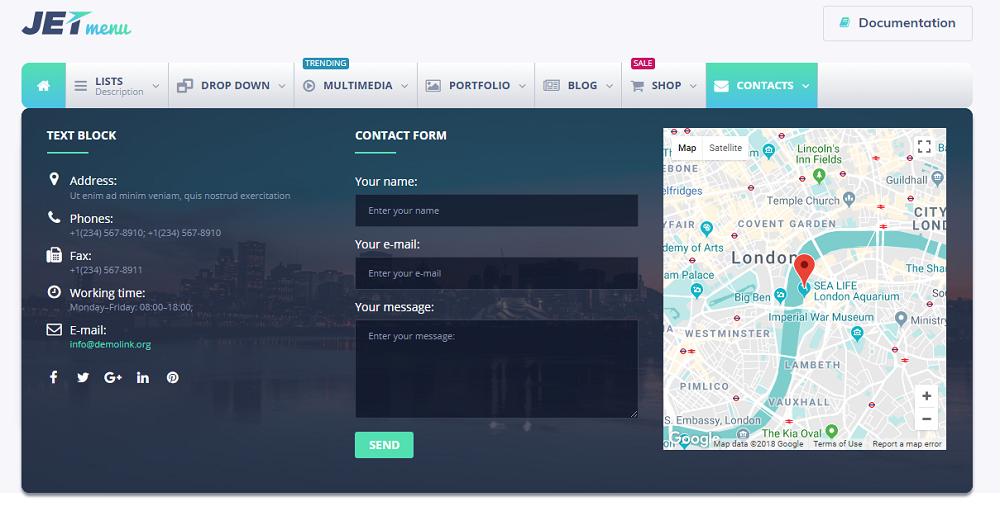
That’s it. You did it. You’re fabulous. Of course, it is only the beginning. There are dozens of features available for you to customize it in your mega menu appearance. The JetMenu goes with well-written documentation, where all the details are described more vastly. To create a mega menu, I spent no more than 20 minutes (and that includes JetMenu installation). If you want to play with customization a little longer, you can achieve results like this:
JetMenu is not the only plugin that helps you to build your website faster. TemplateMonster’s Elementor Marketplace has a bunch of goodies for you – check them out! We gathered products that will give you additional elements, new pre-made pages, and whole Elementor-compatible themes. Everything for Elementor-lovers’ convenience!
If you have any questions, go through the documentation or write your questions in the comment section below. Would you like some additional information added to the article? Was everything clear? Feedback is always welcome.
How to Create Advanced Elementor Mega Menus with Elementor Page Builder
Mega menus can make it much easier for users to get deeper into a site with fewer clicks. Here, you will learn how to make your menus more functional and informative while using mega menus. This tutorial will help you create products grids, blog posts, and even maps and contact forms in a mega menu on your WordPress website using Elementor page builder. Among other tools needed are JetMenu and JetElements plugins. JetMenu is a first-class plugin which allows creating a mega menu with Elementor page builder. With JetMenu, you can add content to a menu using any needed widgets, and style it up according to your needs. JetElements plugin offers a great variety of modules to create high-quality websites.
Follow a few simple steps below and enjoy the result:
- Once JetMenu plugin is installed and activated on your website, navigate to WordPress Dashboard and proceed to the Appearance > Menus tab. You can either select one of the existing menus for further editing or create a new menu and then create a mega menu for one or several of its items. Settings menu allows you to specify mega menu position and set custom width for the particular item. Icon tab allows you to choose the color of your icon. Badges tab helps to create the name of the badge, set the badge color, and badge background color. With the help of the Miscellaneous tab, you can hide the item navigation label and set custom padding for the items. If you are working with vertical menus, you may need to adjust the setting in the Vertical menus tab also.
- In the Content tab, toggle Mega Submenu Enabled option to Yes. Then, click Edit mega menu item content option to proceed to Elementor editor. Here you can use any widgets which you need to build a mega menu. You can use headings, sliders, product grid layouts, post layouts, videos, etc.
- Let’s search for Posts widget. Drop it to the center area and start working on it. Since Monstroid2 WordPress theme is used, the Magic button can be used to gain access to a great collection of ready-made sections and icons. Sections > Blog gives you the choice of different layouts for a blog. You can choose any of those and put them on your page. Note, if you are not using Monstroid2 WordPress theme, but you have downloaded JetElements plugin, you can navigate to Templates in Elementor > Blocks menu and choose any ready-made element in the category dropdown. Pre-made designs are available for each particular widget there. Post grid layout can be inserted to your page. Once it is done, your post section can be styled to your liking (fonts, colors, backgrounds). Make sure this section gets some background color. If you do not set any background (Style menu), it will be transparent. Finally, click Update, go back and Save, close the window, and click Save Menu. Do not hesitate to check the result after.
- The next step is to create a Contact page. To do this, go to the Pages menu to create a new page. Select Contact and click Add to Menu. Once the page is added, click JetMenu button and adjust the settings. In the Content tab, toggle Mega Submenu Enabled option to Yes. Then, click Edit mega menu item content option to proceed to Elementor editor. Drop section layout and search for Advanced Map module. Edit Advanced Map settings to specify the location, adjust Scrollwheel Zoom, Zoom Controls, etc. Map Style section allows you to change Map Height, and Map Style. Add some pins with the help of the Pins section.
- Choose Contact Form 7 widget to continue working on your contact form. As you can see, it has a default generic design. Use the Magic button again and choose the best design for your site in the Sections menu. Once you pick the most suitable layout, click Insert to get it to appear on your page. Afterwards, you can customize the look of your Contact page. Play with the background, padding, fonts, and do not forget to click Update after you finish. Return back, click Save, close the window, and click Save Menu. Refresh your home page and check the result.
- To create a product collection section, you need JetWooBuilder plugin. If you are using JetElements, you will have access to WooCommerce widgets. Just drop the widget to the center and start customization. Set up the quantity of products per page, order by, titles, etc. Click Save, Save Menu, then go to the homepage and refresh it to see the updates.
With JetMenu and JetElements plugins, it is quick and easy to include blog posts, product grids, and a contact page with a map on the home page of your website. I hope you enjoyed this tutorial. Share it with those who are building websites and may find this guide useful. Do not be afraid to experiment to build a fully functional website!
Top WordPress Plugins
Top-3 Elementor Themes with elementor menu
For those of you stuck on choosing the best template for building a user-friendly and highly-functional website, we’ve picked 3 best-selling Elementor themes that come with the innovative drag-n-drop content editor, together with a collection of Jet plugins needed for creating extra modules. So, let’s consider them in detail.
Monstroid2 - Multipurpose Modular Elementor WordPress Theme

Monstroid2 is a flagship product at TM marketplace. This Elementor WordPress theme is famous for its super-light package weight, hence smooth performance. It comes with a vast collection of pre-designed sections and pages, magnificent skins, as well as the most popular plugins and extensions.
Elementor Page Builder included in the package ensures real-time code-free editing, whereas Jet plugins allows for creating numerous elements and modules for advanced functionality. For those of you planning to establish a full-fledged online store, the Monstroid2 template has a WooCommerce package for you. With this e-commerce plugin, you can start selling your products and services in no time at all.
BeClinic - Multipurpose Medical WordPress Theme

BeClinic is another Elementor WordPress theme in great demand among users. Aside from a huge set of demos suiting any of your needs, it also comes with multiple pre-built pages, content types, etc. To create an astonishing layout and customize website content without making many efforts, you can leverage Elementor Page Builder right out of the box. Equipped with a drag-n-drop editor, it ensures codeless customization.
When going ahead with the BeClinic template for building a website, you save up to approximately $700 because all the outstanding plugins are included. Some of the best ones are Revolution Slider, bonus images, Jet plugins, Events Calendar, Cherry plugins, WooCommerce plugin, and 4 blog layouts to choose from.
JohnnyGo - Multipurpose Home Services WordPress Theme
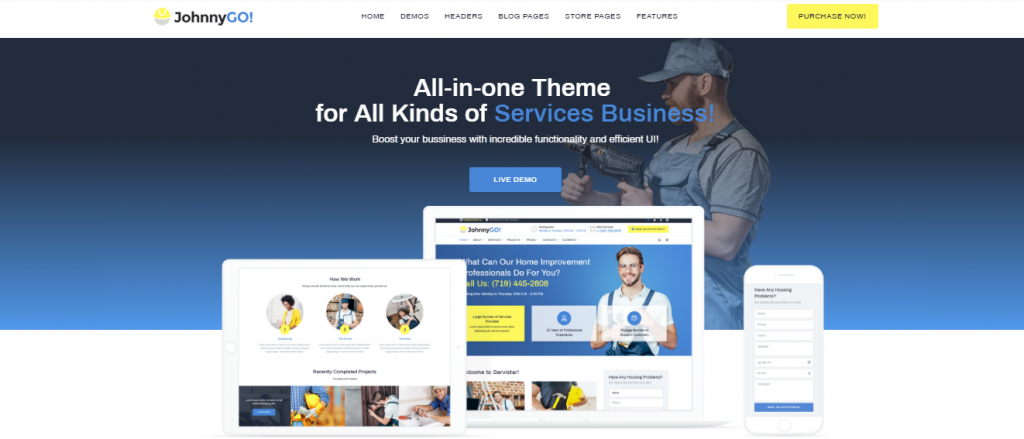
Do you plan to launch a website for your service business? Then, give this multipurpose Elementor WordPress theme a try. Inside the package you will find 16 demos, 30 pre-designed pages, and other elements meant to help you advertise your services online. Apart from that, the incredible functionality and efficient UI of the template will help you boost your business. You’ll be able to master your projects, introduce your team members, sell with WooCommerce, arrange appointments, run a converting blog, and more.
With Elementor Page Builder available in the package, you can create pixel-perfect page layouts without even touching a single line of code. In short, everything you might need for managing your website is onboard.
Read Also
How to Style and Customize Contact Forms with Elementor Page Builder
JET Plugins for WordPress Elementor Builder [Review]
How to Create Testimonials Using Elementor Page Builder
Top 50 WordPress Elementor Business Themes
How to Create a Mega Menu with Elementor Builder Quickly and Easily
JET Plugins for WordPress Elementor Builder [Review]
How to Create Advanced Mega Menus with Elementor Page Builder
How to Create a Countdown Timer with Elementor Page Builder
The Ultimate List of Add-ons for Elementor
Don’t miss out these all-time favourites
- The best hosting for a WordPress website. Tap our link to get the best price on the market with 82% off. If HostPapa didn’t impress you check out other alternatives.
- Monthly SEO service and On-Page SEO - to increase your website organic traffic.
- Website Installation service - to get your template up and running within just 6 hours without hassle. No minute is wasted and the work is going.
- ONE Membership - to download unlimited number of WordPress themes, plugins, ppt and other products within one license. Since bigger is always better.

Self-taught copywriter specialized in web design, marketing, and traveling. Graduated with a degree in German and English translation. Obsessed with guides, listings, and long-read blog posts. Open for new information and strives to explore more undisclosed subjects. Social Media Accounts: Fb, Twitter, LinkedIn.
Get more to your email
Subscribe to our newsletter and access exclusive content and offers available only to MonsterPost subscribers.

Leave a Reply
You must be logged in to post a comment.