How to Insert Youtube Video into Powerpoint Presentation (Using Different PowerPoint Versions)
There are so many technologies that are available for modern users. Some of them facilitate our daily tasks, others show how modern a person is. You must not surprise your audience with a presentation that contains only multiple lists of features, charts, and some images. So, start using videos to enliven your Microsoft PowerPoint presentation! And this guide on how to insert youtube video into powerpoint will help you!
We’ll tell you how to do it in different PowerPoint versions. The level of difficulty is on a minimum. Just get assured that your PC is connected to the Internet. Still, that’s not the only variant.

A video enlivens a Microsoft PowerPoint presentation. If you insert a YouTube clip into a PowerPoint, you will have access to it for as long as it’s available on YouTube, regardless of what device is used to present the PowerPoint. Follow the simple guideline below on how to insert any YouTube video in several minutes, regardless of the PowerPoint version.
- Why to add videos to PowerPoint presentations
- Using PowerPoint 2019
- Using PowerPoint 2010 and 2013
- Using PowerPoint 2007
- Using PowerPoint 2003
- Other Ways to Add a YouTube Video into PowerPoint
- The Most Common Problems with Videos in PowerPoint and How to Fix Them
- How to Convert a PowerPoint Presentation into a Video
- Get a Multipurpose Solution for Your Business PowerPoint Presentations
Why to Add Videos to PowerPoint Presentations
If you look for more reasons to start using videos in your projects, keep reading. First of all, the trends for the next year are already here! That means the popularity of video content becomes even more impressive in 2020. There is no surprise why. Video materials are truly suggested to be the most effective way of advertising a product. Talking about videos as technology or tool, they are also very helpful when you need to show, explain something through a full visualization.
Insert a YouTube video into a PowerPoint presentation to make it not only informative but also provide emotional discharge to your audience.
Stats says 53% of potential clients get interested in a brand or proposition after having watched a video on socials. Very often videos are even more persuasive than charts. But, unfortunately, only 4% of professionals “always” add videos to their presentations.
So, don’t doubt and tell your friends that high-quality video content:
- provides with the greatest number of visualization options;
- makes your idea, product, etc easier to understand;
- enables to explain, tell, show in details a lot in a quite short period of time;
- means high interactivity;
- gives more points to a person or team that hold a presentation;
- is a chance to relax while watching for your audience.
We would like to underline that inserting a YouTube video into a PowerPoint presentation makes it not only informative but also provides emotional discharge to an audience.
Insert YouTube Videos into PowerPoint 2019
For the current moment, the latest version of PowerPoint is the one released in 2019. It boasts of advanced functionality, as well as an intuitive interface adapted for tablets and smartphones with touch screens.
New Features of PowerPoint 2019:
- Windows Server;
- support of PDF files;
- adding pictures and other multimedia files (spectacular vector graphics, converting SVG icons to shapes, the possibility to use 3D models to view objects from all sides, easy-peasy background removal, export 4K videos, and other);
- lots of useful catchy effects and filters (funnel diagrams, charts with maps, diverse, and other animations effects);
- handwriting function;
- built-in digital notebook;
- the elegant minimalistic design of PowerPoint slides;
- synchronization of email, calendars, and contacts;
- import of files from Word, Excel, other PowerPoint versions, MS Office 365, OneNote, Microsoft Publisher 2019, etc.
Benefits of PowerPoint 2019:
- handy interface;
- data analytics;
- a possibility to create presentation templates;
- support of all brand-new forms, options, and effects;
- of course, Morph and Zoom function;
- auto-selection of the size and format of slides up to the settings;
- regular updates.
Please note, PowerPoint 2019 is compatible with Windows 10 and Mac OS X (x86, x64).
And now, let’s find out how to embed YouTube videos to PowerPoint 2019!
This way is suitable for users of Windows and works due to embed code.
#1. So, go to YouTube for a video you want to see in your PowerPoint presentation (remember, only one video in one time!).
#2. Click on the Share button. Just like below

#3. Then, under Share, a link, pick out Embed

#4. As soon as you’ve opened the Embed Video dialog box, choose the inframe code. After, click on Copy.
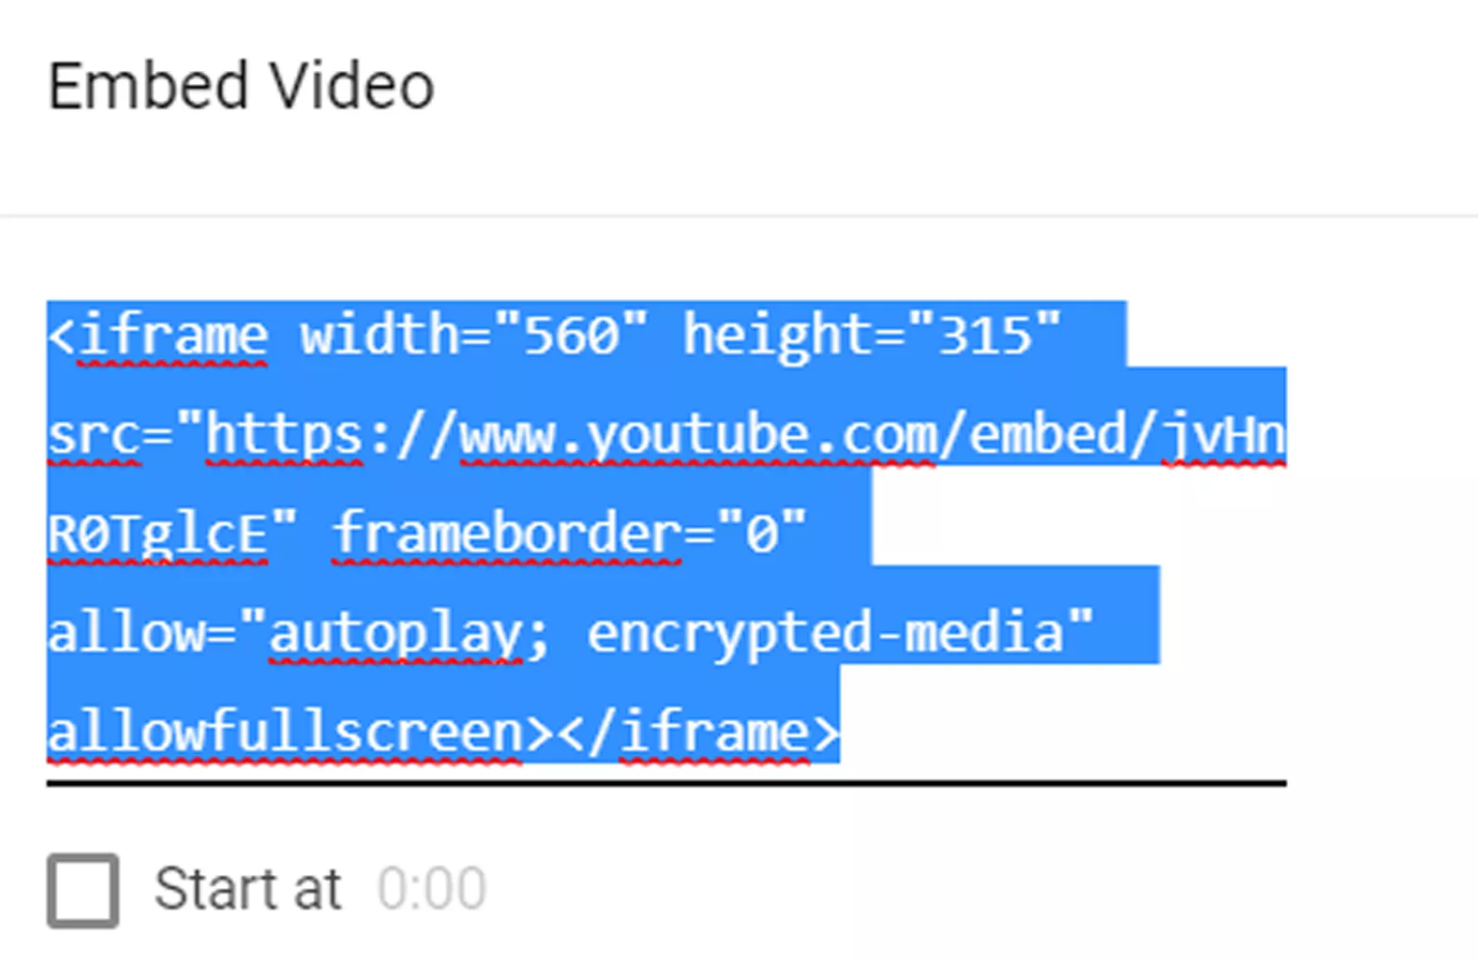
#5. On this step, open PowerPoint 2019 and find the slide you want to place a YouTube video on.
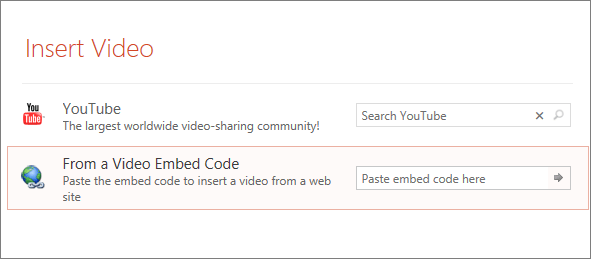
#6. Select Insert, in the Media group tab, choose Video > Online Video. This will open the Insert Video dialog box.
#7. In the Form a Video Embed section, paste the code you’ve just copied. Click on Insert.
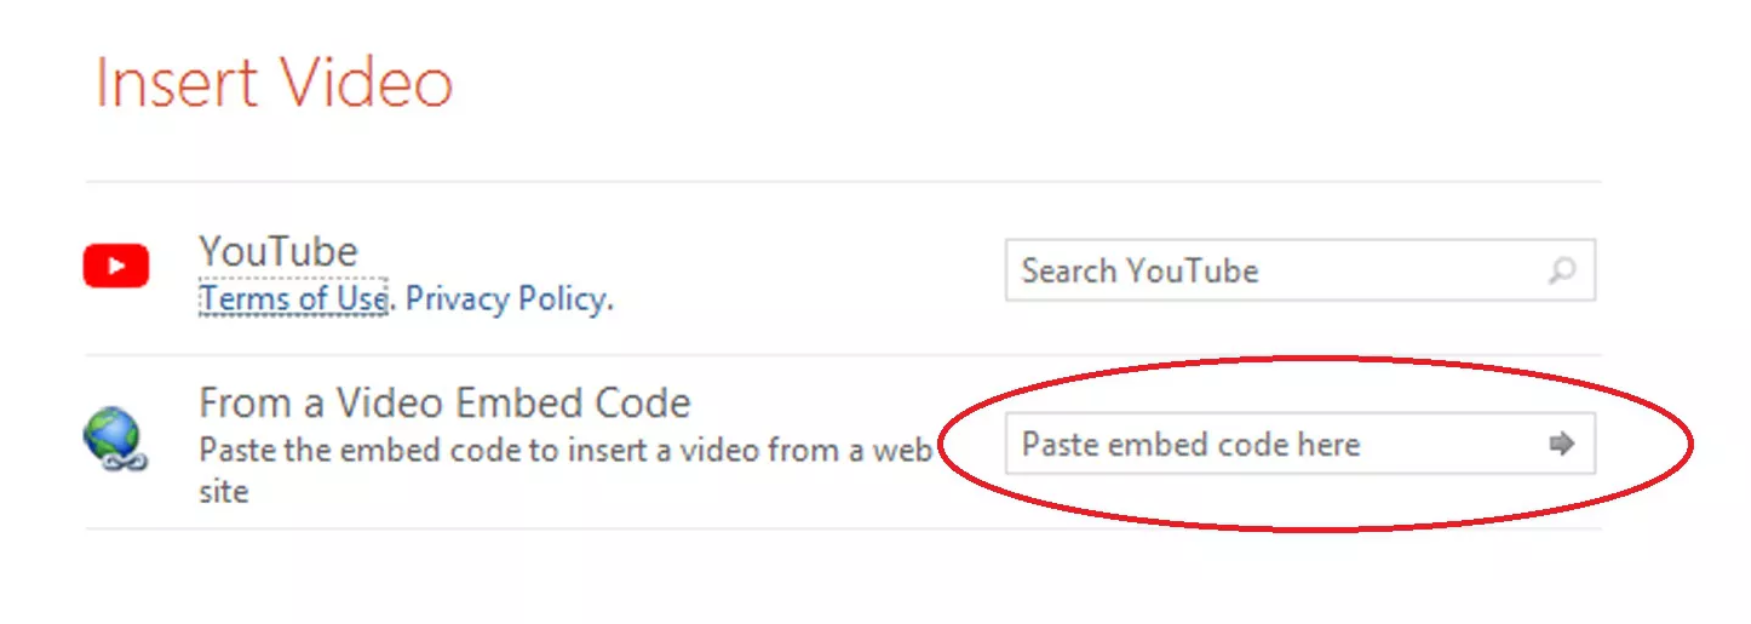
#8. Now, there is must be a video frame on your slide. That’s most the finish line.
#9. Using the right button of your mouse, click on Preview. Then, choose Play. Or, just watch it while checking the whole performance of your PowerPoint presentation (choose From Beginning in the Start Slide Show).
#10. While your presentation in the public, be sure that your PC is connected to the Internet. Seeing the slide with the embed YouTube video, don’t forget to click on it and Play. There is nothing difficult at all!
How to embed a youtube video in powerpoint 2010 and 2013
#1. Use the Developer tab.
The Developer tab allows you to insert objects that are not available with the default settings. This allows you to paste YouTube videos without using the Insert menu.
- Click File and select Options.
- Select Customize Ribbon.
- In the drop-down menu, select Main Tabs.
- Select Developer and click the Add button.
- Click OK. The Developer tab appears at the top of the window in a row with other tabs.
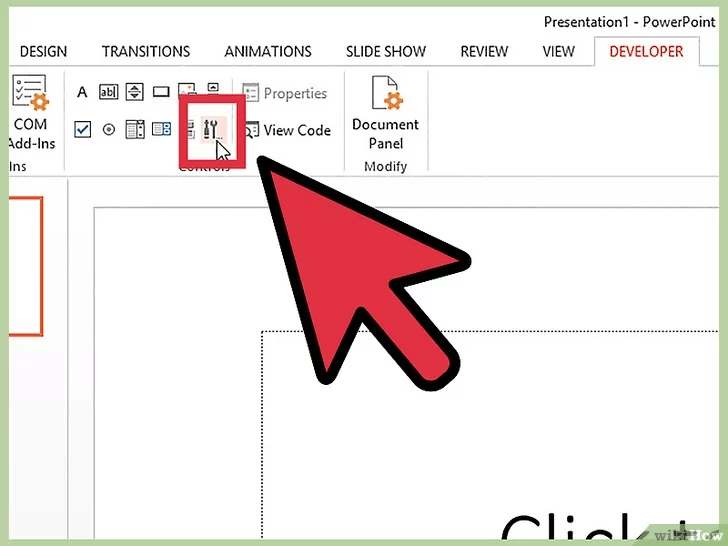
#2. Click More Controls.
The button is in the Controls section of the Developer tab.
#3. Select the Shockwave Flash Object.
You will need to scroll the list to select this tab.
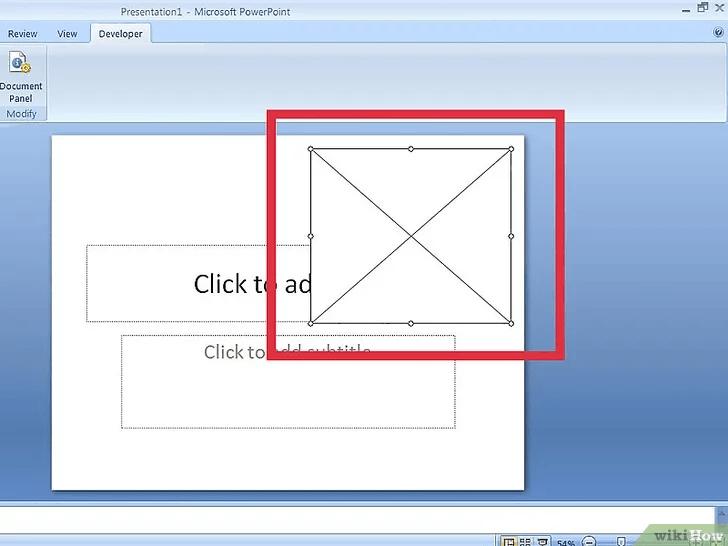
#4. Click and drag the mouse cursor to create the inserted object.
The size of your created object will be the size of the displayed video on your slide. The object will be marked with an "X".
#5. Prepare the URL of the YouTube video.
Find the video on YouTube you’d like to insert. Copy the address to the Notepad editor.
- Remove "watch?" And replace the "=" sign with the "/".
For example, http://www.youtube.com/watch?v=BevOmZtKQ_w will be http://www.youtube.com/v/BevOmZtKQ_w
- If you want the video to start automatically when you open the slide, add "& autoplay = 1" to the end of the address.
For example, http://www.youtube.com/v/BevOmZtKQ_w will be http://www.youtube.com/v/BevOmZtKQ_w&autoplay=1
- Copy the final URL and return to PowerPoint.
#6. Right-click on the object you created.
Click Property Sheet on the shortcut menu.
#7. Find the Movie option.
When you open Properties of your Flash object, a new table will be opened. By default, the items on the table are placed in alphabetical order.
- Copy the final URL of your video into the Movie field. Close the Properties window.
How to embed a youtube video in PowerPoint 2007
#1. Click the Developer tab.
As mentioned previously, the Developer tab allows you to insert objects, which aren’t available with the default settings. This allows you to embed YouTube videos without using the Insert menu.
- Click the Microsoft Office button in the upper left corner. Select PowerPoint Options at the bottom of the menu.
- In the Popular section (opens by default), put a checkmark in the box Show Developer in the Ribbon. Click OK.
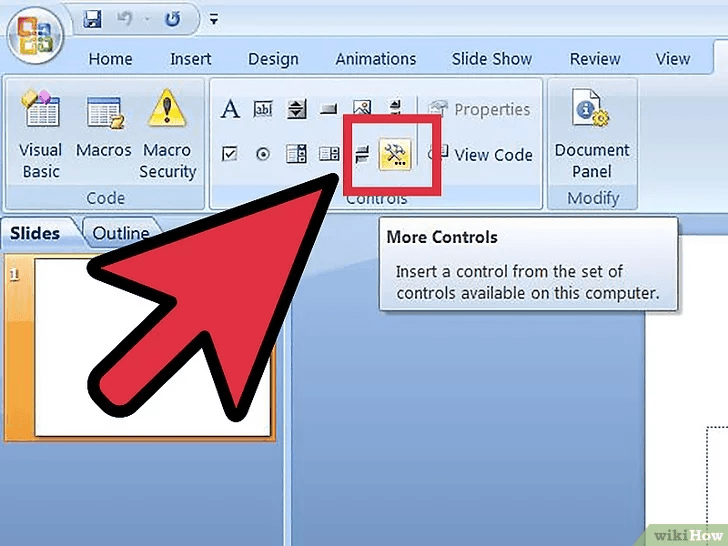
#2. Click More Controls.
The button is in the Controls section of the Developer tab.
#3. Select the Shockwave Flash Object.
You’ll need to scroll down the list to find the item.
#4. Click and drag the mouse cursor to create the embedded object.
The size of the object you created will be the size of the displayed video on your slide. The object will be marked with an "X".
#5. Prepare the video URL from YouTube.
Find the video on YouTube you would like to insert. Copy the address to the Notepad editor.
- Remove "watch?" And replace the "=" sign with the "/".
For example, http://www.youtube.com/watch?v=BevOmZtKQ_w will be http://www.youtube.com/v/BevOmZtKQ_w
- If you want the video to start automatically when you open the slide, add "& autoplay = 1" to the end of the address.
For example, http://www.youtube.com/v/BevOmZtKQ_w will be http://www.youtube.com/v/BevOmZtKQ_w&autoplay=1
- Copy the final URL and return to PowerPoint.
#6. Right-click on the object you created.
Click Properties on the shortcut menu.
#7. Find the Movie option.
When you open Properties of your Flash object, a new table will be opened. By default, the items on the table are placed in alphabetical order.
- Copy the final URL of your video into the Movie field. Close the Properties window.
Using PowerPoint 2003
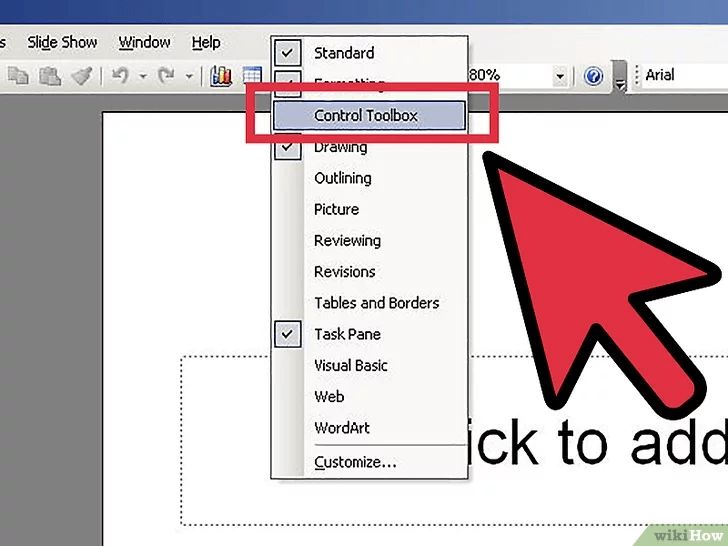
#1. Open the Controls Toolbox.
Right-click the horizontal menu and select the Controls Toolbox. Alternatively, click View and select the Control Panel. Then, select Controls from the drop-down list. There will be a small window with several buttons.
#2. Select More Controls.
The button is located at the bottom of the toolbox.
#3. Select the Shockwave Flash Object.
You will need to scroll down the list to select the item.
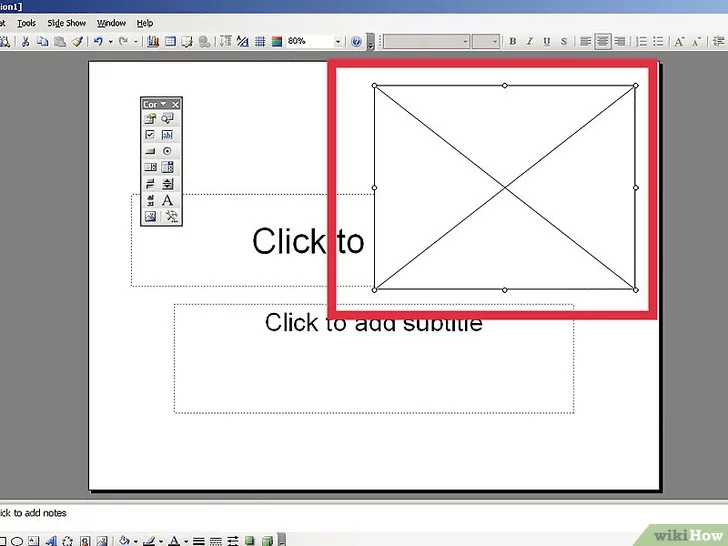
#4. Click and drag the mouse cursor to create the embedded object.
The size of the created object will be the size of the displayed video on your slide. The object will be marked with an "X".
#5. Prepare the video URL from YouTube.
Find the video on YouTube you would like to insert. Copy the address to the Notepad editor.
- Remove "watch?" And replace the "=" sign with the "/".
For example, http://www.youtube.com/watch?v=BevOmZtKQ_w will be http://www.youtube.com/v/BevOmZtKQ_w
- If you want the video to start automatically when you open the slide, add "& autoplay = 1" to the end of the address.
For example, http://www.youtube.com/v/BevOmZtKQ_w will be http://www.youtube.com/v/BevOmZtKQ_w&autoplay=1
- Copy the final URL and return to PowerPoint.
#6. Right-click the added object.
Select Properties in the opened shortcut menu.
Find the Movie option. When you open Properties of your Flash object, a new table will be opened.
Copy the final URL of your video into the Movie field. Close the Properties window.
Other Ways to Add a YouTube Video into PowerPoint
There are several more ways how you can insert a video into your PowerPoint, including the most known way using the embed YouTube code through the Insert tab.
#1. Copy the video embed code from the official YouTube site (click the Share button under the video, then click Embed Video and Copy);
#2. Click the Insert tab, choose Insert Video;
#3. Paste the copied embed video into the From a Video Embed Code section, click the arrow;
#4. To view the video in the presentation, right-click the video and choose the View command. You will see the Play button - click it. The video will be displayed if the computer has Internet access.
Finally, you can use a free Microsoft Office plugin called YouTube Video Wizard, which adds the YouTube Video button to the Insert menu of PowerPoint. The plugin allows you to insert YouTube videos using regular URLs instead of embed codes.
The Most Common Problems with Videos in PowerPoint and How to Fix Them
Most often, adding videos in PowerPoint presentations, users face the following problems:
- A video is displayed as a small icon on the slide and does not play while watching the presentation because of an inoperative link;
- PowerPoint doesn’t support the video format, video or audio codec of your tape recording;
- While inserting a video, an error is displayed, and the video can’t be added to the slide;
- Presentation files with embedded video become too large, which makes it difficult to download or send anywhere;
- embedded YouTube videos don’t play because of Internet connection problems.
In addition, if you use an older operating system (like Windows Vista, Windows 7 or Office suite), then you must have already faced a lack of the necessary codec.
Moreover, if some video or audio codec is not installed on your computer, or they are not supported by your version of PowerPoint, a video will not work at all.
So, how to fix all this?
To avoid the problems described above and minimize all the risks, pay attention to the next:
- It is always easier to deal with smaller files, so it would be useful to pre-compress video files before adding them to your presentation.
- It’s best to convert your video files to WMV / ASF or MP4. These formats are supported by PowerPoint.
Reducing the size of video files and converting them to PowerPoint-compatible formats significantly reduces any errors. You just have to make sure that the link of the embedded video file is correct, and that video is stored locally. If it’s on the YouTube channel, you won’t demonstrate it in your presentation without the Internet connection). So, it’s better to copy the video file that you want to add to the PowerPoint presentation in the same folder where your ppt or pptx file is stored.
How to Convert a PowerPoint Presentation into a Video
Have you ever thought about showing your PowerPoint presentation on YouTube? Then, turn it into a video. In what situations you may need it? For example, posting a product presentation on your website just share a link from your YouTube channel. In such a way, everyone will get acquainted with it quicker than you can imagine.
The same, with PowerPoint, everyone can export a video file that can be played in such applications like QuickTime, Windows Media Player, and VLC. Plus, all the exported videos perform with the same animation effects and transitions. That is very comfortable and avoids extra adjustments.
Keep on reading if you want to find out how to convert a PowerPoint presentation into a video without special tools or applications.
To start, open a PowerPoint presentation. Note, the export of this PowerPoint presentation to a video file should be the last step in this process. This is so, because every time you make changes, you need to convert the PowerPoint presentation to a video once more.
So, go to File → Export → Create Video.

On this step, you can select several basic parameters clicking on the drop-down menus on the right side to control the quality and time of your presentation.
Here are the main points that you need to choose before converting your PowerPoint presentation to a video:
#1. Adjust PowerPoint Video Quality
Select a quality option from the drop-down list to find a compromise between the file size and video quality.
The better quality you choose, the larger the finished file will be. If you intend to upload videos to Internet services such as YouTube, then it’s normal to export in the highest quality and let them take care of the compression.

If you share this video with a colleague per e-mail or publish it on your own server, the smaller file size must be the right choice. Pick out a quality option from the drop-down list.
#2. PowerPoint Slide Time Control
Now, you need to set the runtime for each slide in your video. There are two variants for setting the time in the drop-down menu:
- Don’t Use Recorded Timings and Narrations. Just set the duration for each slide in the video, for example, 5 seconds.
- Use Recorded Timings and Narrations. Set certain time intervals for each slide to show.

For our example, let's choose “Don’t Use Recorded Timings and Narrations”.

As well, set 5 seconds for each slide to be shown on the screen.
#3. Create a PowerPoint video
Finally, click on Create Video. You’ll be asked to save this video in varied video formats and give it a name.
Just mention, for export, you can choose between an MPEG-4 file (.MP4 file) or a Windows Media Video file (.WMV).
Get a Multipurpose Solution for Your Business PowerPoint Presentations
Entorum - Business PowerPoint template with customizable infographics

You can create attractive presentations quickly and easily if you choose a ready-made template. Zemez team has just introduced their innovative PowerPoint template - Entorum. This template has all the chances to become the bestselling one among its competitors. Whether you are working on a presentation of a business plan for launching a new startup or any other businesses, Entorum will help you to deliver the information at the professional level. You will be glad to discover 10+ presentation slides, 28+ analysis infographics, 5+ visual content slides, and many other types.
More features:
- 4 aspect ratios
- Vector icon
- Editable charts
- Light and dark styles
- Numerous map slides
- Guaranteed updates
How to insert youtube video into powerpoint FAQ
A video enlivens a Microsoft PowerPoint presentation. Plus, video materials are truly suggested to be the most effective way of advertising a product. Talking about videos as technology or tool, they are also very helpful when you need to show, explain something through a full visualization.
Here are some facts that speak in favor of using youtube videos in PowerPoint presentations. So, don’t doubt as high-quality video content:
✔provides with the greatest number of visualization options;
✔makes your idea, product, etc easier to understand;
✔enables to explain, tell, show in details a lot in a quite short period;
✔means high interactivity;
✔gives more points to a person or team that hold a presentation;
✔is a chance to relax while watching for your audience.
First of all, it’s always easier to deal with smaller files, so it would be useful to pre-compress video files before adding them to your presentation.
2. It’s best to convert your video files to WMV / ASF or MP4. These formats are supported by PowerPoint.
To avoid troubles creating a PowerPoint presentation, get a ready-to-use template.
Realated how to embed a youtube video in powerpoint
Design in PowerPoint: Step-by-Step Instructions on How to Create Awesome Slides
100 Best Business Presentation Templates. Cool! Great! Awesome!
Get Pitch Pro – A Free PowerPoint Template for Business
Get more to your email
Subscribe to our newsletter and access exclusive content and offers available only to MonsterPost subscribers.








Leave a Reply
You must be logged in to post a comment.