How to Install WordPress to Your Hosting
To use all the benefits of creating a website with WordPress themes, you have to install it to that space. An option of automatic installation of CMS is available on all types of hosting, but it often costs. If for some reason you don’t want to use it, you can easily do the installation by yourself.
Creating a MySQL base on hosting
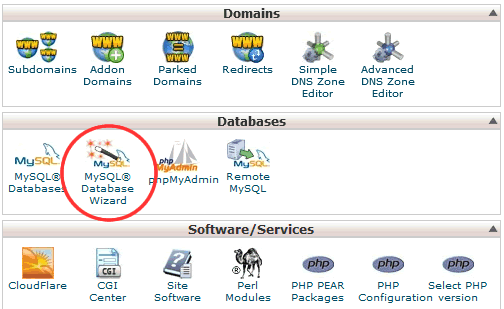
Enter your hosting account admin panel and find the “MySQL Database” button. On different hosting, it could look a little different, but here some examples for you to know what to seek:


After hitting the button, you’ll have to give that database a name, enter database user’s name and invent a password.

When you are finished, note your hostname (very often it is “localhost”), database name, username, and password.


Getting text editor and FTP client
You will need a simple text editor. If you are a Windows user, Notepad will do. Adepts of MacOS and Linux can download a cross-platform editor like Atom or Emacs.
The next necessary tool is a program that will allow you to connect to the FTP (File Transfer Protocol). With this application, you will place downloaded WordPress files to space that you rent on a hosting. The best choice of such a program is FileZilla. It is simple, convenient and completely free.
Best Plugins For A New WordPress Site [Free Ebook]
Downloading and installing WordPress
WordPress software is free and can be downloaded without any payments. Just hit the “Download WordPress” button and you will receive a zip file. Then you have to unzip it to a folder on your computer. There is a file, named wp-config-sample.php there, rename it to wp-config.php and open in a text editor. You will have to type your MySQL database information you noted earlier – database name, username, password and hosting name. Save that file after configuration.

When WordPress files lay safe on your hard drive, it’s time to go again to your hosting admin panel. Find the “FTP” button and hit it to create an FTP account on your server. Note username and password. Now open FileZilla, it will look like that:

Go to File > Site Manager and hit the “New Site” button. Name this new connection as you like and enter your website FTP address (if you named your website http://www.nicesite.com your FTP name for it will be ftp://ftp.nicesite.com or ftp://nicesite.com). Miss the “Port” box, leave it like it is. In the “Type” box choose Normal. Type your full username and password and then click “OK”. Now you’ve created a new FTP connection. Choose it and hit the “Connect” button. FileZilla will look like that if you’ve done everything correctly:

Choose the directory where the WordPress files lay and upload them (only the content, not the folder) to the root directory of your website.

When the upload is done, open the browser and go straight to your website (it would be something like http://nicesute.com/wp-admin/install.php). The first thing you will see is a frame, where a friendly WordPress installation interface gives you the opportunity to choose the language.

The next window will politely ask you to prepare all the required information, and after you push the “Let’s go” button, you will see a form that you have to fill with database information.

After the installation process is finished, you will be asked to fill the website information – title, your administrator’s username, e-mail, and password.

Congratulations!
WordPress is successfully installed. Press “Log In” to start configuring it according to your needs.


Read Also
Top 5 Hosting Tips for All Magento Sites
GoDaddy vs WordPress: Hosting and Builder Review
How to Shop for Reliable Hosting Partner?
Good Web Hosting Is Essential for Stronger SEO and Better Ranks
Managed vs Shared Hosting for WordPress: What’s An Ideal Choice?
Don’t miss out these all-time favourites
- The best hosting for a WordPress website. Tap our link to get the best price on the market with 82% off. If HostPapa didn’t impress you check out other alternatives.
- Website Installation service - to get your template up and running within just 6 hours without hassle. No minute is wasted and the work is going.
- ONE Membership - to download unlimited number of WordPress themes, plugins, ppt and other products within one license. Since bigger is always better.
- Ready-to-Use Website service is the ultimate solution that includes full template installation & configuration, content integration, implementation of must-have plugins, security features and Extended on-page SEO optimization. A team of developers will do all the work for you.
- Must-Have WordPress Plugins - to get the most essential plugins for your website in one bundle. All plugins will be installed, activated and checked for proper functioning.
- Finest Stock Images for Websites - to create amazing visuals. You’ll get access to Depositphotos.com to choose 15 images with unlimited topic and size selection.
- SSL Certificate Creation service - to get the absolute trust of your website visitors. Comodo Certificate is the most reliable https protocol that ensures users data safety against cyber attacks.
- Website speed optimization service - to increase UX of your site and get a better Google PageSpeed score.
Get more to your email
Subscribe to our newsletter and access exclusive content and offers available only to MonsterPost subscribers.

Leave a Reply
You must be logged in to post a comment.