How to Make a Compelling PowerPoint Presentation. Ultimate Guide
This is the third lesson of our Ideal Presentation Free Ultimate Course. Want to get the whole course? Hurry up – follow the link and subscribe!
- What Is PowerPoint?
- Is PowerPoint Free?
- PowerPoint Pros and Cons
- How to Create a Compelling PowerPoint Presentation
- Free Must-Have PowerPoint Plugins
- How to work with PowerPoint:
- How to Cite a PowerPoint Presentation
- How to Add Audio to PowerPoint
- PowerPoint Pre-Designed Templates for a Successful Pitch Deck
- PowerPoint Guide Final Words
What is PowerPoint?
PowerPoint is one of the most popular presentation programs used worldwide. It was released back in 1987, thus being named one of the oldest software for building presentations. It’s widely used for personal, educational, and business purposes.

PowerPoint offers word processing, outlining, drawing, graphing, and presentation management tools- all designed to be easy to use and learn. The software provides you with a number of handy tools and slides’ modification possibilities, including:
- Adding as many slides to your presentations as you wish;
- Managing transitions between slides and animation effects;
- Printing audience handouts, outlines, and speaker's notes;
- Formating all the slides of your presentation with the Slide Master;
- Keeping your entire presentation in a single file, including your slides, speaker’s notes, and audience handouts;
- Importing your PowerPoint presentation in Microsoft Word or Excel, and more!
Is PowerPoint free?
PowerPoint is a paid software that’s included in the Microsoft suite. However, there is also a web-based version available. It’s free, though lacking plenty of features.
If you want to install PowerPoint on your laptop or PC, then you will need to pay for it. It comes with a complete setup called Microsoft Office.
If you don’t want to buy it, then you can use a free online version of the software or simply opt for other web-based tools like Google Slides.
PowerPoint Pros and Cons
There are always two sides to a coin. In addition to the many advantages of using PowerPoint, there are some drawbacks to making presentations with its help.
Let’s begin with the PowerPoint pros :
- It is easy to download and use virtually anywhere.
- PowerPoint is probably the best choice for professional, business-type use.
- The software is best suited for data-focused and informative presentations.
- PowerPoint works well for presentations that will be given by multiple people within your organization or company.
- Visually striking PowerPoint representations can help to reinforce the key points you’re speaking about.
- It is easy to customize each slide to meet specific needs
- You can print each slide directly from PowerPoint.
PowerPoint cons:
- The primary disadvantage is that it takes some time to learn how the software works.
- Because it is part of the Office 365 package, PowerPoint is a paid software.
- Although PowerPoint is compatible with both Mac and PCs, the quality of the program is not created equal on each of them. The Mac version falls short of the PC version.
- PowerPoint lacks in design function.
- People may perceive PowerPoint templates and themes as outdated.
How to Create a Compelling PowerPoint Presentation
When you need to create a compelling PowerPoint presentation, there are 4 major things that matter:
- Design of the template. We strongly do not recommend you choosing default PowerPoint themes because everyone used them and your presentation won’t be unique. Using premium PowerPoint presentation templates that can be found in the TemplateMonster marketplace, you can enhance your presentations with versatile, professionally designed slides, and complemented with customizable maps, charts, and infographics. In other words, they contain everything you need to create unlimited presentations for your projects.
- The content of your slides and the way the content is placed on the slides. Use one slide to deliver one message to your audience.
- Select fonts carefully. Don’t use the default typefaces such as Calibri, Cambria or Arial. Instead, consider Helvetica. Unlike the aforementioned fonts, it comes in a broad range of weights and styles and allows you to build your presentation using only one type of family and retain the integrity of its design.
- Avoid clutter in your slides, and make them as minimalist as possible. Laconic design always looks elegant and will show the audience your excellent taste. Avoid using decorative icons and other stuff that will make slides messy. It is better to leave lots of empty space than overcrowding the presentation with unnecessary details no one will pay attention to.
- Give your audience a chance to contribute to your report by asking questions on the topic. This will not only prevent them from falling asleep but will also give you an opportunity to enliven the presentation, add a personal touch to it and make it memorable.
- Take care of all the possible compatibility issues that you may face while revealing your presentation in front of your audience. If you want to make sure that your PPT file displays properly, better use your own laptop, or specify beforehand if the hardware and software of the PC are fully compatible with your presentation.
Free Must-Have PowerPoint Plugins
Using a PPT plugin is as easy as pie. There are many advantages to creating real-life presentations. 91% of users believe that cool PowerPoints make them feel more confident when giving a presentation.
- 91% also say they would feel more confident if they knew their presentation was elegantly designed.
- 92% of users claim presentation skills are critical to success at work.
- 89% use PowerPoint.
- 79% claim most presentations are boring.
- 79% spend at least one hour practicing their presentation.
- 68% said that they felt they were “good” or “outstanding” at public speaking so the data could be pointing in that direction.
The good thing is that most of today’s PPT plugins are free. Below I listed the ones you may want to use.
- iSpring Free is a free PPT add-in, which will help you to turn the PowerPoint project into an entertaining eLearning course.
- LiveWeb is a free PPT plugin. It allows you to display the web pages directly in the presentation.
- Project Timeline is a free timeline PPT add-in.
- Pro Word Cloud is a free PowerPoint app that will help you to generate word cloud images in the presentation.
- Web Video Player is a handy PowerPoint plugin that lets users insert and play YouTube videos in their presentations.
These were the main PowerPoint add in tips I wanted to give you, but I still have some useful info to share.
How to Work with PowerPoint
By making your PowerPoint presentation boring you don’t simply decrease its value – you set it to zero. If you are planning to screw up your presentation, there is no reason for preparing it in the first place. PowerPoint offers many useful tools and customization options that let you create a compelling PowerPoint presentation that will appeal to your audience. Let’s see how to work with PowerPoint and manage your slides like a pro.
How to Make a Vector Logo in PowerPoint
No professional PowerPoint presentation can go without a logo featured on its pages. To ensure that all your branded logo is displayed properly on all devices and screen sizes, then you need to add a vector logo to your slides.
Vector logo is basically a small image either in JPG, PNG, GIF, EPS, TIF or SVG format. There are many ways to create a vector image and Microsoft PowerPoint is one such way. So how do you do that? Follow these step-by-step instructions.
- Think of the theme for your logo. It can be your company or organization name or a small picture that represents it. There needs to be a clear logic between your logo and the services you provide.
- Once you have come up with your idea, it’s time to make it. To create a PowerPoint file, head to the Insert tab and find “WordArt”. Enter the text you are going to use in your logo and use inbuilt styles to restyle your text according to your desires.
- Make it fancy. Go to the Insert tab, find “Shapes”, and pick the one you want to use on your logo. You can edit the object to make it fit your needs, or you can resize and rotate it.
- In case you are not satisfied with WordArt and Shapes options, you can experiment with PowerPoint illustration tools such as Pictures, SmartArt or Clip Art to make a truly unique and fancy logo.
- The final step is grouping all the elements you used in your logo to make a single item. Select all the elements of your logo, right-click, and select “Group”. Done! Now your logo is a single entity.
- If you want to use your logo more than once (and you probably want to), you have to save it as a picture.
Here are some examples of fancy logo designs that you can use for inspiration.
![]()
How to Insert PDF into PowerPoint
There are many ways to make your business presentation informative. One of the most common solutions for PowerPoint presentations is using infographics, images, and PDF files.
There are several ways to embed PDF files into your PowerPoint presentation. Just have a look.
If you want to insert PDF into your PowerPoint presentation as an object, take the following steps:- Open your PowerPoint presentation and find the slide on which you want to insert a PDF file.
- Head to the “Insert” menu and find the “Object” tab.
- Choose “Select from File” and then browse the file you want to insert into your presentation.
- The first page of the PDF file you just added to your presentation will show up on the slide.
The PDF file will become a part of your PowerPoint presentation file, which means that you will not need to have an additional copy of this file on the computer you are going to show your presentation on.
Sometimes you need to have only one page of the PDF file displayed in your PowerPoint presentation. Take the following steps to do it.
- Open the PDF file you need for your presentation.
- Open your PowerPoint presentation and find the very slide you want to add a PDF to.
- Head to the “Insert” tab and click on “Screenshot”.
- Find your PDF file under Available Windows and insert it into your presentation as a picture.
Another way to embed a PDF file into a PowerPoint presentation is using Adobe Acrobat:
- Open your PDF file in Adobe Acrobat Reader.
- Head to the “Tools”, choose “Basic”, and click on “Select”.
- Select the text in the PDF file you need to copy.
- Head to “Edit” and copy the text.
- Find the slide you want to add the copied text to.
- Press Ctrl+V.
PowerPoint Text Effects
PowerPoint text effects will help you to emphasize the key points of your presentation as well as make it readable. Among the most useful text effects are Text Fill & Outline, Shadow, Glow, Reflection, and 3D Format. These simple effects can really make your presentation much better, so do not take them for granted.
PowerPoint lets you experiment with different forms and styles of presenting data in your presentation. This includes:
- Highlight text ;
- Curve text;
- Wrap text around images;
- Outline text;
- Add scrolling effect to text;
- Animate text;
- Add in-text citations and more.
You can find step-by-step instructions on how to implement all of these techniques in your PowerPoint presentation in this detailed guide.
How to Embed Fonts in PowerPoint
Pretty often we start looking for more opportunities to create eye-catching presentations and embedding fonts in PowerPoint can have a huge impact on the look and feel of your slides. Here’s how to embed fonts in PowerPoint :
- Log in as Administrator, open file manager and navigate to C:\Windows\Fonts.
- Locate the typeface used in your presentation, right-click and choose “Properties”.
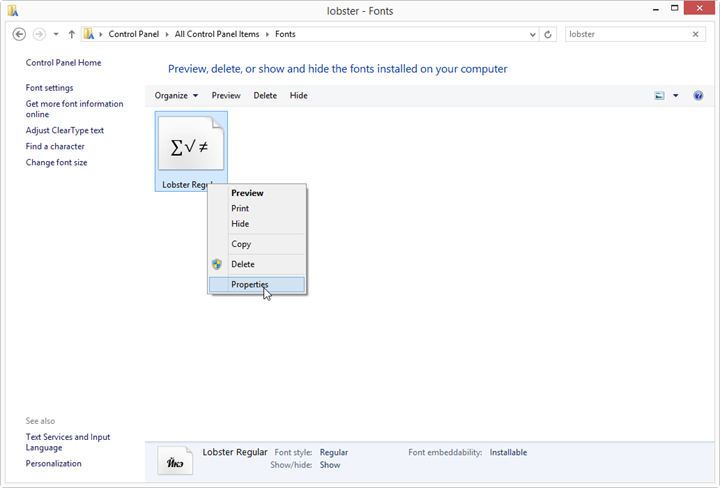
- Unmark “Read-only” option if necessary and click OK to apply changes.
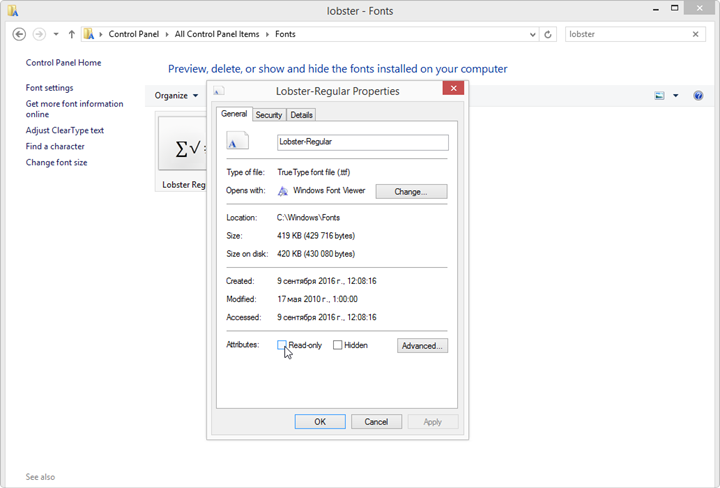
- Switch the tab to “Details” to make sure the font embeddability has either an “installable” or “editable” value.
- Open up the pitch that needs to be shared.
- Navigate to PPT menu on the left sidebar and pick “Options”.
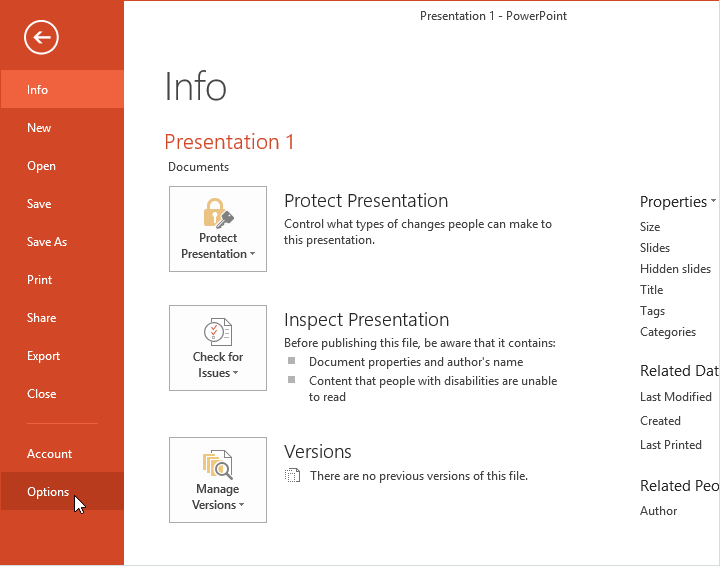
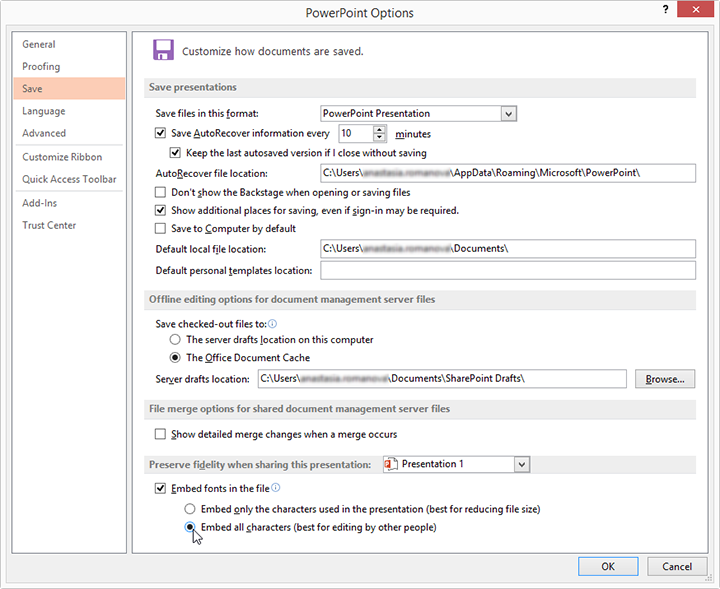
- Go to “Save” options where you will find the embedding options right on the bottom of the menu box. Under “Preserve fidelity”, select the presentation you want to embed the typeface in and then tick “Embed fonts in the file” and opt for “Embed all characters”. Click OK to save the changes.
How to Use PowerPoint Pictures
PowerPoint offers plenty of possibilities to add an eye-catching style to your presentations. One of them is by using striking visuals. Though it may seem to be quite easy and effortless, but sometimes we may face unexpected difficulties when working with pictures in PowerPoint . To avoid this from happening you need to comprehend the technical side of a question or have the instructions on how to work with pictures in PowerPoint.
One of the most popular effects applied to pictures in PowerPoint is managing their transparency. Here’s how you can manage it:
- Select an image.
- A new section “Working with Images” will appear in the header of the program, and a tab “Format” will appear in the header.
- Here we need a function that is located at the very beginning of the toolbar on the left. The function is called “Remove Background”.
- A special mode for working with the image will open, and the photo will be highlighted in purple.
- A violet color will fill in everything that will be cut. Of course, we need to remove what should remain in the end. To do this, click on the "Mark areas to save" button, which is a basic tool for adjusting the background in PowerPoint.
- The cursor changes to a pencil, with which you’ll need to mark the areas of the photo to be saved. Ideally, you choose a PowerPoint background image with the boundaries of the sectors that are easily determined by the system. In this case, it is enough to make light strokes or clicks inside the sectors framed by the borders. They will be painted in the original color for the image.
- As a result, it is necessary to ensure that only an unnecessary background remains purple. There are also other buttons on the toolbar. “Mark area to be deleted” has the opposite effect—this pencil marks the selected sectors in purple. And “Delete Mark” removes previously drawn marks. There is also a button “Cancel all changes”—when it is clicked, it cancels out all the changes and restores the original version.
- After the final selection of the necessary zones for saving, you need to click on the "Save Changes" button. The toolkit will close, and if everything is done correctly, the photo will no longer have a background.
When working with images in PowerPoint, keep in mind that you can increase your file size significantly when featuring many images on your slides. Here’s how to reduce the file size by compressing images in your presentation.
- In the presentation, click “File” and “Save as.” Select a name and location to save the file.
- In the window that opens, click "Tools" and select "Compress Images ..." in the drop-down list. Then a window will appear where you can choose a compression method and image quality.
- Using the option “Use document resolution”, you can compress the image size to the selected number of pixels per inch “File | Options | Additionally".
- A quick note! If you enable the option "Delete cropped areas of images", then PowerPoint will delete unnecessary areas in cropped images. After finishing work on the image, click “OK” to confirm the changes.
How to Make a Poster in PowerPoint
A poster is a bright placard, in which the main role is given to the image. In most cases, the text on the poster is minimal or absent. A poster is the most effective means of announcing an event to a large number of people. It can be a concert, presentation, sale, auction, etc. PowerPoint lets you create posters that can be as striking as the designs built in popular photo editing apps.
If you’d like to make a poster using PowerPoint, here’s how to achieve the desired effect step-by-step.
- Create a PowerPoint presentation or open an existing file.
- Add a new slide.
- Set the size of your poster. The maximum slide size in PowerPoint is 52 inches (width and height). This can be a large poster size of 23.39 inches (594 mm) by 33.11 inches (841 mm) or a small poster size of 11.69 inches (297 mm) by 16.54 inches (420 mm).
- If you want to add a background to your poster, take care of it in this step. From the pop-up menu, select "Background Format" - "Flush Color" - "Fill". From the options provided, select the one that suits you. If you want to background an image, click on the background format - "Fill" - "Picture or texture" - "File". Next, you need to select the image and make it the background.
- Decide what image you’d like to use in your poster, locate it, and manage settings with the right-click on it. On the window that pops up, enter the height and width of the picture.
- If you add some figures to your poster, you can change their colors, add shadow, volume, rotation, etc.
- Add the text. You can copy and paste the finished text. To do this, you need to copy it, select the "Drawing" group on the "Home tab," and then click "Inscription." After that press "Insert" and your text is already on the poster. Or as the second option, you can write beautiful text using Word Art by selecting "Word Art" in the "Insert" tab.
- Save the presentation once done.
How to Insert GIF into PowerPoint Presentation
Using GIF files, you can make your PowerPoint presentation brighter, more dynamic and interactive. Such visuals are better attention-triggers than common static images. So, if you are looking for a way to bring achieve a more engaging display for your content, use the following instructions on how to insert GIF into PowerPoint presentation.
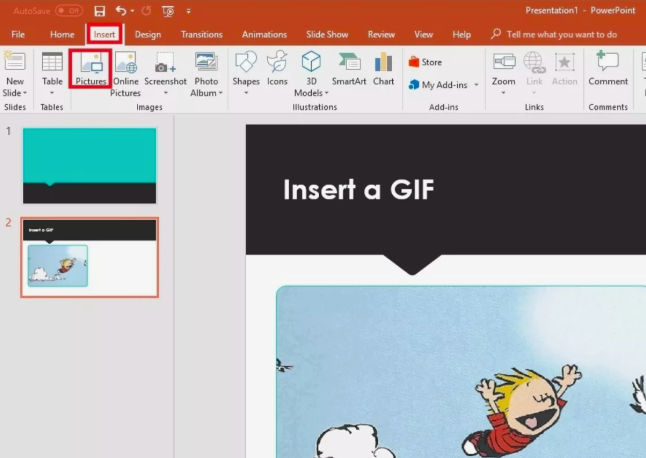
- Open PowerPoint, choose the slide you want to add the GIF file to.
- Navigate to the Insert tab and choose Pictures.
- Once the dialogue box shows up, locate the file on your computer and click Insert.
- Proceed to the Slide Show tab and choose From Current Slide to get the GIF animated.
If you want to access to a collection of PowerPoint GIF files, then take the following steps:
- Locate the slide where you want to add a GIF file.
- Navigate to the Insert tab.
- Choose Insert Clip Art (PowerPoint 2010) or Insert Online Pictures (PowerPoint 2013 or newer).
- Creative Commons Only should be selected to make sure you are using images that can be used legally.
- Enter “GIF” to start searching. You can narrow your search while adding a keyword; e.g., an animated bear.
- Make sure to click Insert to add the GIF to the slide.
How to Narrate a PowerPoint Presentation
Delivering a presentation to an audience doesn’t always require your attendance. When staying in different countries, cities, and rooms, people can learn your pitch. This is when recording voiceover narration enters the game. In PowerPoint, you can add audio to separate slides without timings for the whole pitch or add the voiceover to the entire presentation.
Before you start to narrate a PowerPoint presentation, make sure that your mic is turned on and ready to record.
- Open PowerPoint and set View to Normal. To narrate the entire project, start from the first slide.
- Navigate to Slide Show > Record Slide Show > Record from Current Slide.

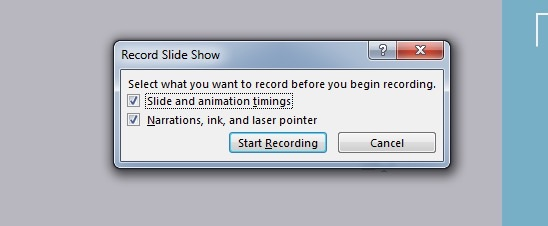
- In the pop-up window, you will see two options: a) slide and animation timings; b) narrations, ink, and laser pointer. Leave both options checked to automate the slideshow with ease.
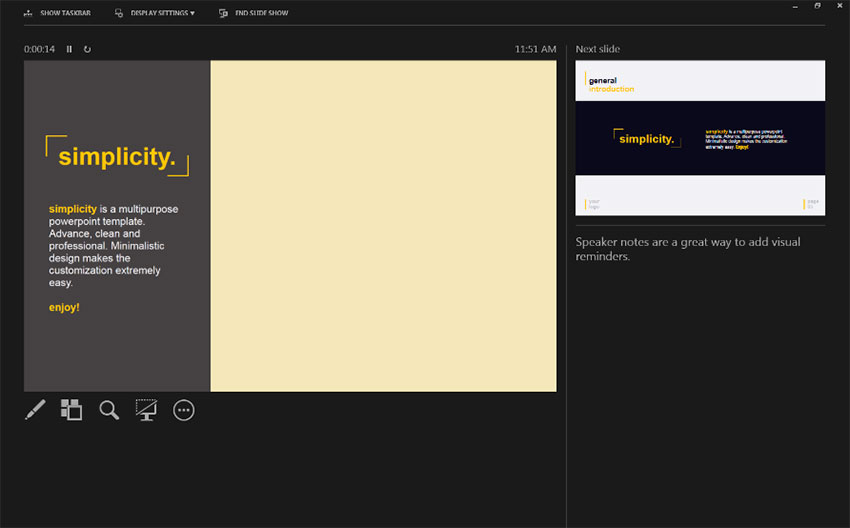
- Upon starting the record, PowerPoint automatically goes into a full-width view and starts recording from your mic. At the top of the window, you will notice the Recording panel with counter and buttons that allow you to control the narration length.

- Close the Recording panel once you are done with narrating to complete it.

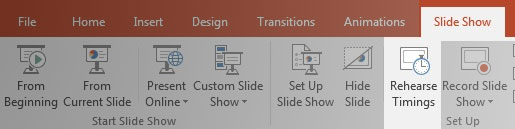
- In case you are out of timings of the slide changes, there’s an opportunity to rehearse them. Navigate to Slide Show > Rehearse Timings and set new timings for slides using arrow keys while you are in the full-screen mode.
Once done, you are ready to send a pitch to viewers. The recorded audio will play on the timings you’ve recently set up.
How to Cite a PowerPoint Presentation

There are several citation styles available, and it is always a good idea to check with your editor to find out which one he prefers. MLA, APA, and Chicago are the most widely-used styles to cite your sources. Here’s how to cite a PowerPoint presentation using the MLA style.
MLA style is the most widely used format of documenting and citing of sources in the field of humanities. It was developed by the Modern Language Association and used in the USA, Canada, and other countries.
MLA style suggests that you use footnotes or endnotes.
- You can use a number in superscript when you refer to the presentation and specify the citation at the bottom of the page.
If you decide to proceed with endnotes - include a PowerPoint works cited page with the list of the presentation sources at the end of the paper, rather than on each page. - If you refer to a digital presentation, make sure you know who the author is.
E.g. Baker, John - You can refer to the presentation you saw at a lecture: E.g. Baker, John. “Nature pollution”. Grand Hall. Paris. Jan. 27, 2010.
- If you saw a presentation on the computer, specify the type of digital medium and the date it was created: E.g. Baker, John. “Nature pollution”. Jan. 27, 2010. PowerPoint presentation.
How to Add Audio to PowerPoint
One of the most interesting features of PowerPoint is the creation of slides, which contains not only text and pictures, but also sounds and video fragments. To bring a boring presentation to life, add different sounds to it, such as the squeal of brakes or the sound of breaking glass. Let’s see how to add audio to PowerPoint 2010.
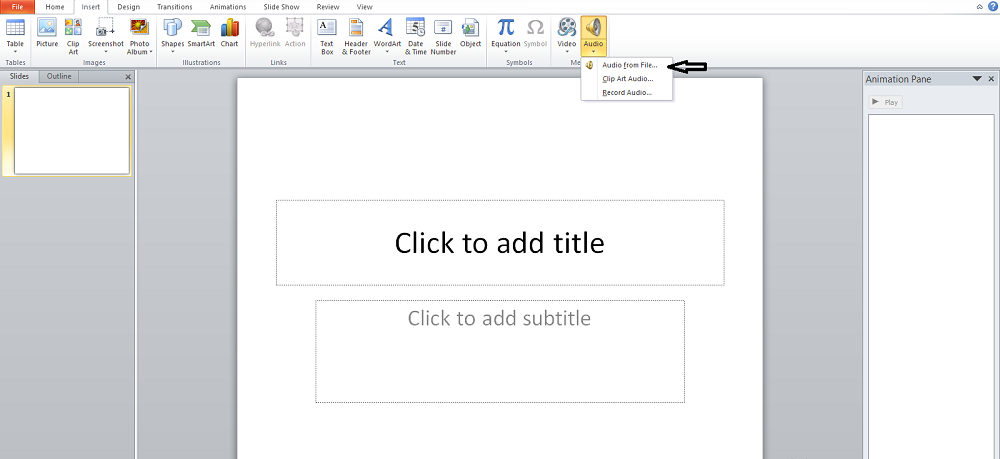
On the Insert tab, select Audio - Audio from a file. Open the desired music file.
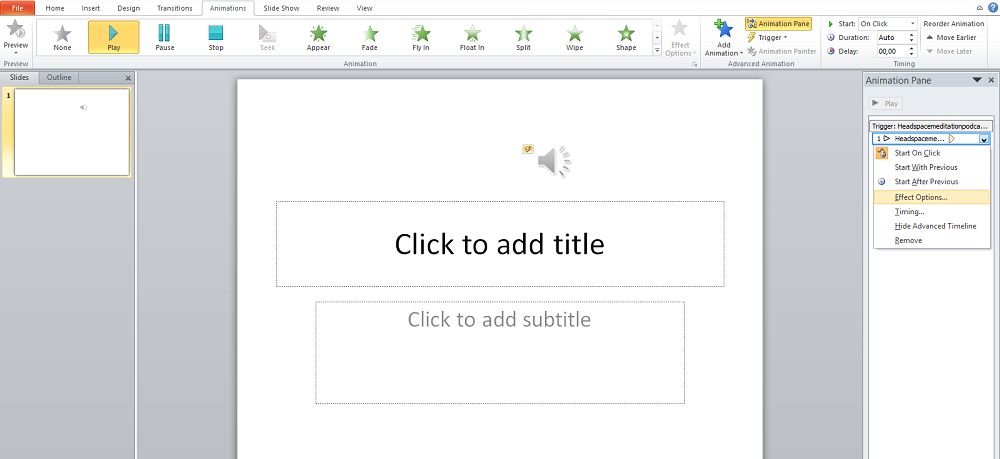
Select the speaker icon, on the Animation tab, select the Animation Pane. In the animation area, click on the triangle to the right of the music file - Effects Options.
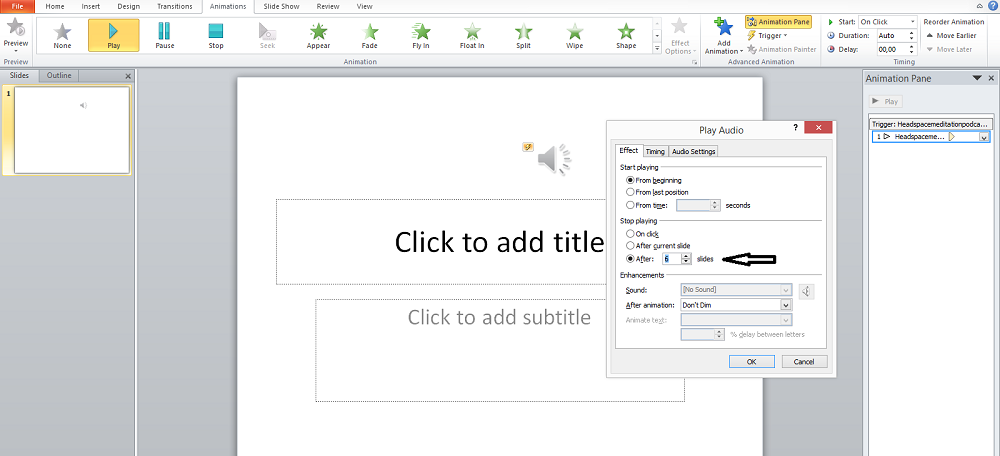
In the Play Audio window, configure the parameters:
- On the Effect tab, select Stop playing - After 6 slides (because the presentation contains six slides).
- On the Timing tab, select Start - With Previous. You can set the number of repetitions and music delay.
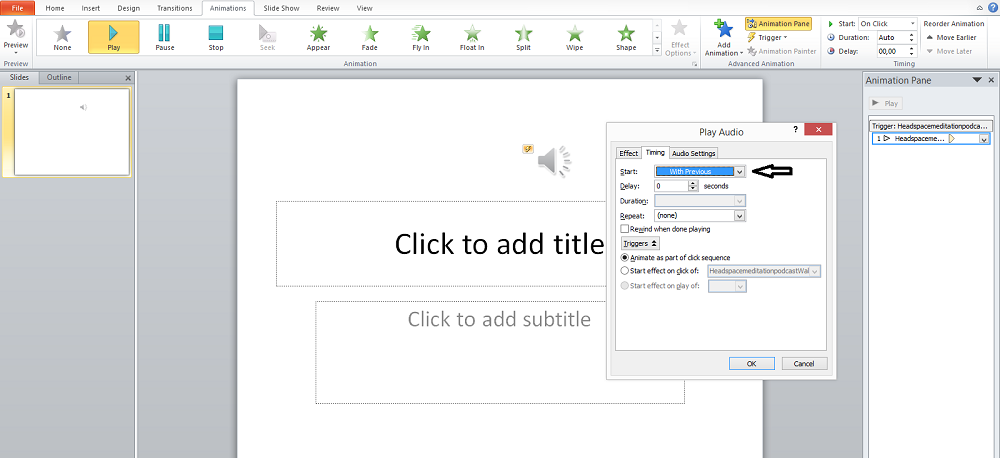
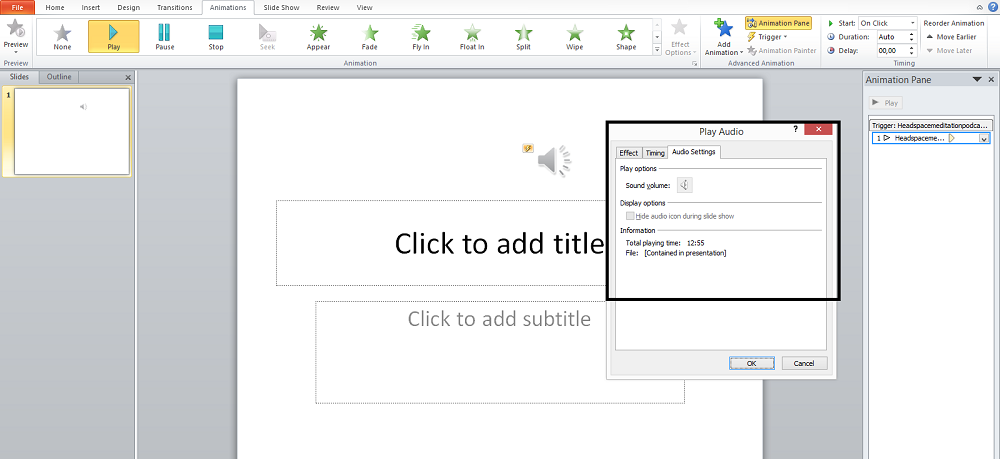
- On the Audio Settings tab, where the “Hide sound icon during the slide show” option and the volume setting of the music file are inactive. Please note that you’ll get the embed music in ppt. Click OK.
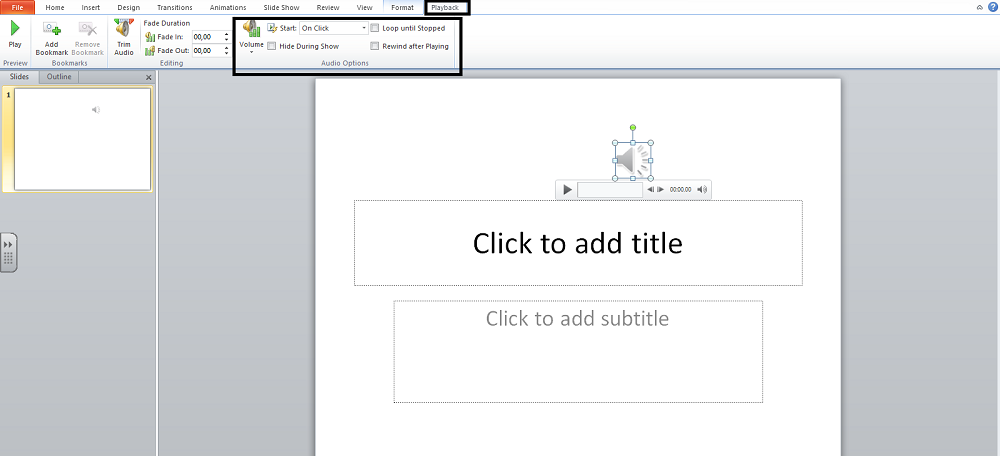
- Select the speaker icon on the slide, go to the Playback tab. We can adjust the sound settings: hide the icon during the show, adjust the volume, set the start time for playback.
PowerPoint Pre-Designed Templates for a Successful Pitch Deck
While creating a presentation, you may be faced with a choice of a template that would perfectly suit your needs and correspond to the business identity. Fortunately, there are many third-party custom-made templates meant to impress the audience from the first slide. TemplateMonster is one of the biggest marketplaces offering a myriad of PPT templates for all tastes and budget preferences.
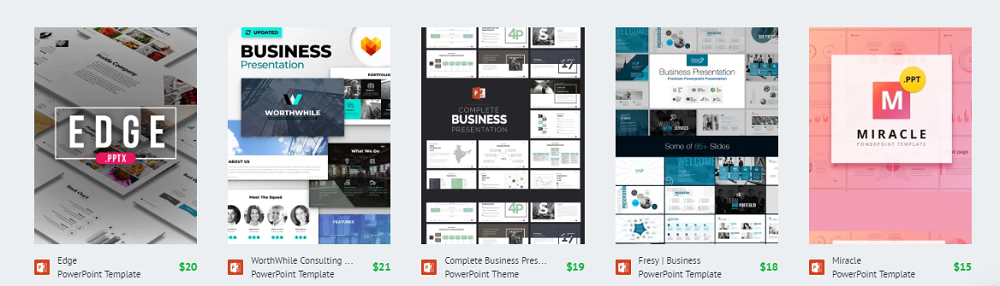
Aside from the elegant design, the templates also cover a wide range of usage: monthly reports, project presentations, business plans, and more. So, if you seek an effective way to present the project to a wider audience and keep them engaged during the whole presentation, give a premium PPT template a try.
PowerPoint Guide Final Words
When introducing your pitch to colleagues, business partners, or even investors, you may want to improve the communication further. For this, you can print out the presentation together with the author’s notes left on the slides. This way, you provide the attendees with some detailed information, in addition to what is displayed on the slides, so that they can get a fuller picture of your pitch. Check out our detailed guide on how to print PowerPoint with notes.
Since many people have kept arguing about which presentation program is better—PowerPoint or Google Slides—it is now possible to convert the files back and forth. In other words, a PowerPoint pitch can be presented leveraging Google Slides, while a Google Slides presentation is easy to transform into PowerPoint format at the push of a button. In this Google Slides tutorial, we’ll try to prove how easy it is to convert Google Slides to PowerPoint.

Get more to your email
Subscribe to our newsletter and access exclusive content and offers available only to MonsterPost subscribers.

Leave a Reply
You must be logged in to post a comment.