How to Leave Squarespace Safely and Move on to WordPress
- Squarespace weak points
- Squarespace and WordPress comparison
- First Step: prepare the landing strip
- Second Step: Squarespace to WordPress
- Third Step: polishing the details
- Conclusion
Squarespace is a very popular platform for creating websites quickly and easily. It focuses on personal portfolio websites, blogs of all types, and small e-commerce sites. When creating a page for your business on Squarespace you don’t have to think about coding. In fact, you have to think only about the content of your website – the texts and pictures you will put there. That’s very convenient for users who want to create a tiny site really quickly and simply have no idea where to start. However, Squarespace is good only for small projects. If you would like to expand the site in the future, it will be really difficult.
After some time of working with Squarespace, you realize that it starts to feel uncomfortable. It is like putting on a dress you wore in school. When you grow up – you just become too big for it. So, when your business grows bigger you have to change your clothes and move on to a bigger, better, and more convenient CMS. For example, you could shift from Squarespace to WordPress.
WordPress is the most popular and widely used content management system on the web. More than a third of all websites in the world are created on WordPress. Generally, it is not only especially user-friendly but also has a lot of tutorials. YouTube and different blogs are filled with detailed “How to” texts and videos. WordPress is highly versatile and allows for the creation of any type of website and many free plugins help you add any imaginable functionality. Let’s look a little closer.
WordPress is the most popular and used content management system on the web. More than a third of all websites in the world are created on WordPress.
Squarespace weak points
- Not for starters. Squarespace interface is quite intuitively understandable, but only for those users who have already tried at least one website builder. A person who hasn’t worked with any of the website creation tools before will have problems going through the controls.
- No trial. Actually, there is a 14-day free trial, but it allows you only to create a website – you won’t be able to publish it until purchasing a plan. That means you won’t be able to see how your website looks like from the customer’s side – you have to pay first.
- Bad search engine optimization. Such tools as Squarespace (and WiX, and Weebly) often have very bad ratings in Google search results. Search engines don’t like websites created with such third party software and your website could have problems with organic traffic.
- Shallow navigation menu. Most of the website builders of the Squarespace type have only one level of sub-menu. That means that you won’t be able to create a large and understandable menu, which means navigation through your website won’t be easy or pleasant for the visitor.
- English-only interface. In fact, Squarespace allows you to create a website in many languages but the interface will still be only in English, no matter your needs.
- No backup. Any breakdown of your website will make it complete trash. Squarespace doesn’t provide users with a backup and they won’t restore the data. If something happens – you’ll have to create another website from the ground up.
Squarespace and WordPress comparison
| Squarespace | WordPress | |
| Pricing | Starts from $12 | Free |
| Templates | About 100 | Millions of available variants |
| Tutorials | Lots of articles and videos | Lots of articles and videos |
| Purpose | Portfolio, blog, small online store | Any type of website |
| Flexibility | Has a certain number of tools | Can be customized any way you would like to |
First Step: prepare the landing strip
Before taking the plane up into the sky you have to prepare the landing strip for it first. If an angry house owner doesn’t kick you out immediately, every normal person starts the process of moving out, starting with seeking and renting some new place. The same algorithm is true for moving a website – you create a platform first and then start to carry out the stuff from the “old” place. Migration from Squarespace to another CMS is not a complicated task (especially if you have a little website) but it demands that you go through certain stages.
So, you have chosen to move your website from Squarespace to WordPress (and that is probably the best possible choice). The starting point of that process is to create a website and to do it you will have to perform three simple steps:
- choose a hosting service and subscribe to it
- install WordPress there
- get yourself a domain name or migrate the existing one
Purchasing a hosting plan
Of course, there are free hosting services that don’t demand to pay a monthly fee. However, I strongly recommend that you choose a paid one. There are dozens of reliable hosting services that are not very expensive. Paid hosting will be safer, more reliable, and won’t place ads on your website without your permission. If you have any problems with choosing the best hosting for your website (and you probably will, there are a huge variety of them) – you can take a look at the comparison article we wrote. The most popular hosting services (Bluehost, InMotion, HostGator, GoDaddy, and SiteGround) are compared there.
Installing WordPress
Most hosting services, even the free ones, have an automated WordPress installation tool. That is one of the advantages of using the most popular CMS on the web – all the supporting functionalities are suited for it. In most cases you will just have to click one single button – and everything will be done for you. However, if you didn’t find a way to do it automatically, you can still do it manually. We have a detailed tutorial with screenshots about it – check it out.
Domain name
If you used a Squarespace subdomain for your website – then you have to get your website a domain name. Most of the reliable paid hosting services (like Bluehost) offer clients a free domain name. If your hosting provider doesn’t offer you a free domain name or you want some other domain – you will have to get it by yourself. In this case, you can either get a free domain (but the ending of your website name won’t be .com or .org but some .gt or .ml) or buy it (and then you will have a cool domain name with .com ending).
By the way, we have a very detailed guide about how to create a WordPress website really easily and quickly. If you want some more details or need a step-by-step guide – go through the “Easy as LEGO” article.
When you have a beautiful and fitting domain name – you have to migrate your WordPress website to it. The first thing you have to know about it is that it won’t be an instant action. Migration to the new domain could take up to ten days and it all depends on the hosting provider. In fact, you don’t change the domain name by yourself, manually – your hosting provider will do it for you; you only have to make a sort of appointment for it. For the details about how to do it – go through this article about migration.
If you want your WordPress website to have the same URL it had while it was on Squarespace – you can change it the same way. Just don’t forget to set redirection on your Squarespace site – I will show later in this text how to do it.
Second Step: Squarespace to WordPress
So, you rent a big new house and you’ve cleaned it all up. Everything is ready to move in, so it is time to take all the content you have on your Squarespace website and put it onto WordPress. At this moment I have both good news and bad news for you. The good news is that you can move some content from Squarespace to WordPress automatically. And the bad news is that you can’t export all the content to WP this way. Yep, this means that part of it you’ll have to move manually – copying and pasting it.
What you will have to export manually:
- Product and event pages
- Albums
- Images, audio, and video
- Product blocks and CSS codes (the custom ones that you wrote or copied somewhere)
- Blog pages (in case if you have more than one blog page)
Besides that, the styling and current template you use in Squarespace also won’t be imported automatically. To make your website look the same way it looked on Squarespace you will have to find a similar theme (or, at least, close enough). Luckily, there are thousands of astonishing WordPress templates on the web.
Grab the content from Squarespace
It’s time to pack the stuff into boxes and call for the moving truck. Go to your Squarespace dashboard and open the “Settings” tab. There you will have to click Advanced > Import/Export.
Export – is when you move something from Squarespace to somewhere else and Import is when you move something from another place to Squarespace. Click the “Export” button.
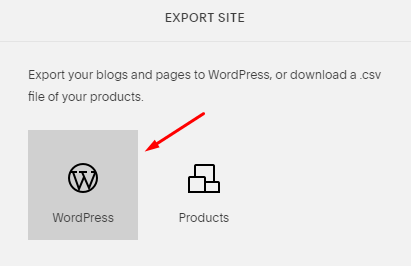
The pop-up window shows you not where but what you can export. The button with the WordPress logo means the content can be exported to the WordPress website. If you had a little online store on your website, you will be able to export products further as a .csv file. Click the button with the WP logo.
When the exporting process is finished – you will see the button to download the file with the content. Click it and save the file somewhere on your PC.
Unpack the boxes in WordPress
All the stuff you had in your “old house” is delivered to the new one. The content of the Squarespace website is stored on your PC and it is time to load it to WordPress. Go to the dashboard and hit Tools > Import. You are going to import a WordPress compatible file, so you need a WordPress importing tool. Press “Install Now” to make it available.
When the installation is complete – hit the “Run importer” button. Click the “Choose File” button and pick the file you saved previously. Then hit “Upload file and import” to start the process of unpacking the boxes.
At this stage, you can set other authors and assign posts to those authors. The “Import attachments” function doesn’t work so well, so ignore it – I will show you how to import images from Squarespace to WordPress later. After finishing, press the “Submit” button, and that’s it. Your content is now on your WordPress website.
Don’t forget about images
Luckily, you don’t have to manually download every image one by one and then upload to the Medial Library. That would’ve been really boring and tiring, huh? There is a plugin called “Auto Upload Images”. It starts working when you save the post. Imported from Squarespace, website content contains some pictures, URLs, and the plugin looks for those pictures and puts them into the post. On the one hand, it is still not completely automated because you will have to save every post to make the plugin work. On the other hand – it will definitely be faster than downloading and uploading pictures separately. Besides that, there is a trick which will help you to upload all the images to all the posts in just a few clicks.
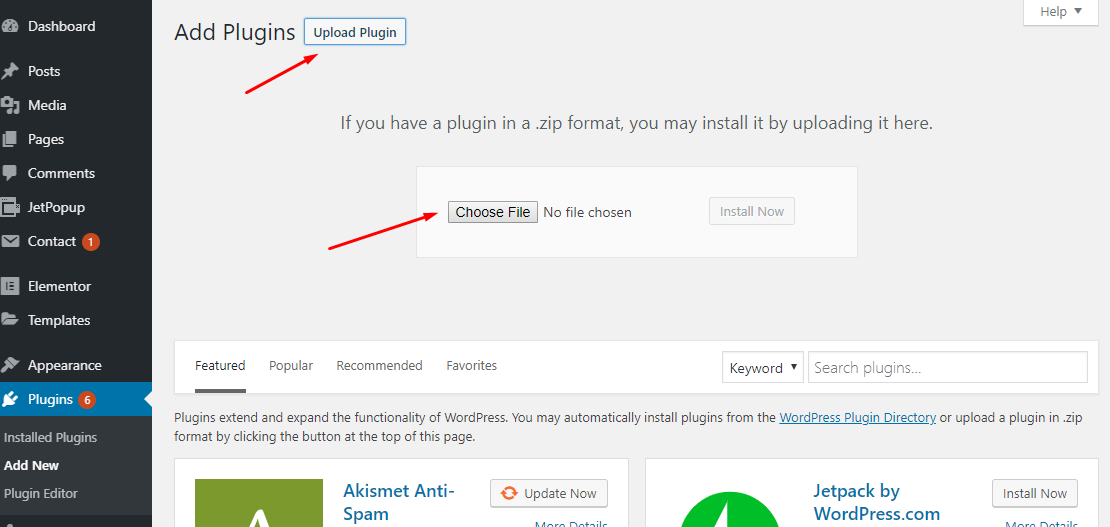
Click the “Download” button and save the plugin to your PC. Open your WordPress dashboard, go to Plugins > Add New and press “Upload plugin.”
Hit the “Choose file” button and select the file from your PC (don’t forget it has to be in .zip format, so don’t unpack it). Click “Install Now” and when the installation process is finished – activate the plugin by pressing the appropriate button. The plugin is ready for work.
Now, let me show you a little trick. WordPress allows you to do the bulk actions – you just choose the action, the posts, and click one button. Let’s do it step-by-step. Go to Posts > All Posts and click the “Screen Options” button at the top right corner.
In the “Number of items per page” row type a bigger number, for example – 200, and press “Apply.” If you have a large number of posts it will allow you to work with the bigger numbers of posts.
Press the checkbox near the “Title” (that will make all posts match), choose “Edit” from the drop-down bulk actions menu and hit the “Apply” button.
You can set some changes into the edit box that opened or just click the “Update” button without any changes. After that all matched posts will be updated and, therefore, the Auto Load Images plugin will load the pictures to the posts.
By the way, that action will make the plugin load all the images used in posts to the Media Library. All the pictures will be further available for usage and editing.
Third Step: polishing the details
By this time your Squarespace website is partly moved to WordPress. The content and images are successfully loaded without any troubles. However, there are a few more things you should do to polish the result and make sure you won’t leave anything behind. I’m sure that you would like to save all your additional information and clients.
Taking care about permalinks
You see, Squarespace has its own system of naming the blog posts. In fact, every CMS has its own system, but in WordPress, you, as the website admin, can change that system. In the current state, if you linked some of the website’s pages in the posts – the links are probably broken. This means that links don’t lead the readers to the pages, because the links you used don’t exist now. However, there are a few ways to fix that problem.
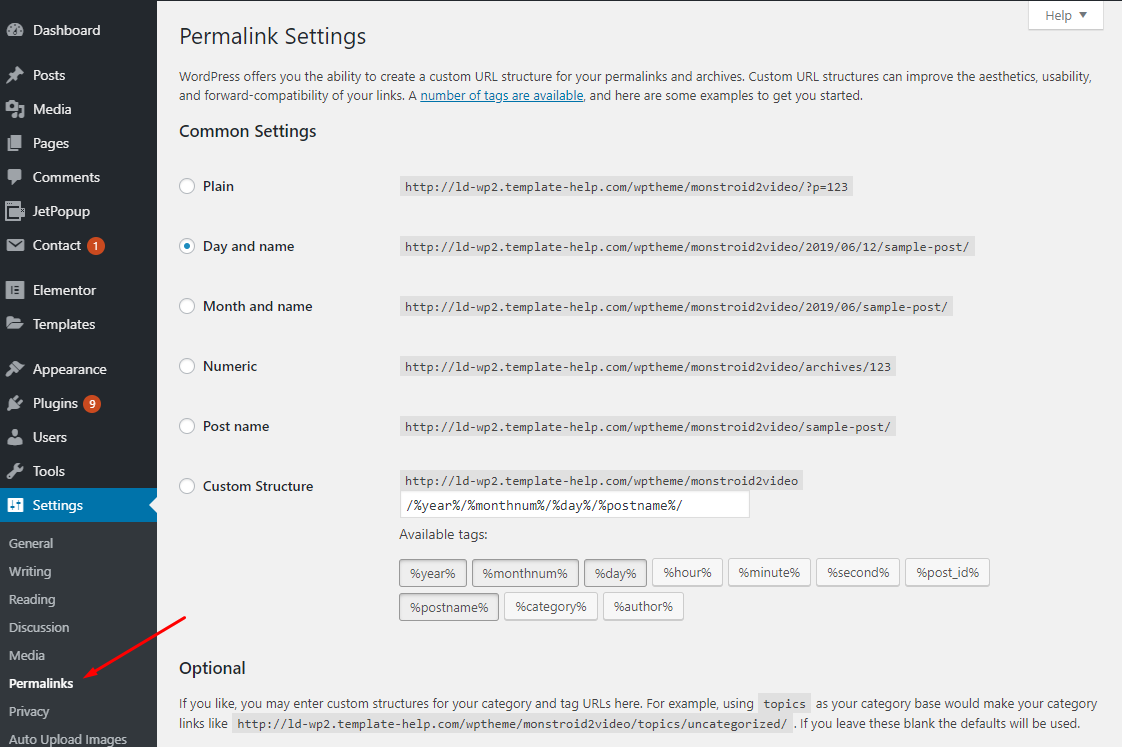
If you used the same domain name as you have on Squarespace – you can just change the rule of blog posts naming in WordPress. Look at the links of posts on your Squarespace website. Commonly it will look like that: https://niceperson.com/blog-1/year/month/day/astonishingpost. WordPress has an option to make all your blog posts to be named the same way. Go to Settings > Permalinks and look at the settings. Currently, you have a rule for naming orders set but you can change that easily.
There’s no ready-made option to set the order similar to the Squarespace variant. However, you can set the custom structure. Using existing tags, you have to set the following order: blog-1/%year%/%monthnum%/%day%/%postname%/. After you do it – click the “Save changes” button at the bottom of the page.
Redirection from Squarespace to WordPress
If for some reason you changed the domain name but don’t want to lose the customers or readers who got used to finding you at the concrete URL – you have to set the pointing from Squarespace to WordPress. Then the users who came to the “old” link will be automatically redirected to the new one.
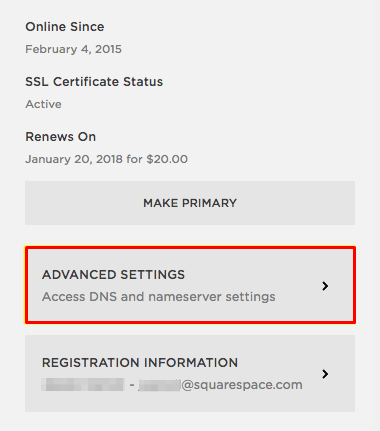
Go to Settings > Domains and click on the domain name you are using. In the opened window press “Advanced settings” button.
You can see two tables now – “Website Defaults” and “Custom Records.” First of all, click the “Website Defaults” rows and delete all the data (there will be a red button with a dumpster icon on it). Then click the row in the “Custom Records” section.
Type in the host (it will be “www”), choose the CNAME (Canonical NAME record) from the drop-down menu and write down your new URL. You can also fill the bars with the IP address data 0 then type “@” to Host, choose A CNAME, and type the IP to the Data bar. When you hit the “Add” button the process will be complete.
Conclusion
That’s it, you finished the migration. Now all of your data landed safely in WordPress, but the rest can be transferred only manually, copying and pasting to the new pages. However, content, pictures, and URL are now on WordPress. I’m sure you will be completely pleased with the work of this CMS and never regret moving from Squarespace to WordPress.
If you have some ideas or suggestions about the article – you are welcome to let us know in the comment section below.
Read Also
Blogging Platforms Showdown: Tumblr, Blogger, Squarespace and WordPress
Should I Use WordPress, Tumblr, Blogger or Squarespace for My Blog?
Squarespace Review - The Industry Leader or a Pig in a Poke?
Don’t miss out these all-time favourites
- The best hosting for a WordPress website. Tap our link to get the best price on the market with 82% off. If HostPapa didn’t impress you check out other alternatives.
- Website Installation service - to get your template up and running within just 6 hours without hassle. No minute is wasted and the work is going.
- ONE Membership - to download unlimited number of WordPress themes, plugins, ppt and other products within one license. Since bigger is always better.
- Ready-to-Use Website service is the ultimate solution that includes full template installation & configuration, content integration, implementation of must-have plugins, security features and Extended on-page SEO optimization. A team of developers will do all the work for you.
- Must-Have WordPress Plugins - to get the most essential plugins for your website in one bundle. All plugins will be installed, activated and checked for proper functioning.
- Finest Stock Images for Websites - to create amazing visuals. You’ll get access to Depositphotos.com to choose 15 images with unlimited topic and size selection.
- SSL Certificate Creation service - to get the absolute trust of your website visitors. Comodo Certificate is the most reliable https protocol that ensures users data safety against cyber attacks.
- Website speed optimization service - to increase UX of your site and get a better Google PageSpeed score.
Get more to your email
Subscribe to our newsletter and access exclusive content and offers available only to MonsterPost subscribers.


Leave a Reply
You must be logged in to post a comment.