Shopify Online Store Theme Customization: Astonishing Layout
This is the third lesson of our Shopify Online Store Creation from the Ground Up course. If you want to get the full educational plan – follow the link and subscribe to the course.
- General view
- Header
- Image with text overlay
- Featured Collection
- Image with text
- Slideshow
- Footer
- Custom content
- Conclusion
The website’s layout could be compared to the skeleton. Muscles and skin that we can see and consider beautiful are not pretty without a body that holds it together. Did you know that there are twenty-eight bones in the human skull? Yep, that is not a single solid bone. The layout of the online store has a similar function to bones—it makes the whole website look solid.
The number of layout parts won’t be as big as twenty-eight, of course. Think of website building as of creating a human body model. Firstly, you construct the skeleton and then wrap it with appearance features. The creation of a well-thought-out website layout is halfway to an attractive and successful Shopify online store.
Let’s go through the Shopify dashboard layout customization options. I will show you which elements are available, how to change their positions, and the main functionalities you can use.
General view
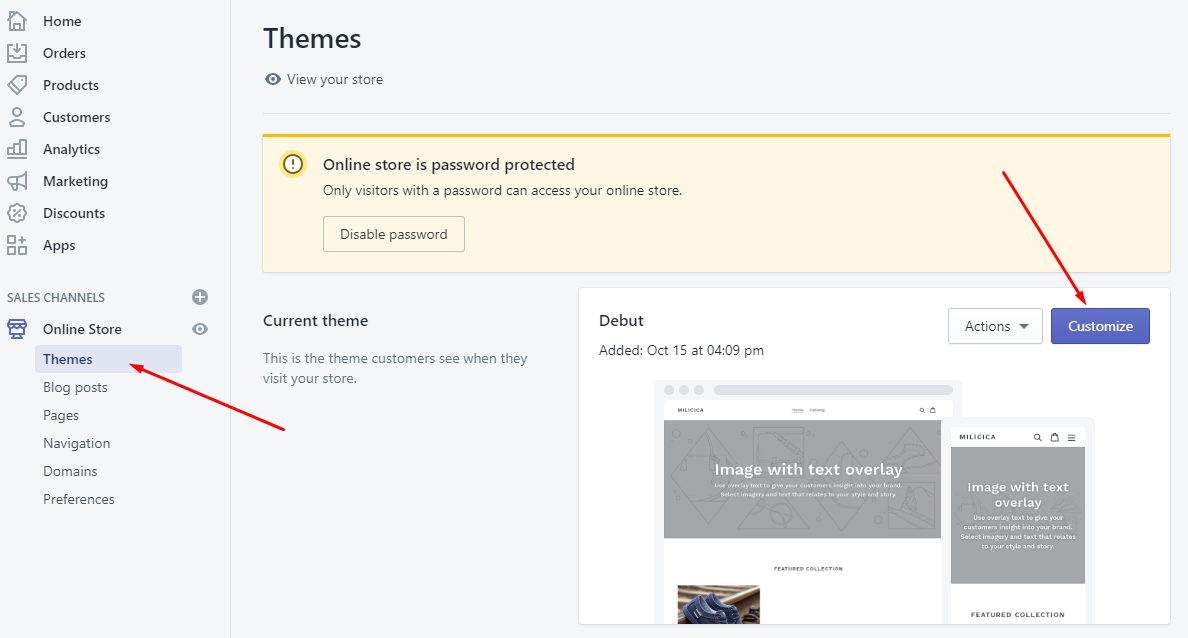
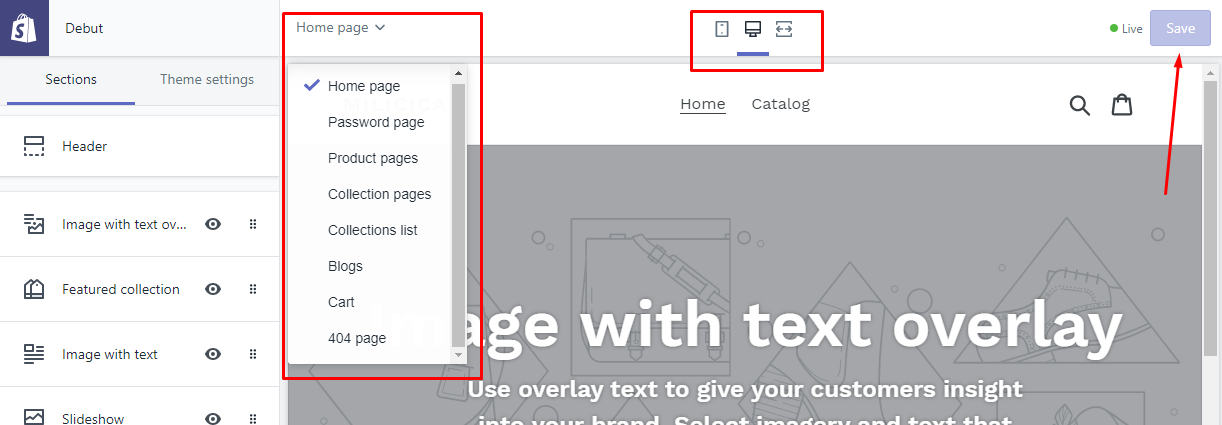
Let’s start with the general structure of the page. Go to your Shopify dashboard and open Online Store > Themes. In the current theme section click the “Customize” button and you will be taken to the customization panel.
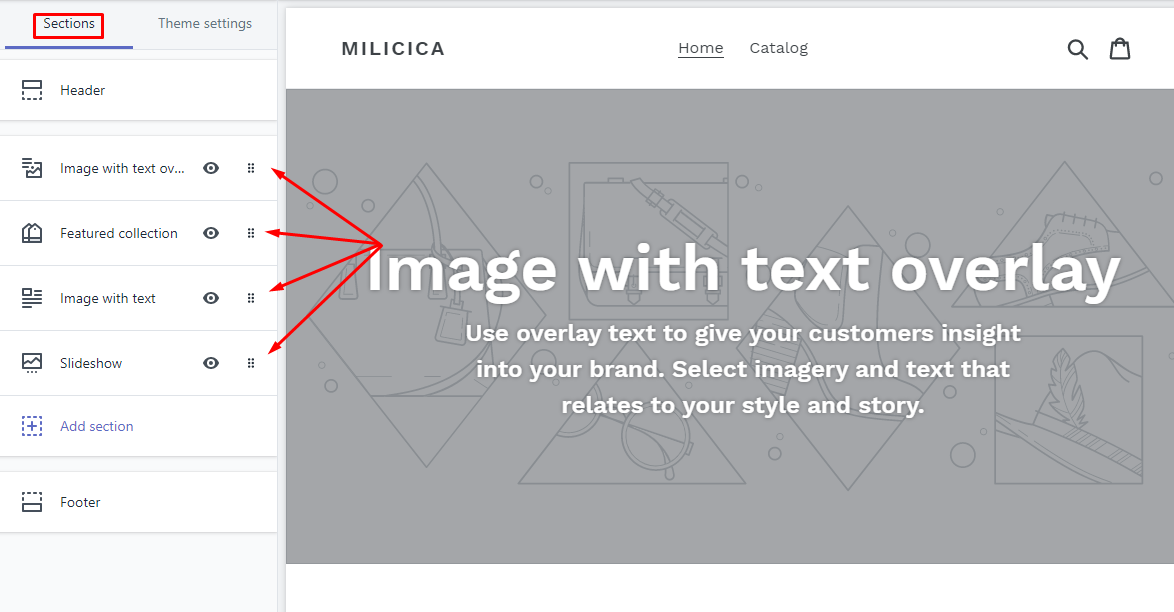
The “Sections” tab has all the functionalities for layout creation. Take a look at the menu on the left side. That is a model of your page with the sections put in a clear order, one after another. Every section, including header and footer, is customizable.
When you hover the pointer to the left, dotted side of any of the menu objects, you will be able to grab and move it to another position to change the structure according to your taste and needs. If you click the “Add section” button, you will be able to add some new elements to the layout.

In the header of the customization dashboard, you will find the drop-down menu. There you can choose what page to customize. Besides that, to make your Shopify online store responsive, in the header, there are a few buttons that will help you to change the size of the screen and make sure everything looks good. When you finish the customization, hit the “Save” button, which is also located in the header.
Header
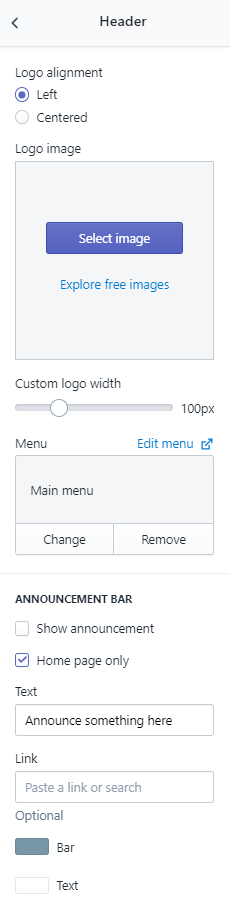
Now, let’s take a look at each of the default elements. We will be moving according to the default position of the elements. What do online shop creators usually put in the header? The logo, the main menu, the search bar, shopping cart, and social media sharing icons—all that stuff you can set up in the Header menu section. So, what options do we have here:
- Logo alignment. The most common positions are in the left corner and in the center.
- Logo image. Here you can set the logo image by choosing it from the computer or from the catalog of free pictures.
- Custom logo width. When you change the position of that slider, it makes the logo picture wider, making the whole picture larger.
- Menu. Here you can choose which menu to put in the header, or you can remove the menu completely. There’s also a link to the menu customization, so if you want to edit the current one, you can do so right away.
Besides that, you can put an announcement bar above the header. It will inform the users about sales, freshest updates or show any text you would like the customers to see first. After matching the checkbox, the announcement bar will become visible. You can show it on the homepage only or on all the pages of your Shopify online store. Type in the text of the announcement, paste the link, and choose the colors of the bar and the text on it. The changes you make will become visible immediately.
At the bottom of the Header customization panel, there is a “Theme Settings” drop-down. There you can add links to your social media pages and the appropriate buttons will appear in the footer.
Image with text overlay
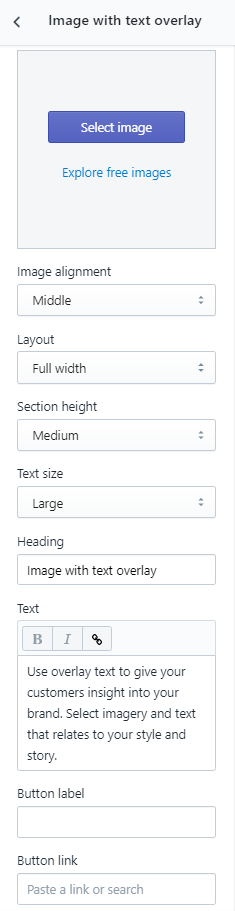
The next default section is an image with text that is placed over it. I’m sure you’ve seen those lots of times; they are quite popular. You can use that section for advertisements, to show your happy clients or some new products that will become available soon. This section could either be a text-only section or an image with a call to action and button.
- Image. Just as in any other section—here you can choose and set the image for the section. There’s an option to load it from the computer from the free pictures collection. After choosing you can change, edit or remove effortlessly at any moment.
- Image alignment. You can move it to the top or to the bottom, as well as place it in the middle.
- Layout. There is an option to stretch the image to the width of a page or set a fixed size for all types of screens.
- Section height. There are six variants for you to choose from, including not only the large and small ones but also the size that fits the height of the picture.
- Text size. You can choose the size of the letters placed over the image. They could be large or medium.
- Heading and Text. Those are bars to place your text in. The Text window has options to make letters bold or italic and to add a link.
- Button label and Button link. These two options define what will be written on the button and where it will lead the customer after clicking it. The button will appear on the image just after pasting in the link.
At the bottom of this panel, there is a “Remove section” button. With its help, you can delete the section if you don’t need it.
Featured Collection
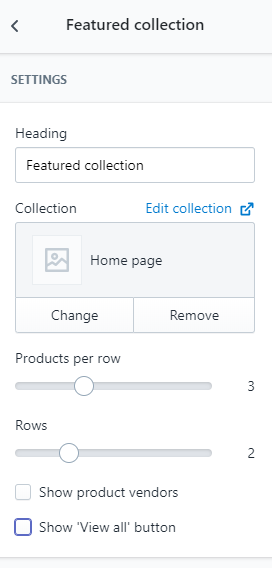
You started to create a Shopify online store to sell something, and, of course, your customers have to see the products the next few seconds after they have come to your website. The featured collection allows you to put the best and the freshest of your products on the homepage, so everyone can see them. The collections are created in the specialized tab of the dashboard, but you can edit the collection you use as featured by clicking the “Edit Collection” link.
Any of the created collections could be shown as featured; there is a convenient window to change it. You can choose the heading and the number of rows and columns. By matching the checkboxes, you can choose whether you want to show the products vendors and the “View all” button.
Image with text
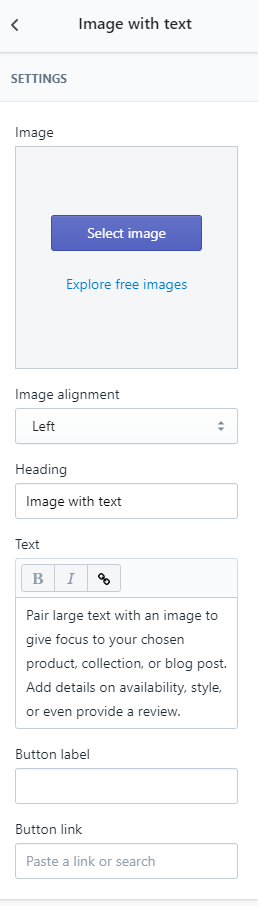
Another section where you can show the customers a certain product or sales proposal. It could also be a success story of a client that bought your stuff or a short article about a member of your team. This section consists of two parts—the image and the text, that is located near it. You can choose whether it will be placed to the left or to the right.
Besides the image and the text, you can also put there a button and call the visitors to perform some action. All the options are intuitively understandable, so there won’t be any problems dealing with it.
Slideshow
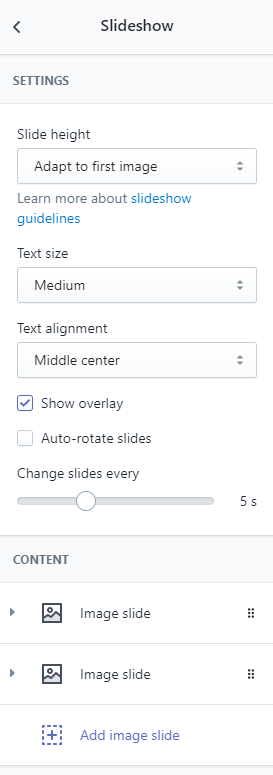
Awesome photos always attract attention. People like to look at professionally done photos of products, especially if they are bright and beautiful. Image slider allows you to show a few great pictures without adding a whole image gallery. Besides that, if made automatic, an image slider could add some dynamics to your Shopify online store’s page. In the “Image slider” menu tab there are two sections — “Settings” and “Content”. Let’s go through the options the first section offers you:
- Slide height. This option will help you to choose how big the slides section will be. Along with the small, medium and large variants, there is also “Adapt to the first slide”.
- Text size and Text alignment. These two drop-downs allow you to set how the overlay text will look like and where it will be placed.
Besides that, you can choose to make the photos darker with the overlay or not. The darker background will make the white text more visible, but that is certainly up to you. The last option gives you the opportunity to make the slideshow and set the frequency for how often pictures change.
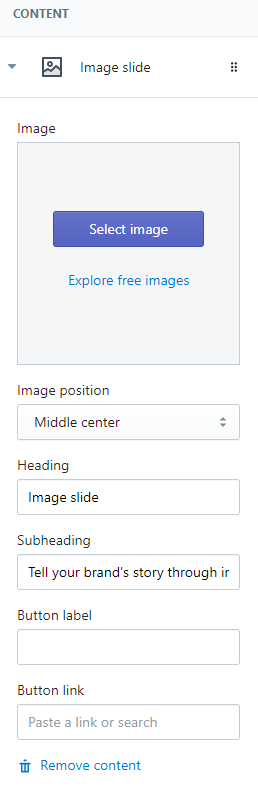
In the “Content” section you can add, delete, edit and change the position of the slides. The slide titles are expandable and open the individual little menu when you click on it. There you will be able to choose the image to place to the slide, its alignment, and type in the heading and subheading.
Besides that, you can place a button on the slide and help your customers to get the item that you placed there easily and quickly. The slideshow can contain as many slides as you would like, but I recommend to add no more than five—that will be a number the visitors won’t be tired to go through.
Footer
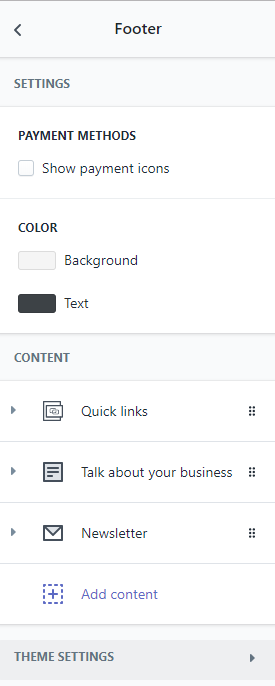
Footer is a part of the page where you can put all the navigation options you don’t want to see in the header. Roughly speaking, the footer is a bottom header. If you don’t put the “About us” page to the header menu—it is common to put it to the footer, and the users are used to it. In this part of the menu, you will be able to choose what content to put to the footer.
First of all, you have to determine whether you will show the payment options. I strongly recommend to show the available variants of payments to the clients; it will make them feel more comfortable. After that you can decide what will be the colors of the footer; it doesn’t necessarily have to look exactly like the header.
The “Content” section gives you the power over the types of content you want to place in the footer and their positions. There are only three available variants for this part of the website; let’s go through them.
- Quick links. This content type adds a menu to the footer. You can create that menu separately and then add it. That menu could contain all the pages you consider to be interesting for the user and can look very different from the header menu. If you didn’t put the “About Us” page in the header, it will be a nice idea to locate it here.
- Talk about your business. That is a little text section where you can write a few words about your company or anything else you would like the customers to see.
- Newsletter. Here in Shopify, you have a special menu tab for the customers’ information. Those who will leave their email in the newsletter form will land in the “accepts marketing” list, and you will be able to send them some promo materials and sales offers.
I would also remind you, that the “Themes Settings” section gives you an opportunity to place the social media sharing buttons in the footer of your Shopify online store. You just have to add the links to appropriate bars and the button will appear in the left bottom corner of the page.
Custom content
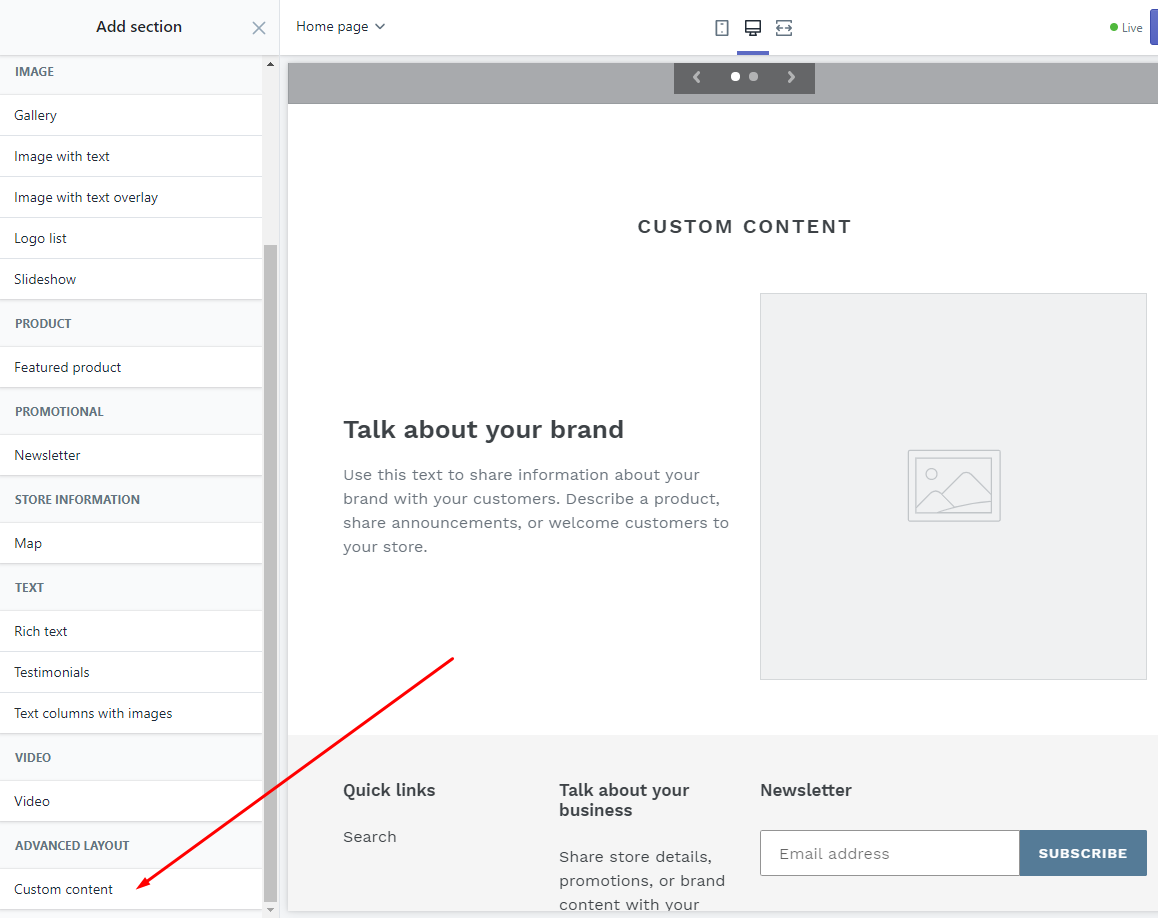
That is all about the default content sections of the Shopify online store homepage. If you would like to add some section that is not there yet, you just have to hit the “Add section” button. In the list of available items, there are about sixteen options, including blog posts, maps, and videos. However, if you would like to see something special on your store’s page, you can choose the “Custom content” variant and construct the section of your dream.
As you can see after clicking this section, it is a little more flexible than others. Here you can combine text, images, video, products, collections and custom HTML. You can combine those components according to your needs and then customize every part of the content separately. Pay attention to the “Container width” customization option; it will allow you to place the elements side by side or one after another if you would like to.
If you set the container width on 50% for two elements that go one below the other in the left-side list, they will fit the page and will be placed side by side.
Conclusion
Shopify website construction tools were made to be intuitively understandable and convenient—and they are. It is quite easy to get along with the available options and figure out how to create the layout of your dream. And with that skeleton of a website, you will be able to create an astounding design that attracts lots of customers and makes your online store profitable.
This article is a part of Shopify Online Store Creation from the Ground Up course by TemplateMonster.
To read all the tutorials, follow the link and subscribe!
Subscribers will receive more tips, discounts, and hot offers via email!
Read Also
How to Create a Shopify Store?
One Product Shopify Store - Examples and How-to Guidelines
Shopify Tools 2019. Essentials for Developers and End-Users
Create a Memorable Shopify Logo As an Essential Part of Your Company’s Branding

A passionate WordPress monster since 2018. Loves professionally built website templates, is Elementor Page Builder fan and becomes extremely curious when it comes to trying some new site creation tools. Quora account
Get more to your email
Subscribe to our newsletter and access exclusive content and offers available only to MonsterPost subscribers.

Leave a Reply
You must be logged in to post a comment.