From WiX to WordPress: How to Move Out?
Why did you create your website on WiX? Maybe you were afraid that WordPress is too complicated, or maybe some friend recommended it to you. One way or another – you have a website on WiX and after some time realized that this was not the best of your decisions. You’ve watched a few tutorials and now understand that WordPress is simpler and more convenient then you originally thought and decided that it is time to move out.
Why should you quit WiX?
- Price. If you don’t pay an annual fee – you have to deal with the numerous WiX ads. And to get rid of the advertisements you will have to pay at least $11. WordPress is free, the only thing you will have to pay for is hosting. And low-cost, but reliable, hosting service starts at about $3 per month.
- Customization options. WiX is not flexible at all. After you choose a template at the beginning of the website creation process you won’t be able to change it afterward. To change the look of the site you will have to create a new one.
- SEO. This CMS is not very search engine friendly. You won’t get to the top position of search results page with it. There are some SEO improvement tools in it but they are much more complicated than the ones created for WordPress. If you don’t have sufficient traffic from social media or advertising – WiX is not the best platform to use.
- Poor navigation. WiX is not a CMS for big sites. The menu you can create in it has only two levels of depth and that means you can’t create complicated submenus. That will make the user experience worse and navigation, in general, less understandable.
Preparations
Before you start the “big migration” from WiX to WordPress you have to do some preparations. They are similar for all three methods of shifting, so you have to perform these steps one way or another. Start from the beginning, so you won’t have to think about the basics later.
1. Hosting

Before moving, every normal person does his best to find a place to go first. The same situation should be with migrating from WiX to WordPress. You have to prepare a new place first. And hosting is such a place. Find a hosting provider you consider to be reliable (for example InMotion or Bluehost) and create an account. I recommend choosing a paid hosting plan, although there are a few free ones. Hosting affects your website’s speed and security, so pay serious attention to it. You get what you pay for.
Really good hosting services like those I mentioned include a free domain name, so you won’t have to worry about that. Besides that, while your website is still on WiX you have to wait to take that name after deleting the previous site. If you wonder what hosting service to choose here’s a very detailed WordPress Hosting 101 where we go through the advantages and disadvantages of all the best providers in the web.
2. WordPress

Once you’ve created an account for the hosting it is time to install WordPress there. Solid hosting services have that option by default – you don’t have to spend any additional efforts, just click the appropriate button and WP will be installed automatically. You won’t be able to download the theme you chose on the WiX site, so I recommend that you also get yourself a WordPress theme that will look similar to the one you had previously (or maybe it is just time to change your website’s style).
If you need some more details about registering on the hosting and creating a WordPress website – go through our “Easy as LEGO” article.

Doing everything with your own hands

This is the slowest, long-term, and routine method. However, it is completely free and you won’t have to spend any additional resources or money for it. In this case, you just manually copy all the data you had on your WiX website and paste it to your new WordPress site. It is as simple as it sounds – Ctrl+C and then Ctrl+V. Repeat until all the data has landed on your new website. And yes, this kind of activity will demand all the patience and accuracy you have because it is a little tedious and boring.
If your website has fewer than twenty pages – this is a perfect migration method that won’t take much time. It is also good because you can control that fact that all the content will be in its place. However, if there are hundreds or even thousands of posts… well, those would be really long working hours (on the other hand, if you are a boss, you can give that job to one of your employees – good to be a boss, huh?).

There is a specialized plugin that helps to post lots of posts together at the same time (Mass Pages/Posts Creator) but it is not really convenient. To post several posts you have to type the information and separate it with commas and that is a little messy and could make checking a hard task. If you are creating a demo this plugin will be useful because you can create dozens of dummy posts at a time. But for your own business website, it is better to copy and paste one post at a time.
- URL. You have to pay attention to the way it will be generated by WordPress. The URL has to be precisely the same it was on the WiX website – so that your readers will be able to find it.
- Formatting. If you copy the content from the pages of the website directly – the formatting could be damaged. Make sure you cleared the previous formatting and set the right one to avoid an ugly appearance.
- Links. Check all the links you inserted into text to be sure they are not broken and will lead the visitor to the appropriate page of your website or some other.
- Images. You can’t just copy and paste images from WiX to WordPress. You will have to download them to your computer and then upload to the WordPress Media Library. Don’t forget to add alt text – it is very useful for search engines and people who have problems with sight accessibility.
Using RSS feed
Actually, all the steps will be the same and the difference is that some of them will be performed automatically by a special algorithm. WiX allows you to add an RSS button to your blog and WordPress allows you to import RSS feeds. It could save you some time.
So, first of all, you have to add a little button to your blog. It will display an RSS feed further. Go to the WiX Editor (I mean the drag-and-drop one). Choose to customize the Blog page.
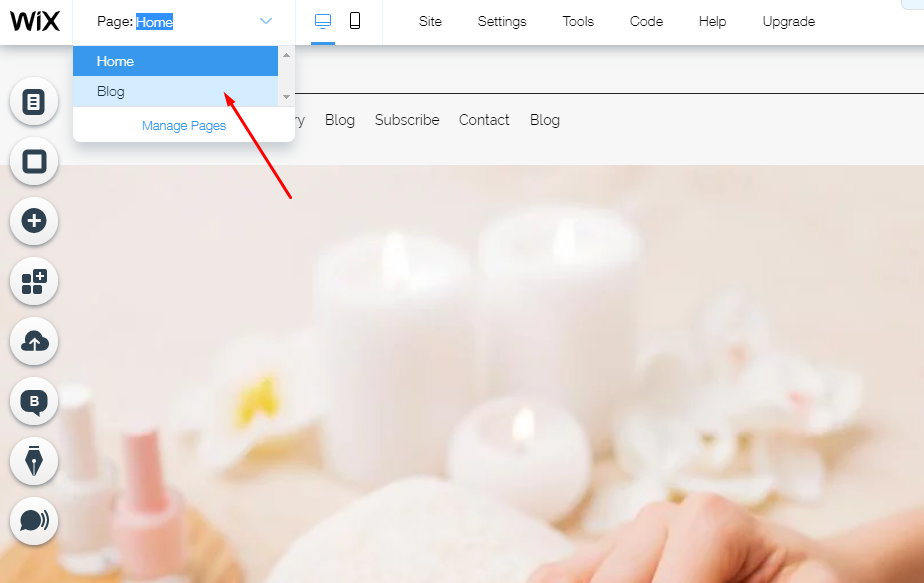
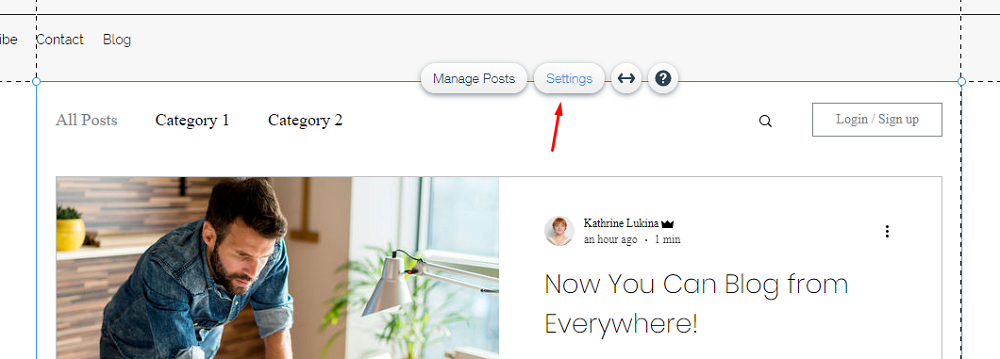
Now click the blog feed. Four buttons will emerge, choose the “Settings” button and hit it with the pointer.
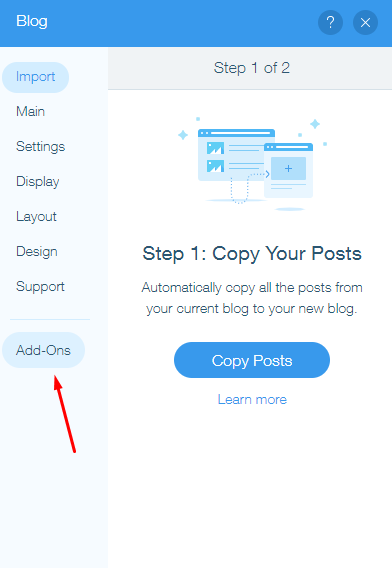
It will open the specialized tile of Blog settings. Open the “Add-Ons” tab.
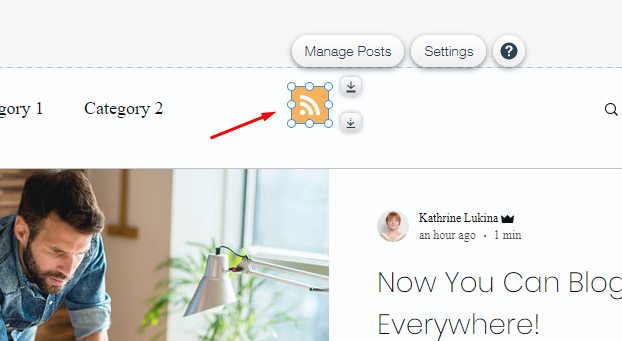
You will see a block with a few elements in it. You will need the last one – RSS Button. Click “Add to the page and in the drop-down menu choose where it will land. I picked “Blog (Current)” option.
The button will be placed on the center of the screen and you can now move it to any place you would like to see it. It’s done!
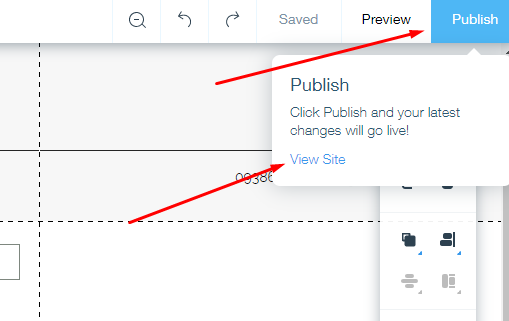
Now click the “Publish” button to show the changes and then “View Site” to shift to the live view.
On the site go to your blog and find the RSS button you just added. After you click on it you will see something like this:
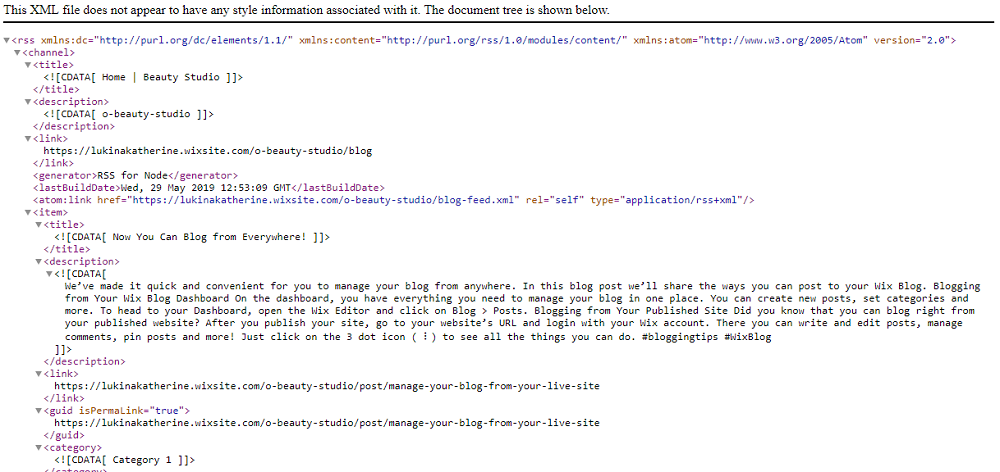
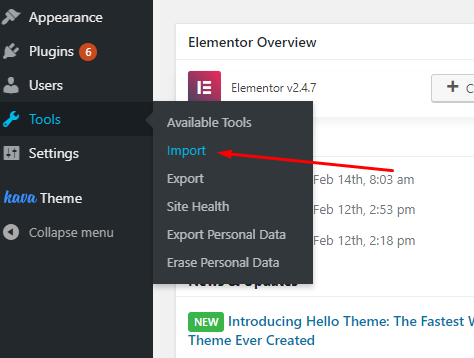
Do a right-click somewhere on the page and save the XML file to the computer. You have to understand, that RSS feed won’t contain the images – only text information. You will have to download all the photos manually. And now open your WordPress dashboard. Open Tools > Import tab.
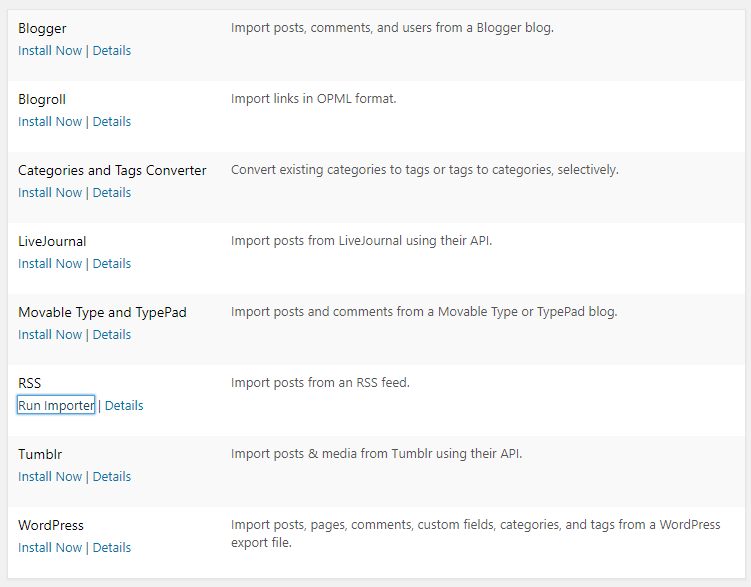
Here’s a list of data you can import to your WordPress website. Click the “Install Now” button under RSS option and then confirm running an importer.
Click the “Choose file” button and pick the appropriate file on your computer. Then hit the “Upload file and import” button. It will take a few seconds and the RSS feed will be imported and the posts will appear in the list (check it by going to Posts > All Posts). There will be only text content but what do you do with the pictures? Luckily you won’t have to manually download and insert pictures to every post. There’s a great plugin to do it.

Auto Upload Images plugin starts to work when you save the post. It searches for the images URLs which are in the post and uploads the images to the WordPress Media Library. After that, it replaces the new URLs with the old ones and the pictures appear in the post. It is much faster than manually downloading all the pictures and then inserting them one by one to the posts.
Using paid plugin
In the end, you don’t have to do anything by yourself. There’s always an option to ask for help from some professionals. Of course, that will be a paid service but it could make your life sufficiently easier. CMS2CMS is such a service and they could provide as much help as you would like to have.
First of all, you can download their plugin for automated migration. There you will be able to take a look at the demo migration and evaluate if you like the service. The plugin will move ten pages from WiX to WordPress and that will include pictures and content. The system will also give you recommendations about the template which will match the theme you used on WiX.
So, how does that service work? I’ll describe all the steps for you.
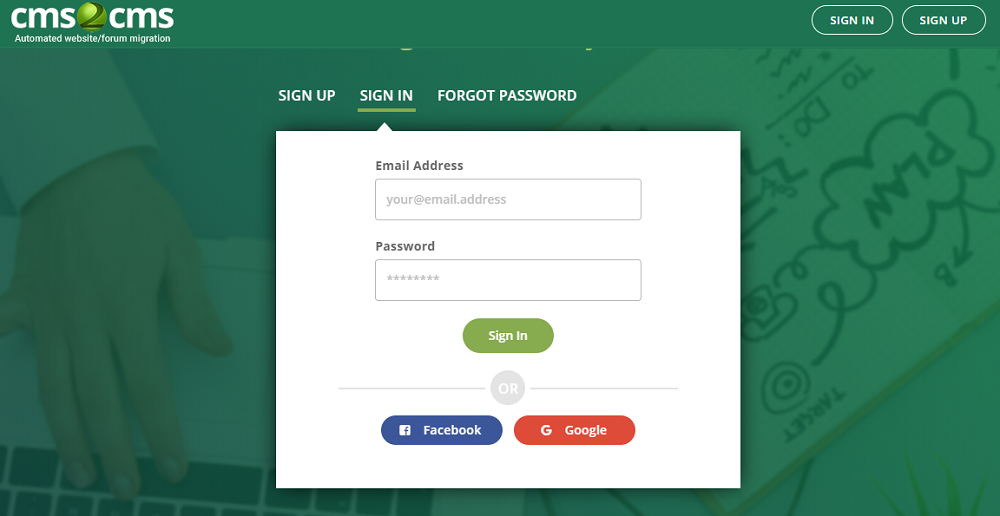
Create an account on the website. You can sign up not only by typing your email and password, but via Google or Facebook account.
After registration, you will be lead to the specialized wizard and through the data collecting process. Type the URLs of WiX and WordPress websites and install the Connector plugin.
Verify what data you would like to move to your new website. That could be content, taxonomy, user info, and menu. After that, click “Start Demo migration.” As I said previously it will move up to ten pages.
When the moving is finished you can check how well it worked and continue. After finishing the demo migration, the system will give you a report about the price of the completed migration. It could vary according to the number of pages your website has.
The CMS2CMS company also offers services and if you don’t want to waste any time – they will completely transfer the website to a new platform and even customize the template so it will look like the one you had chosen on WiX.
Polishing the theme

Transferring the data is not enough. If you liked the look of your WiX website and want the new site to look just like that – you will have to spend some time searching for a fitting template. Of course, there could be a possibility that you will find an appropriate free theme but I still recommend you get a premium one. Paid templates are more reliable and have more useful features. For a business website, it is better to have a fully functional theme that is supported 24/7.
After the latest update, WordPress has a Gutenberg Editor that is a little bit similar to the WiX Editor. At least it is also a drag-and-drop builder and you will spend less time trying to figure out how it works. If you don’t like Gutenberg I recommend you try Elementor builder – it is the most user-friendly, smoothly-working, and simple page builder on the market.
Changing the domain name
Your readers, customers, and visitors have become used to finding you at your specific site domain. If you change it, some of them won’t be able to find you. That’s why it is better to take the domain name with you when leaving WiX and moving to WordPress. Luckily, when you have purchased a domain name you can easily move it to another website, no matter the CMS.
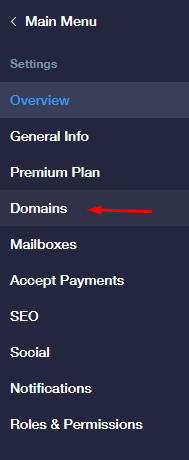
Go to your WiX account and in the left side menu find “Settings” tab. Open the “Domains” option.
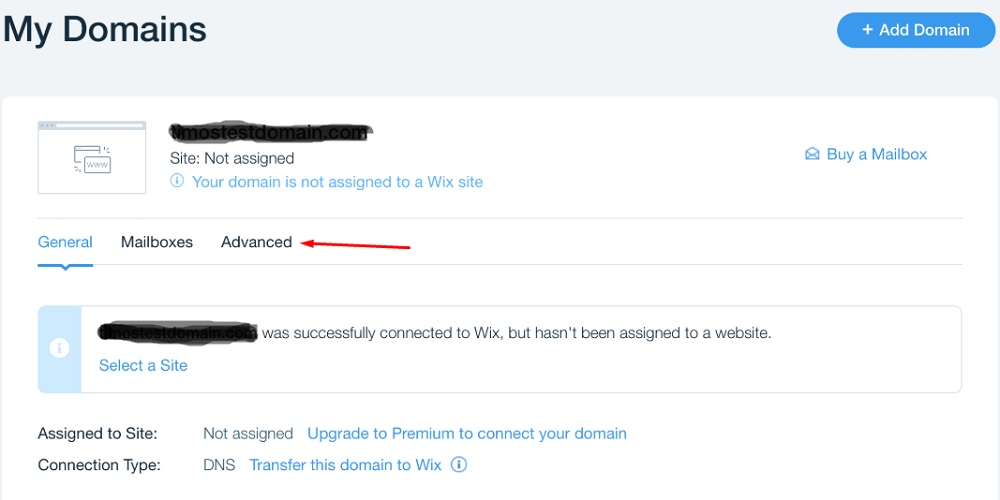
You will see the domain name you bought. Click on it and look at the available options. You need an “Advanced” tab.
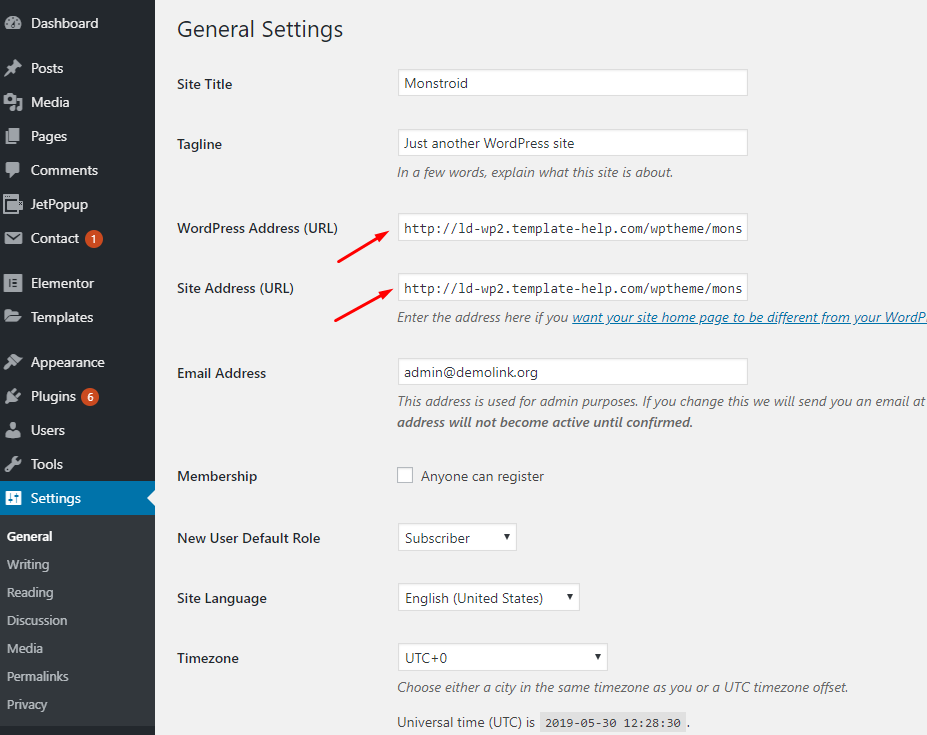
After clicking “Transfer away” and “Send code” you will receive a code in your email box. You will need that code when proving to the hosting provider manager that you really own that domain name. Open your WordPress dashboard and go to Settings > General. Change the WordPress Address (URL) and Site Address (URL) to the ones you used in your previous website on WiX.
Wrapping up
You now know what you are going to face when starting to transfer your website from WiX to WordPress. However, I’m sure that this is the right decision and after you finish – you will be glad you migrated. WordPress is a much better CMS for a business website. It is more customizable, more flexible, and more reliable. That’s why I congratulate you with the choice and wish patience to move all the data to the new website.
Read Also
Wix | What’s Your Best Visual Builder? The Unknown Side of the Page Editor
18 Best WordPress Migration Tutorials
Don’t miss out these all-time favourites
- The best hosting for a WordPress website. Tap our link to get the best price on the market with 82% off. If HostPapa didn’t impress you check out other alternatives.
- Monthly SEO service and On-Page SEO - to increase your website organic traffic.
- Website Installation service - to get your template up and running within just 6 hours without hassle. No minute is wasted and the work is going.
- ONE Membership - to download unlimited number of WordPress themes, plugins, ppt and other products within one license. Since bigger is always better.

A passionate WordPress monster since 2018. Loves professionally built website templates, is Elementor Page Builder fan and becomes extremely curious when it comes to trying some new site creation tools. Quora account
Get more to your email
Subscribe to our newsletter and access exclusive content and offers available only to MonsterPost subscribers.

Leave a Reply
You must be logged in to post a comment.