How to Launch WordPress Site | Easy WP Guide
- Reasons to Use WordPress
- How Much Does It Cost to Build a WordPress Site?
- Choose Website Platform
- Domain Name & Hosting
- How to Install WordPress
- How to Install WordPress Templates
- WordPress Step by Step Plugin Installation
- WordPress Developer Tutorials
- Resources to Learn WordPress and Get Support
- What to Do After Your Launch WordPress Site
- Conclusion
Are you looking for the best way to launch a WordPress site? Gone are those days when you needed to invest a fortune in the design and development of your online resource. Learning WordPress development has become really quick and affordable thanks to the abundance of ready-made web design solutions and educational materials, like the one that we are going to share with you in this post.
You can pay someone to build a website. However, learning how to create and maintain a website with WordPress is one of the essential skills for a business owner these days. Here are just a couple of advantages of building sites on your own:
- Learning WordPress development and creating a website on your own can save you reasonable amounts of cash on web developers and designers.
- This allows you to discover the latest web design trends, thus making certain that your own web resource features only the trendiest techniques making your web page both usable and outstanding.
- You will make your site stand out from the competition. While other projects can be slowed down by the need to consult developers, you will be able to manage most of the things on your own.
Don’t be terrified about launching your website if you are not techy. Don’t worry. You’re not alone. TemplateMonster has helped thousands of people building websites from scratch. So. make yourself comfortable, and read through our most comprehensive guide on how to launch a WordPress site.
Reasons to Use WordPress
There are many platforms that you can use to create your website. The idea of using a Content Management System is to access a wide range of tools for building any kind of personal or business site, as well as editing your site’s content without even knowing any design or coding fundamentals. There is no doubt in the fact that WordPress is the most popular CMS that’s used by more than 32% of all websites that are available on the modern-day web.
Here are the key details about WordPress that make is the preferred option for millions of webmasters:
- open-source;
- free to use;
- fast and SEO-friendly;
- this is the ultimate DIY solution for building websites;
- you can build sites without any design or coding skills by means of page builders;
- choosing from a wide selection of pre-built WordPress themes, you can launch any topic-specific online resources.
How Much Does It Cost to Build a WordPress Site?
The answer to the question depends on what kind of a website you’d like to create. The cost of your website can be broken down into the following categories:
- Hosting,
- Domain name,
- Design,
- Plugins and extensions.
A typical business website can cost as low as $100/year and can go as high as $30,000/year. You can start small and add more features to your website as your business grows.
In this easy WP guide, we’ll show you how to build a website for less than $100.
Choose Website Platform
The most common mistake that beginners make when building site is choosing a wrong website platform. Selecting wordpress.org is the perfect choice when learning WordPress development. It’s free to download and use. By means of thousands of designs and addons, you can create any kind of websites without any restrictions.
Domain Name & Hosting
When building a personal website or an online project for business purposes, then selecting a domain name is one of the most fun aspects of the entire process. In order to store your images, content, and website files, you need to get a reliable hosting provider.
One of the leading and most popular solutions for building WordPress sites is choosing Inmotion Hosting. This US-based company has been providing reliable and secure web hosting services for more than 14 years. Depending on the size of your business and the number of data that your website will include, you may choose from:
- WordPress hosting;
- Shared Web Hosting;
- VPS Hosting (Cloud-Based & Managed)
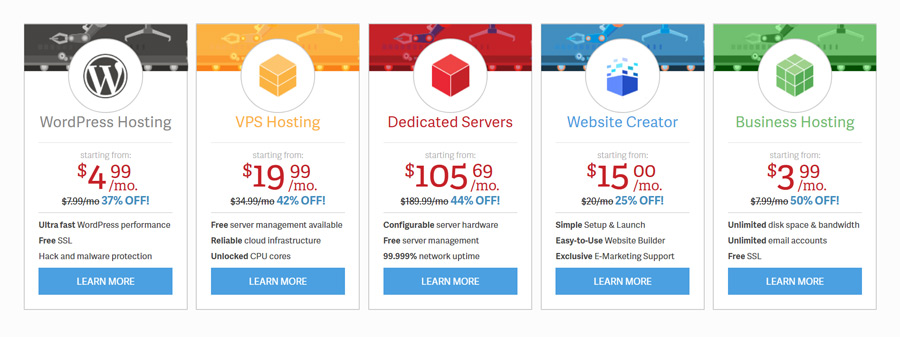
Selecting WordPress Hosting, you will be provided with three more options (suited for different types of websites):

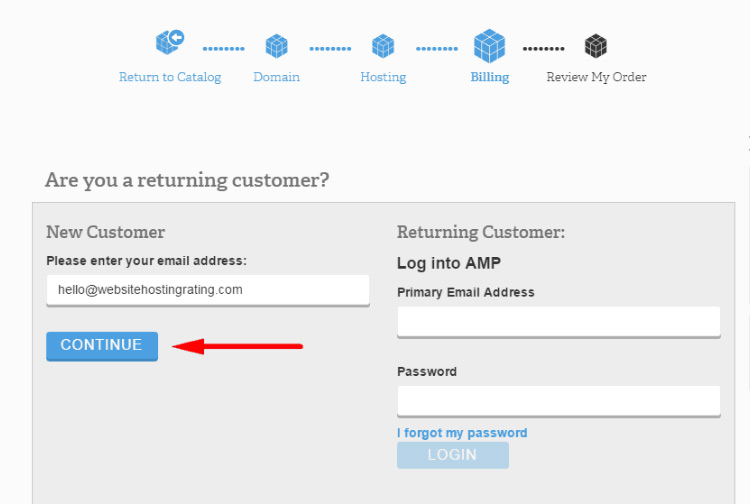
As soon as you choose a hosting plan, below the “Other Actions” header you can find “Add Additional Domains” options. Select it and you will be taken to a page where you can choose your domain name.
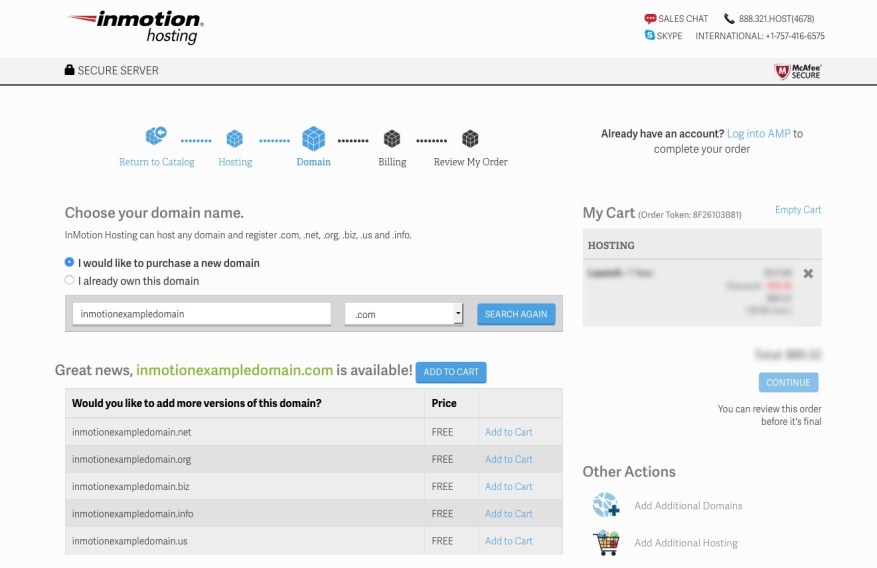
As soon as you pick a domain name, add it to your shopping cart. You will notice that it’s added at no cost.
In fact, no matter what type of hosting you choose, Inmotion provides you with a free domain name. You can check if the preferred domain name is available and choose it for your own site for free.
While choosing a domain name for your site, there are several major tips that you should follow in order to make it work for the benefit of your site.
- A domain is the address of your website on the Internet. Make it unique and memorable yet keeping it relevant to the name of your business or the services you provide.
- Using a strong keyword as a foundation for your domain name grows the chances that your site will have stronger positions in search engines.
- Keep is clear and concise. A long and confusing domain name is harder to remember and easier to mistype.
- It should be easy to read and pronounce. Don’t use numbers and additional characters in your domain name. This can be confusing for people to pronounce and search for your web page online.
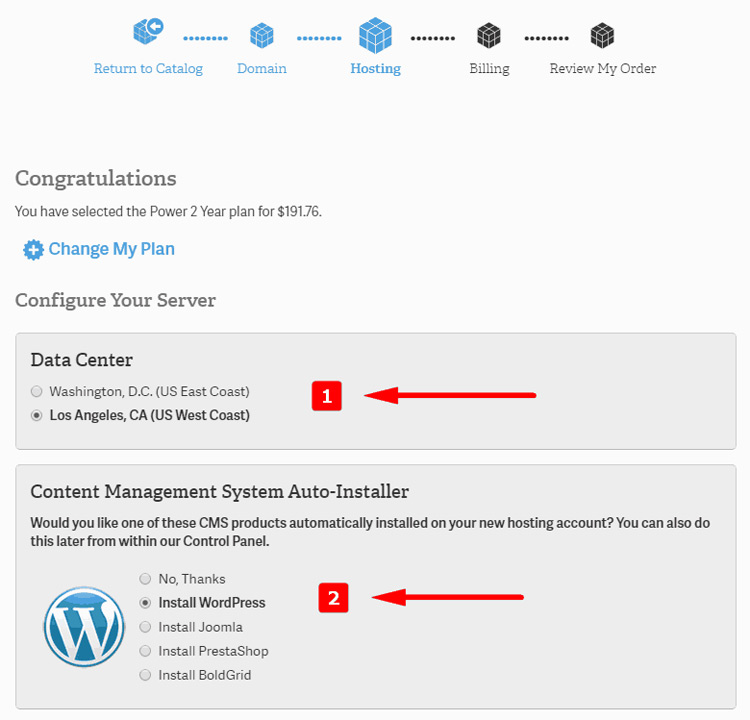
Next, you will need to configure your hosting plan while selecting which data center servers you’d like to use - US East Coast (use this if you are in Europe) or US West Coast (for the Asia Pacific).
Also, save your time on a WordPress installation. Simply check Install WordPress, and the CMS will be installed automatically on your new hosting account.
Next, the system will ask you to create your hosting account:
 Complete your account billing information as you fill out your name, address, and contact details. Inmotion Hosting accepts credit card payments, as well as payments via check and money orders.
Review your order and click submit. You are done with the domain and hosting registration!
How to Install WordPress
If you didn’t choose to pre-install WordPress on your site during hosting registration, then you can do this on your own as you login to your Inmotion Hosting Account Management Panel.
Under your account name, click on the cPanel button and you will be logged in automatically.
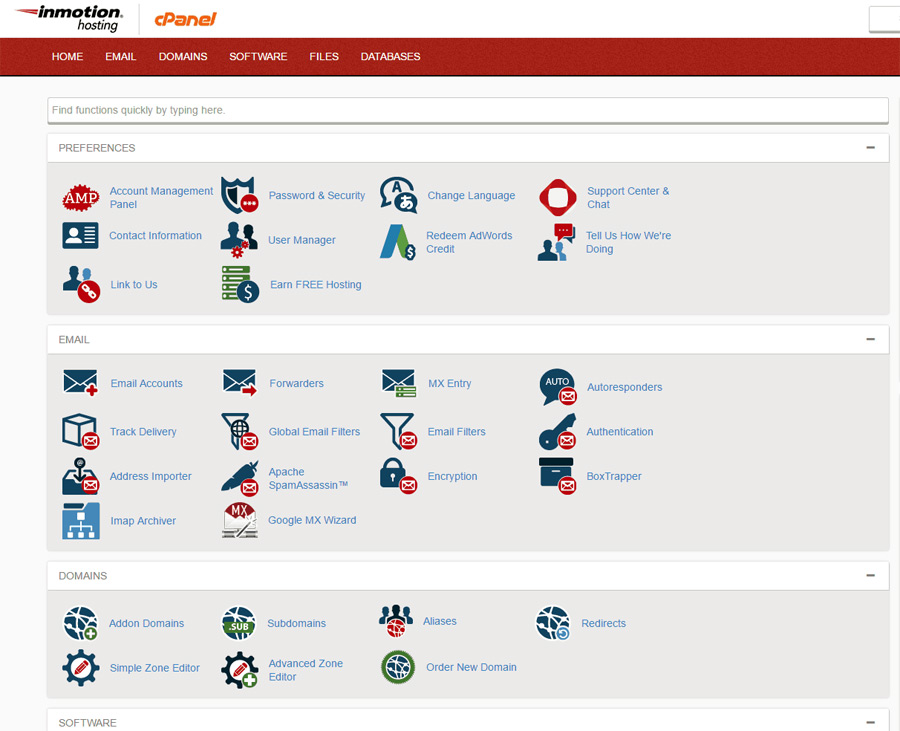
Navigate to the Software/Services section and choose Softaculous link here.
Click on the WordPress icon. Choose Install. Enter installation details and click Install.
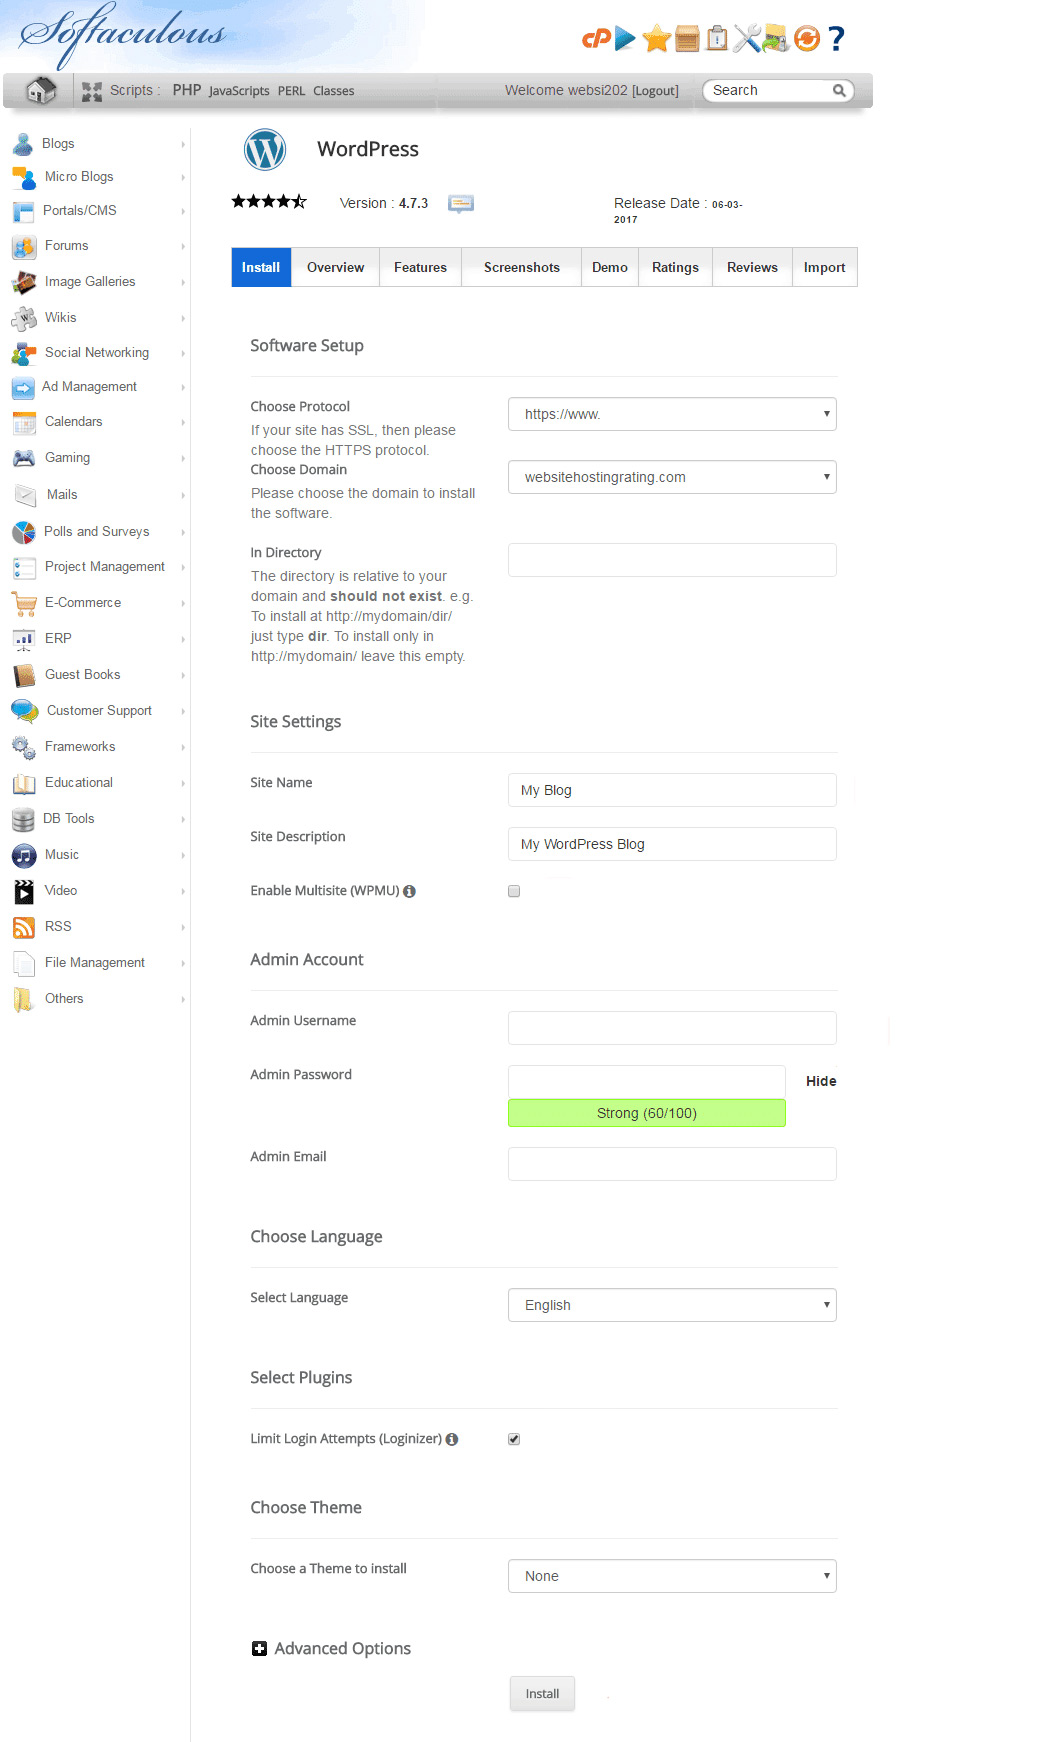
Next, you’ll see a page with settings for your WordPress site in front of you. Here’s what you’ll need to specify:
Select from what protocol your website will be accessed from (e.g. https://www).
- Select the domain name for your site.
- Install in the directory. Leave it blank if you want to install your site on domain directly.
- Enter the name of your website.
- Add site description for your site.
- If you want to make your site WPMU (multiuser) enabled then make sure you check the respective box.
- Enter a username for your site.
- Specify a password for your WordPress dashboard login.
- Enter an email address for WordPress dashboard login.
- Select the language that you’d like your WordPress platform to be installed on.
- Boost security on your WordPress site as you limit the number of login attempts.
- Choose what theme you’d like to install. Select “None” unless you want to use a theme from the dropdown.
- And finally, click Install and WordPress will start installing on your site. Once done, you will be shown the login details.
How to Install WordPress Templates
Now that you have successfully completed WordPress installation, there are a few more things that you need to do to get started with your WordPress site. Installing a WordPress theme to change the visual appeal and functionality of your WordPress site is essential for every online project that strives to stand out from the competition.
We all know that there are free and premium WordPress themes that you can use as the foundation for your online project. While freebies can be the ideal choice for getting started with a personal blog or a startup project, premium WordPress solutions provide you with a wider choice of the essential tools and elements that power up your own web resource.
When adding a theme to WordPress, please mind its compatibility with popular drag-and-drop page builders for the CMS. One of such widely-used content editors for WordPress is Elementor. It includes both free and premium subscription plans. You can start using the free version of the builder and upgrade to the Pro version whenever you need extended theme customization options.
The best thing about working with the page builder is that it requires no coding or design skills to edit your WordPress site. It’s also compatible with all the latest WordPress themes so you can customize your WordPress site absolutely worry-free.
Well, how to create and maintain a website using WordPress themes? We’ve prepared an easy step-by-step guide that describes the entire process in minor details.
If you are going to work with Elementor WordPress themes, then you are given 2 options to choose from. First of all, you can get a premium theme from the Elementor marketplace for about $70-80 for single use. If you want more than 1 theme, then you can subscribe to the ONE for $19/mo and get unlimited access to 10,000+ premium-quality themes, plugins, and graphics that can be applied to any topics-specific online resources. By the way, applying promo code BecomeThe1, you can save 5% on the subscription.WordPress Step by Step Plugin Installation
The real power of WordPress comes from the massive collection of premium and free WordPress plugins. Working like applications for your website, extensions let you boost the functionality of your online resources and add new features to your site.
You can find an impressive collection of WordPress plugins at wordpress.org, as well as browse third-party websites for some custom solutions for your site. TemplateMonster also provides you with a selection of WordPress plugins and Elementor add-ons that you may feel free to add to your site.
So, how to install a WordPress plugin? May this easy step-by-step guide come in handy to you.
There are several ways to install WordPress plugins. One of the most popular solutions is to search WordPress plugins through your WordPress admin area. To do this, login to your WordPress dashboard and navigate Plugins > Add New.
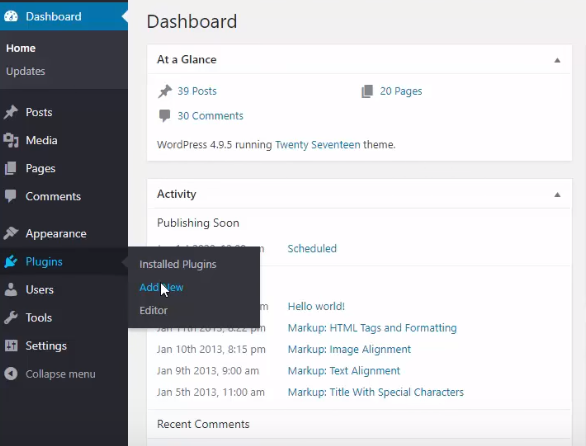
You will see a page like the one in the screenshot below.
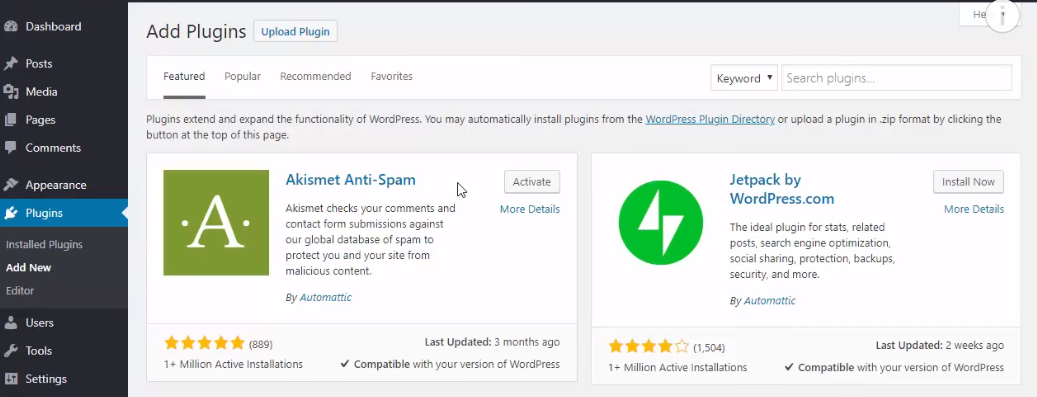
Search plugins using an advanced search bar. As soon as you find an extension that matches your search criteria, simply click Install Now and WordPress will download and install the plugin for you. Once the installation is completed, you will see a message asking you to activate the plugin on your WP site.
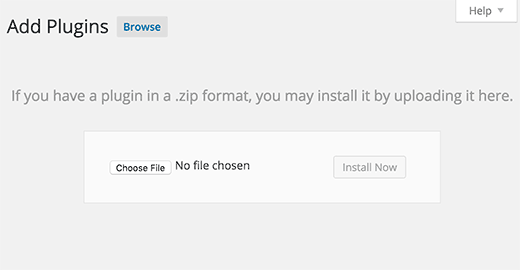
If you’d like to add a paid extension to your WordPress site, then use the Upload Plugin method. As soon as you download the plugin from the source, navigate Plugins > Add New > Upload Plugin. You will see a window asking you to select the plugin file and install it on your site. Once done, click Activate and configure the plugin’s settings.
WordPress Developer Tutorials
If a picture can say a thousand words, then watching a video is a lot more effective. On our YouTube channel, you can find a lot of educational videos on how to start building a site from scratch using Elementor for WordPress. Watch the playlist to learn how to manage a WordPress website step-by-step.
Create Tables on WordPress with Elementor
Sometimes adding a table to your website is necessary as it is a great solution to present data more effectively and systematically. You can either hand-code it or copy and paste a table from another table generator but then you will have responsiveness issues. If you have a WordPress website, I would like to offer you an amazing solution - Table widget for Elementor. This is an add-on companion for the most advanced front-end drag-and-drop page builder – Elementor. Learn how to create tables and customize them right inside the page builder.
Displaying Posts on WordPress Using Elementor
A blog will help you give the impression of a trustworthy web resource. If you’ve decided to use a blog on your site, I recommend considering the best practices for making it more sophisticated. The following step-by-step guide will show you the ways you can improve the look of your blog posts.
How to display Progress Bar and Circle Progress with Elementor
The following quick video guide tells how to create the necessary elements on the site in just 5 minutes. This is very easy to do in the Elementor editor if you have the powerful JetElements plugin. This Elementor add-on offers a lot of useful widgets including the two widgets we will need today. So, before getting started, make sure that you have this plugin installed.
How to Display Current Weather with Elementor
It is difficult to find a person who would not be interested in the weather forecast. There’s no need to own a meteorological website only to display weather records. Be on top of the wave and add the weather widget to your website. Use it to inform your visitors about current weather conditions and daily weather forecasts. Make sure they stay warm, dry, and safe with the help of your website. Today, it is simple and easy to accomplish this idea with an Elementor WordPress theme and JetElements plugin.
Pie Chart Circle Progress on WordPress with Elementor
You can add a progress bar to let your visitors know the state of the project, for example. In fact, you can use progress bars for any purpose, just to visualize the progression of a certain project, action, operation, etc. In the following guide, you will find out how to add a pie chart circle progress with Elementor Page Builder.
Image inside Text - Elementor Tutorial
Learn how to add an image inside your text using WordPress Elementor themes. Besides Elementor, you will need the JetElements plugin. With just a couple of clicks, you can have a heading with a beautiful image inside. It’s as simple as that. In addition, you can add any image of any resolution. Simply choose what image you want to be shown inside your text and you can achieve some really interesting effects.
Tabs and Accordions on WordPress with Elementor
Now let's talk about how to add Tabs and Accordions to your WordPress website. Elementor gives us a bunch of options to edit each widget. After adding a widget, you can change its content, style, indentation, and alignment.
Image Accordion on WordPress with Elementor
Image Accordion allows you to display images in a beautiful accordion effect. From the tutorial below you’ll learn how to create eye-catching content and attractive Image Accordion widgets. You will master your skills on how to style the container, the image, and caption text, as well as how to control the animation speed and other features.
How to Add and Manage Brands Module in WordPress Elementor Themes
Next, let's see how to add and manage brands module on your WordPress site featuring Elementor page builder.
Ways to Create a Parallax Effect with Elementor
Parallax is the movement of objects relative to the distant background that changes from different positions of the observer. Let's take at 3 ways to create the parallax scrolling effect using Elementor page builder.
How to Create a Posts Carousel Using JetElements Posts Widget
The easiest and most convenient way to add a post carousel to your website is with the usage of JetElements Elementor plugin. JetElements helps you not only with post displaying, but also add a sufficient number of available options for web page styling and organization. If you haven’t used Elementor by now – you should try. It helps web design beginners create a fascinating look without huge efforts.
How To Add A Background Video To Your Pages With Elementor
When building a website, people set a goal to attract as many visitors as possible. There are a lot of different ways to reach the goal, yet background videos are the most popular and trendy. These are the steps that need to be followed to add a background video to your sections with the help of Elementor Page Builder.
How to Create Pricing Tables with Elementor
First of all, to create pricing tables, you will need the JetElements plugin in addition to Elementor Page Builder. The add-on can be found on Elementor Marketplace recently launched at TemplateMonster.com. The creation of pricing tables with the help of JetElements is easy, and you can see all the applied changes in real-time.
How to Create a Mega Menu with Elementor
The bigger your online shop is, the more categories you need. The more categories you create, the harder it is to navigate them. Certainly, there are solutions to the problem of navigation. You can sort the categories in the sidebar, create a pile of links with icons directly on the homepage or create a sitemap, but a mega menu is much more convenient. Here's how to create a MegaMenu using Elementor Page Builder.
Resources to Learn WordPress and Get Support
Millions of people use WordPress CMS. This is the easiest CMS in the market but sometimes you may need a little help. Here are some of the useful resources that you will find on TemplateMonster (all of them are totally free).
- MosterPost - The central place for all our WordPress tutorials and guides.
- Free tutorials - on MonsterPost, you can also find an ever-growing collection of easy step-by-step guides, including WordPress and Elementor educational materials.
- Free eBooks - a collection of free books on how to launch WordPress sites, promote your website and keep your design up-to-date.
- Free 24/7 technical support for all TemplateMonster clients.
- The impressive knowledge base in the TM Help Center.
What to Do After Your Launch WordPress Site
After you finish managing the design and functional sides of your WordPress site, set up a schedule for new posts. For a new website, it’s essential to post a new article at least once a week in order to build up an audience. Research the topics that appeal to your readers and update your WordPress blog with relevant pieces of content that are optimized for high rankings in search engines.
This is a good idea to create content for your WordPress site before it launches. That way you can spend weeks and even months after you launch WordPress site putting the full energy into marketing and online promotion of your web resource. Building backlinks and managing your social media presence will help you bring more traffic to your online resource.
There are also a handful of other things that you need to do right after your WordPress site to set your project up for success:
- Integrate your site with Google Analytics. With its help, you can track the actions that your audience takes on your site. The tool provides you with detailed information about everything that your visitors do on your site, including the most viewed posts, bounce rates, conversion rates, and lots of other useful stats.
- Enable caching. Installing a caching plugin on your website you can speed up the overall page loading sites, which automatically improves your site’s ranking in the search engines. Some of the most popular free WordPress caching plugins include W3 Total Cache and WP Super Cache.
- Backup your site’s data. Using WordPress backup plugins like Jetpack, you can store your site’s data in a safe place and run one-click restores whenever anything bad happens to your site.
- Use security services like Sucuri in order to protect your WordPress site from hacker attacks, malware, viruses, etc.
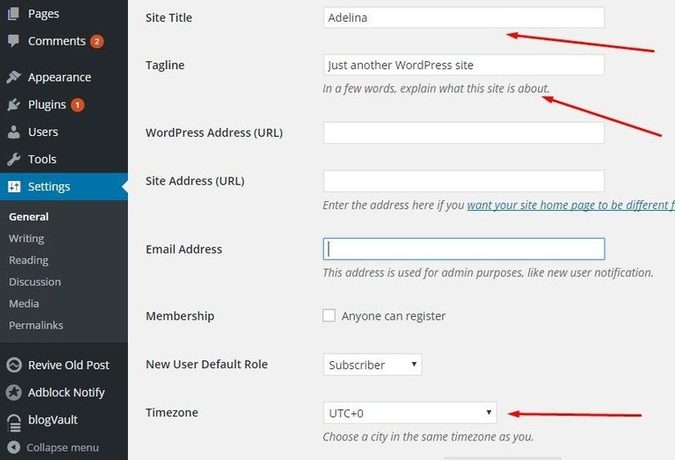
- Customize your site’s basic information. Go to your WordPress dashboard and click Settings > General to change your site’s title, tagline, timezone, and favicon.
- Create sitemap.xml - a file that lists all of your site’s URLs, thus making it possible for Google to understand how your site is organized what kind of information it contains. Plugins like Google XML Sitemaps let you create sitemaps with just a few clicks.
Conclusion
Almost anyone can launch a WordPress site on their own. By following the basic steps that we've highlighted in this easy WP guide, you can build a remarkable and competitive online project without investing a fortune in your web resource. While getting started with your WordPress, keep a clear plan of the things that you’d like to feature on your web project. Decide on the elements it will include and the concept that it will be built on. And don’t forget to be creative. Impress the audience with your eye-catching design and unique pieces of data that are frequently uploaded to your blog.

Don’t miss out these all-time favourites
- The best hosting for a WordPress website. Tap our link to get the best price on the market with 82% off. If HostPapa didn’t impress you check out other alternatives.
- Monthly SEO service and On-Page SEO - to increase your website organic traffic.
- Website Installation service - to get your template up and running within just 6 hours without hassle. No minute is wasted and the work is going.
- ONE Membership - to download unlimited number of WordPress themes, plugins, ppt and other products within one license. Since bigger is always better.

Get more to your email
Subscribe to our newsletter and access exclusive content and offers available only to MonsterPost subscribers.

Leave a Reply
You must be logged in to post a comment.